To setup WooCommerce Shipping Strategy can be quite confusing as there are many variables such as Weight, Size, per Item, Flat Rate and so on.
Configure WooCommerce settings
If you offer free shipping, local pickup, or flat rate shipping, everything you need is built into WooCommerce — no other plugins or extensions needed.
Start by navigating to WooCommerce → Settings → Shipping in your dashboard, which contains your options for Shipping Zones. A shipping zone is a geographical area that you ship to, defined by countries, regions, states, and zip codes. Set up shipping zones to define different rates based on customers’ locations.

To assign shipping methods to zones, click Add Shipping Method. Choose Flat Rate, Free Shipping, or Local Pickup, and select the options and pricing you’d like for each one.
You can also determine rates based on shipping classes, which are groups of similar products. If you sell craft supplies, you might charge a flat rate for individual items and offer free shipping for larger kits that include a variety of supplies. If you’re a restaurant, you might charge for shipping packaged food and offer free local pickup for meal kits. Select the Shipping Classes tab and create whatever classes you’d like, and edit each of your products to assign them to a class. To finish, set the shipping rate for each class in your shipping zone settings. Find out more about shipping classes.
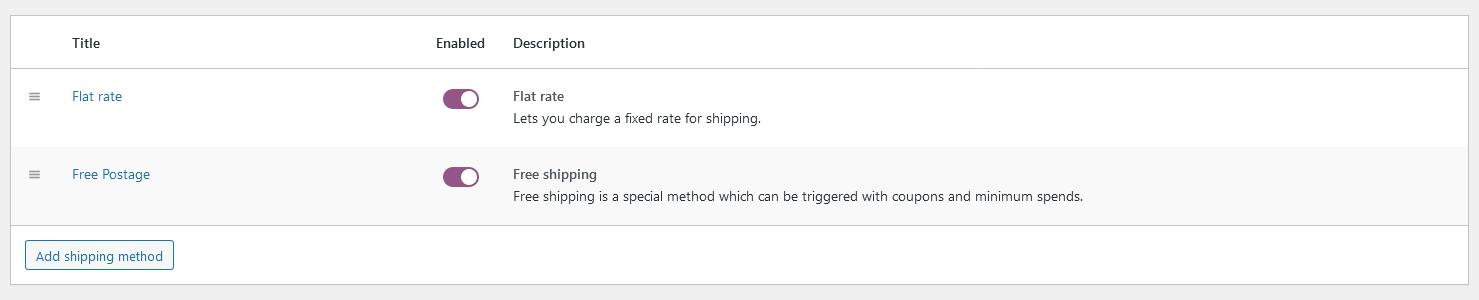
You can apply more than one shipping option to a shipping zone. In the example below a Flat Rate of €5.00 is available and a Free Postage Option if the Order is more than €50.00.
Install and activate shipping extensions
To use table rates, live rates, or a combination of shipping methods, you’ll need a shipping extension to add more options. Extensions are also excellent for adding functionality like label printing, tracking numbers, and warehouse syncing.
Start by purchasing or downloading an extension from the WooCommerce Marketplace. Not sure which one you need? Use our post about shipping strategies to make the right decision for your store.
Then, navigate to Plugins → Add New in your WordPress dashboard and choose Upload Plugin. Select the extension ZIP file on your computer and click Activate to enable it on your store.
Adjust shipping settings to meet your needs
Each extension has its own settings, so instructions will vary depending on the ones you choose. To find specific instructions for your extension, navigate to its page in the WooCommerce Marketplace, and click the Documentation button in the right hand column. This will walk you through any extension-specific setup.
Test your shipping setup
Before making your new shipping configuration available to customers, test it thoroughly. Here’s a pre-launch checklist:
- Test a product from each shipping class, from every shipping zone that you set up. Are rates calculated correctly on your Cart and Checkout pages?
- Test combinations of products and different cart sizes. Are discounts and free shipping applied appropriately?
- Go through the entire checkout process. If your site is integrated with a third-party tool like ShipStation, is shipping information synced correctly?
- If you have tracking information set up, are tracking numbers attached to customer emails and available on account pages?
- If you’re using live rates, do the costs displayed to customers match your carrier’s rates?
- Are your shipping policies and return policies easy for customers to find on your site?
- If you offer discounts or free shipping based on order size, is that information visible to site visitors?
If everything looks good, then you’re ready to ship!
Start shipping your products
WooCommerce provides all the tools you need to ship your products affordably, efficiently, and accurately for happy customers and an efficient store. Need more information? Check out the official shipping documentation or reach out to me.