WordPress booking system
for Holiday and Hotel, Camping Rentals
If you already have a WordPress website for vacation rentals but can’t make online reservations for your property, implement a booking widget to accept direct bookings and credit card payments on your website today. There are many different Plugins to achieve this. Some Commercial, some Free.This one is quite a comprehensive one. (LONG Article)
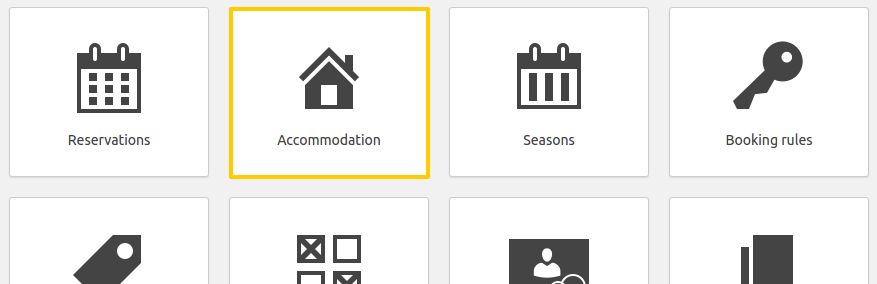
Accommodation
In this section of the documentation, you will find information regarding the Accommodation sub-menus of HBook menu. For the plugin to work correctly you need to create at least 1 type of accommodation.
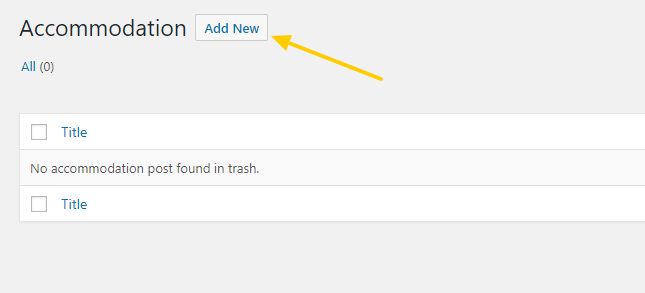
Create a new accommodation
You can create as many accommodation types as you need. For each accommodation type (for example “Double room”), you will be able to set how many you have of this type (for example “10” Double rooms).
- Click Add New Accommodation

- Click Add New Accommodation
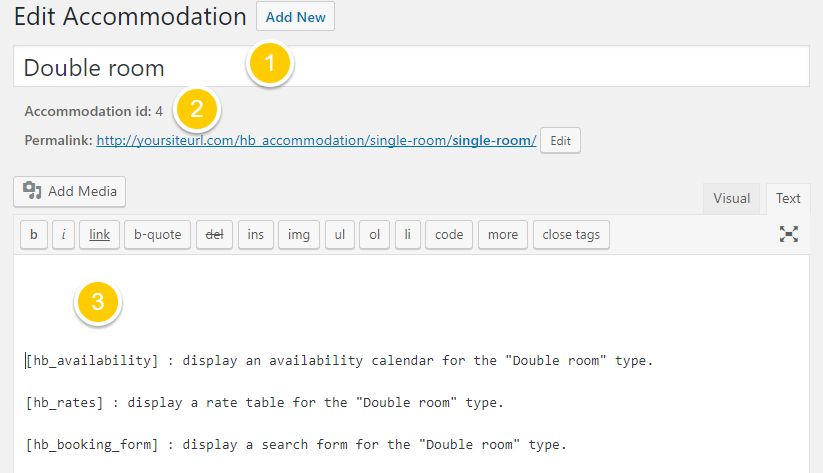
- Enter the Accommodation title and the Accommodation description. You can use short codes or blocks to display a search form, a rate table, an availability calendar…With the Classic editor:

With Gutenberg editor:

- Enter the Accommodation title: this is the name of the accommodation type as it will appear on front-end. You can create a different admin name (see below)
- You will see the accommodation id here: you might need it when using the shortcodes
- If you wish to use the default HBook accommodation post to display your accommodation page, please enter the content of the post here. You can add HBook shortcodes to add an availability calendar, a rate table or a search form. By default, if a shortcode is added within the accommodation post, it is applied for this accommodation type.
- Enter the Accommodation title and the Accommodation description. You can use short codes or blocks to display a search form, a rate table, an availability calendar…With the Classic editor:

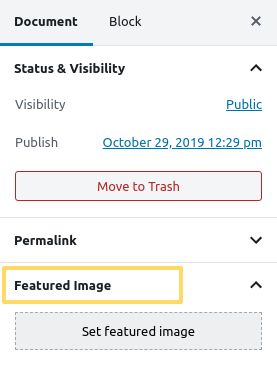
- If you wish, you can set a Featured image that will appear as the accommodation thumbnail in the search results and.in the accommodation list.

<!–more–>
Accommodation settings
The settings are here to provide HBook with the information needed for the booking system. Normal occupancy, Maximum occupancy and Number of accommodation of this type are the only required settings for HBook to work.
Here are the sections you will find for the accommodation type settings:
- General settings
- Occupancy settings
- Descriptions
- Display options
- Automatic blockings
General settings
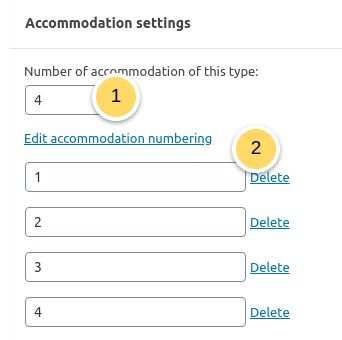
- Indicate the number of accommodation of this type (required)
- If you have several accommodation for an accommodation, you might wish to give different names/numbers than the default numbering. If you click Edit accommodation numbering, you will be able to rename the accommodation for that Accommodation type.
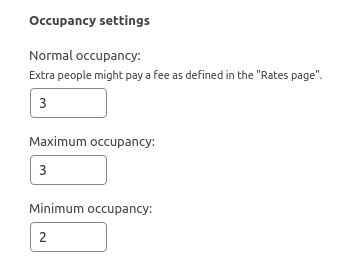
Occupancy settings
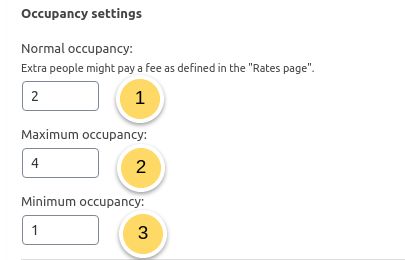
- Enter the normal occupancy (required): this is the number of people the accommodation rate (as set in HBook->Rates) is for.
- Enter the maximum occupancy (required): this is the maximum number of persons the accommodation can cater for.
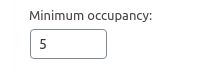
- Enter the minimum occupancy (optional): if you wish to set a minimum number of person for the accommodation type, please enter it here.
If your prices change according to the number of persons:
- you will use the normal occupancy to set the number of persons for which your base rate is (set in “Accommodation rate” in HBook > Rates ). And you will set the “Maximum occupancy” to the greatest number of persons the accommodation can accept
- you will then set in HBook > Rates the “Price per adult above normal occupancy” and “Price per child above normal occupancy”.
Descriptions
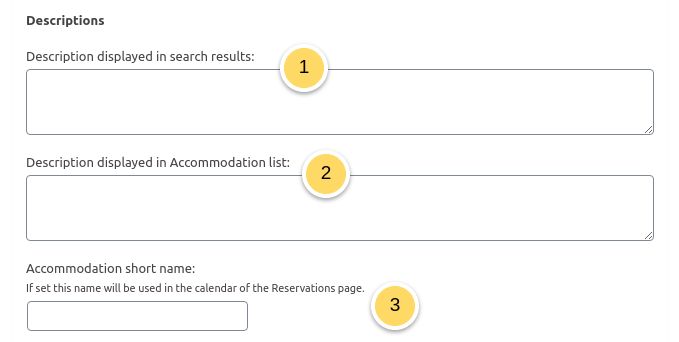
- Enter the description displayed in searched results (optional): it will be shown in the result of a search when using [hb_booking_form].
- Enter the description displayed in Accommodation list (optional): it will be shown when using [hb_accommodation_list].
- You can give a accommodation short name to the accommodation to be used in the calendar of reservations in Reservations. This can be useful if you have long accommodation title to simplify the display in the calendar.
Display options
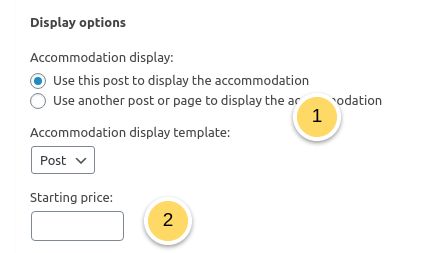
- Set your preferences regarding the display of your the accommodation type. HBook allows you to either :
- use HBoook default accommodation post type
- apply one of your page template
- or use a different page/post to showcase the accommodation type
- Enter a starting price (optional): it will be shown in the list of accommodation when using [hb_accommodation_list].
If you choose to use the accommodation type post for display purposes :
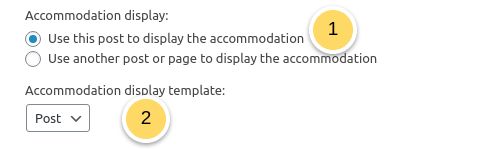
- You will set that you wish to use this post to display the accommodation…
- … and you can choose which template you wish to apply
If you choose to use another post or page for display purposes :
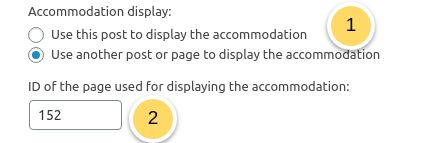
- You will set that you wish to use another post or page to display the accommodation…
- … and you will enter the id of the page or post to be used instead.
It has several effects:
- You can then use HBook shortcodes on the page you use for display without specifying the “accom_id” parameter. HBook will know what accommodation type is concerned.
- At the accommodation selection step of the booking process, the “View accommodation” button will redirect to the page set to be used for display.
- At the accommodation selection step of the booking process, if you have set that the thumbnail and title of the accommodation type should link to the accommodation page, it will open the page set to be used for display.
- In the accommodation list, if you have set that the thumbnail should link to the accommodation page, it will open the page set to be used for display.
Automatic blockings
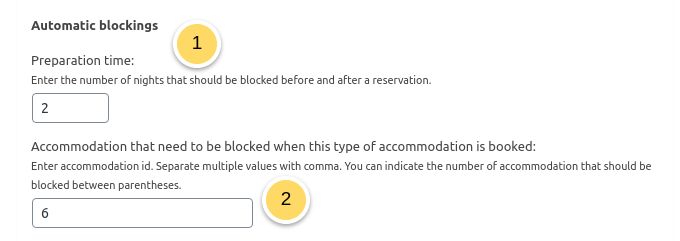
- Indicate the preparation time. HBook will automatically block x days before check-in and after check-out of a reservation.
- Indicate the linked accommodation: you will enter here the accommodation ids of the accommodation that need to be blocked automatically when the accommodation type you currently edit is booked. If you need to specify the number of accommodations that need to be blocked for each linked accommodation type, you can add that number in ().
- .
- When set to “Always”, HBook will never show this accommodation when several accommodations are needed to accommodate the number of persons searched.
- When set to “On global search only”, HBook will not show this accommodation when several accommodations are needed in a global search form. But, on a search form for this specific type of accommodation, it will be possible to book several accommodations of this type, if the number of persons searched can be accommodated.
- When set to “Never”, HBook will never show this accommodation in the search results when several accommodations are needed to accommodate the number of persons searched.
Examples of occupancy settings:
- Rate per accommodation independently of the number of guests
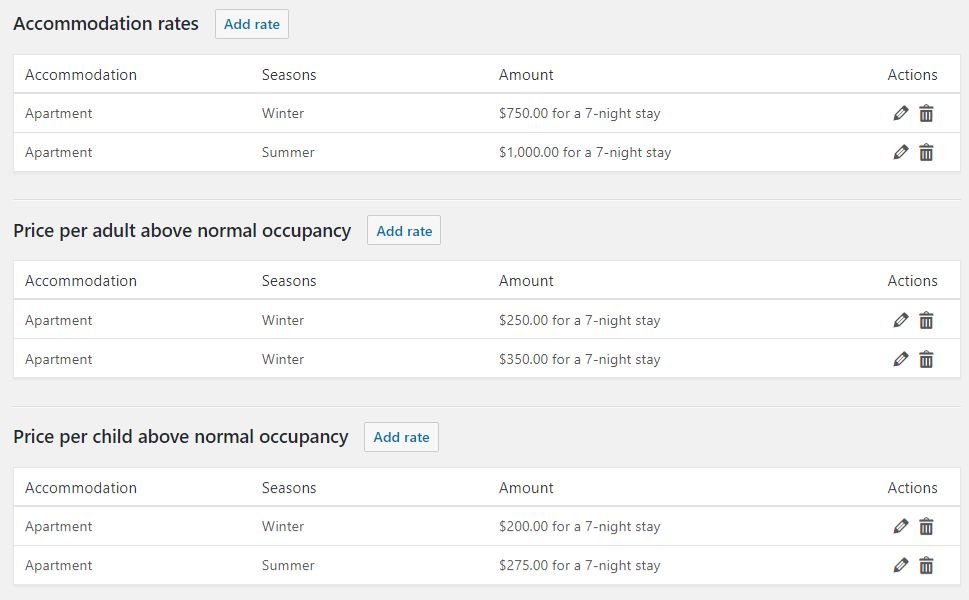
In this example, we have a Triple Room that can be occupied by 2 persons or 3 persons. The rate is $75 per room in Winter season and $95 per room in Summer season (be it for 2 or 3 persons).
Normal occupancy and maximum occupancy are set to the maximum number of persons the accommodation type is for. Minimum occupancy is set to 2 to prevent this room to show up in the results in the search is for 1 guest only.
We use only the Accommodation rate as there is no need to define prices for people beyond normal occupancy since the price does not vary according to the number of guests.
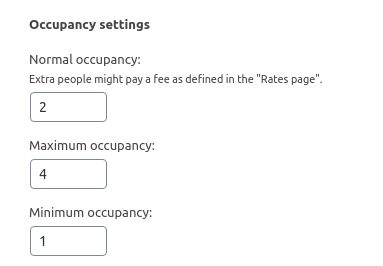
- Base rate for the accommodation and rate for extra-persons
In this example, we have an apartment that is rent per week for maximum 4 persons ; price is the same for 1 or 2 persons but 3rd and 4th persons need to pay an extra fee.
Normal occupancy is set at 2 persons and maximum occupancy is set to 4 persons (this will allow us to define the price for up to 2 persons and for each additional guest).
In HBook->Rates, you will set the “Accommodation” rate as being the rate for up to 2 persons and you will set the “Price per adult/children above normal occupancy” to set the price for the additional guests.
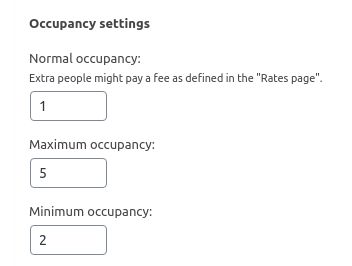
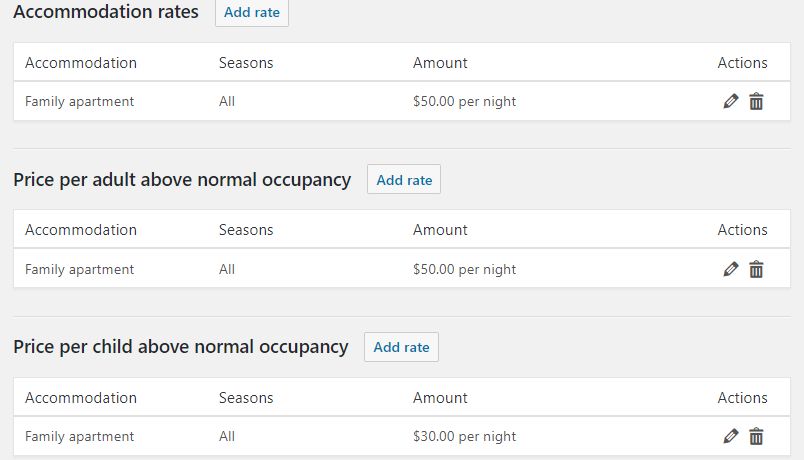
- Rate is per person, not per accommodation
In this example, we have a family apartment that can accommodate between 2 and 5 persons. The price is per person: an adult will pay $50 per night and a child will be charged $30 per night.
Normal occupancy is set at 1 persons and maximum occupancy is set to 5 persons (this will allow us to define a price per person). Minimum occupancy is set at 2 persons.
In HBook->Rates, you will set the “Accommodation” rate as the rate for 1 adult. Then, you will set the “Price per adult above normal occupancy” at $50 (price per adult) and the “Price per children above normal occupancy” at $30 (price per child).
- Accommodation with a minimum occupancy. In this example, we have a holiday home that can be rented per room or entirely. We have created an accommodation type “Entire holiday home” but we don’t want to offer it for less than 5 persons. Therefore, the accommodation type should not be shown in the results if the search is for less than 5 persons: minimum occupancy is set to 5.
- Rate per accommodation independently of the number of guests

Examples of linked accommodation settings:
- When there is a booking for this accommodation type, one accommodation of the accommodation type id 2 is blocked automatically for these dates.

- When there is a booking for this accommodation type, one accommodation of the accommodation type id 2, one accommodation of the accommodation type id 3 and one accommodation of the accommodation type id 4 are blocked automatically for these dates.

- When there is a booking for this accommodation type, three accommodations of the accommodation type id 2 and five accommodations of the accommodation type id 3 are blocked automatically for these dates.


Pricing settings
In this section of the documentation, the following sub-menus from HBook settings are explained:
- Seasons
- Booking rules
- Rates
- Extra services
- Fees / Taxes
1. Seasons
You will find the page of the Seasons in the menu HBook > Saisons . For the plugin to work correctly you need to create at least 1 season. Note that since all bookable days must belong to one season, you need to define at least one season with an end date which is at least equal to the Maximum date for a reservation (which can be set in HBook > Misc).
Step 1 : Create a new season
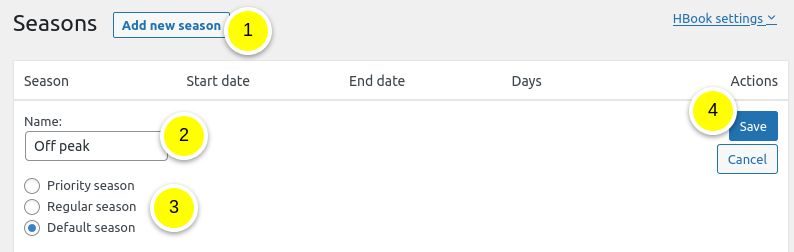
- Click Add new season
- Enter a name
- Select the season’s status:
- Priority: this is the highest status. When a date is found in several seasons, if it is found in a “Priority” season, then it is the rates and rules associated to this season that will be applied.
- Regular: this is the middle status. When a date is found in several seasons, if there is no “Priority” season for it, but there is a “Regular” season set, then it is the rates and rules associated to this season that will be applied.
- Default: this is the lowest status. If the dates searched are found only in a “Default” season, then it is the rates and rules associated to this season that will be applied.
- Click Save
Step 2 : Add one/various period(s) for the season
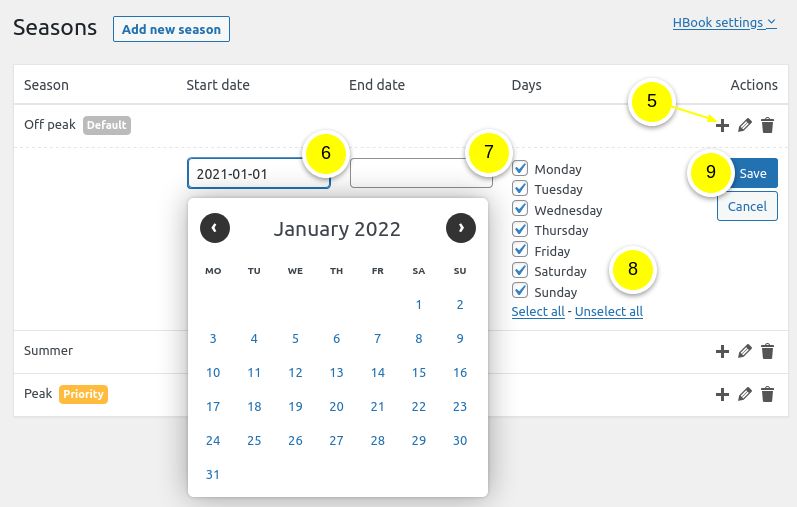
- Click on the + icon.
- Enter a start date
- Enter an end date
- Select a set of days for the chosen dates
- Click Save
Examples:
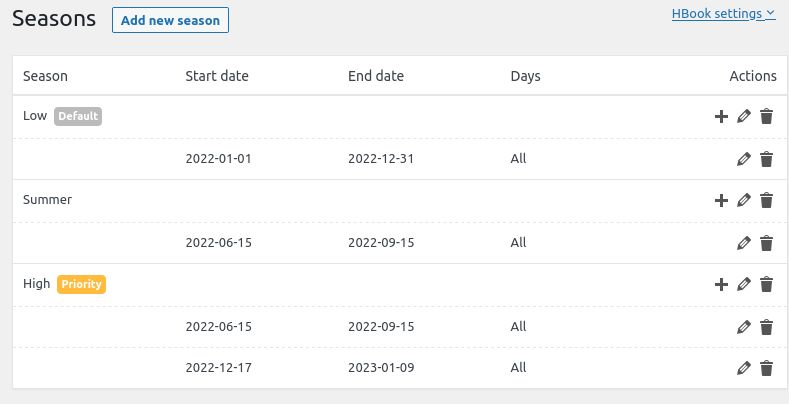
- Low, Summer and High seasons

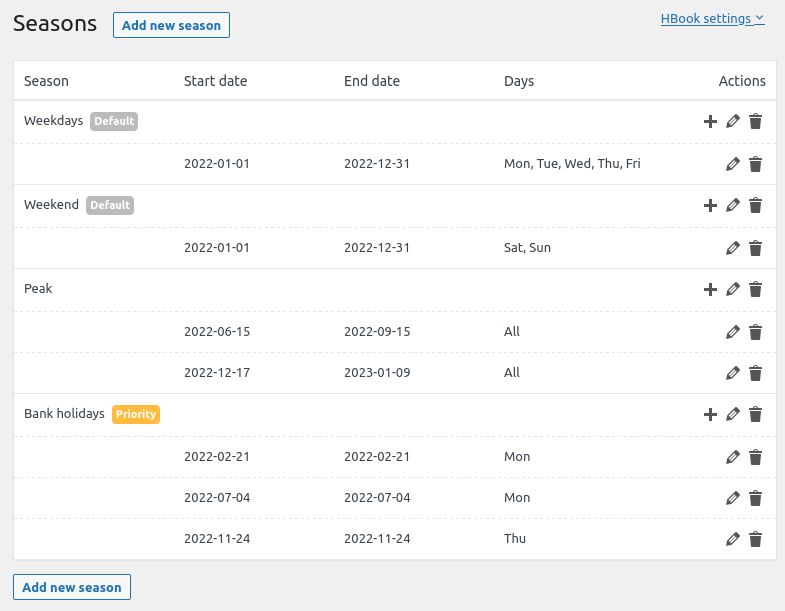
- Weekday, Weekend, Peak season

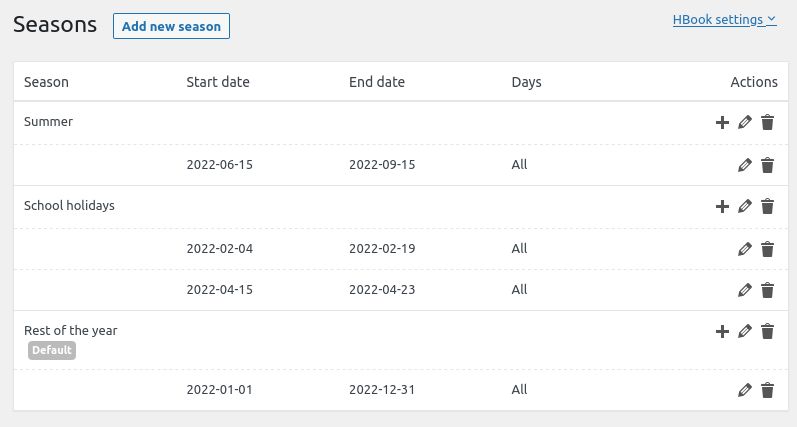
- Summer, School holidays, Rest of the year

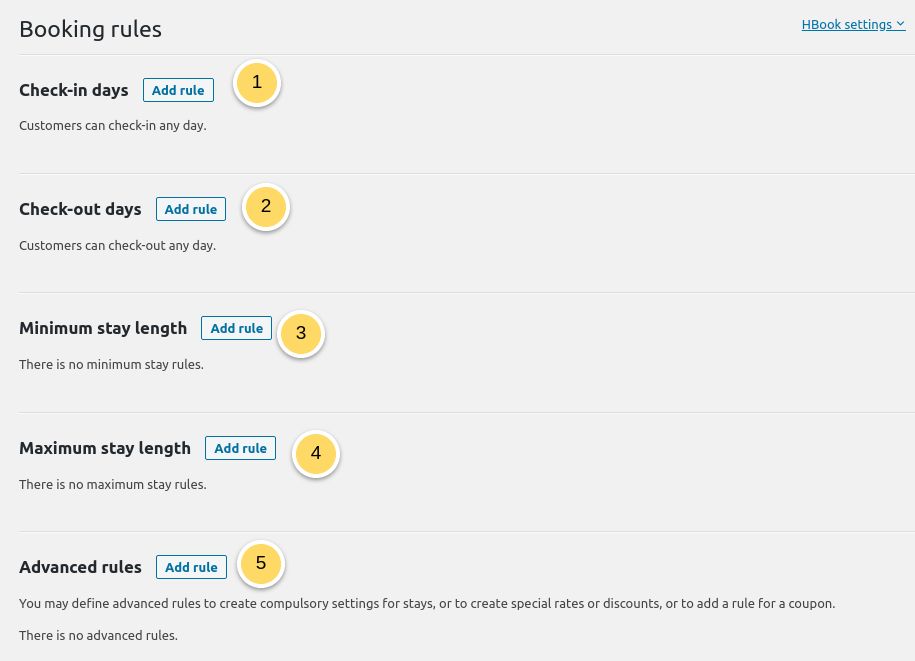
2. Booking rules
You will find the page of the Booking rules in the menu HBook > Booking rules . Booking rules are optionals. There are 5 types of Booking rules.
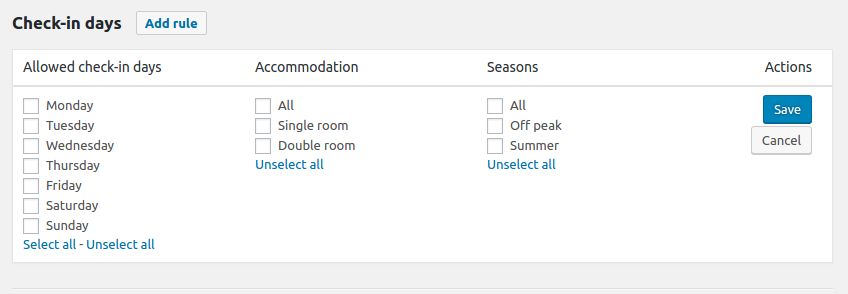
- Check-in days: define on which days customers are allowed to check-in.
- Check-out days: define on which days customers are allowed to check-out.
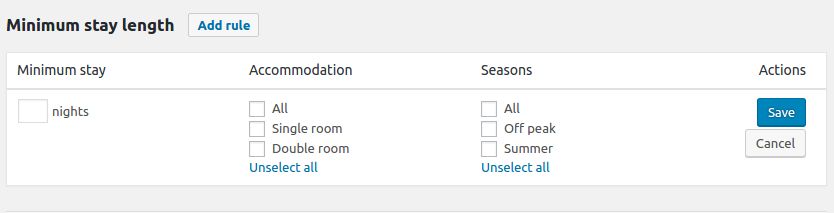
- Minimum stays: define the minimum length of a stay.
- Maximum stays: define the maximum length of a stay.
- Advanced booking rules: define advanced rules to create compulsory settings for stays, special rates, discounts or coupons.
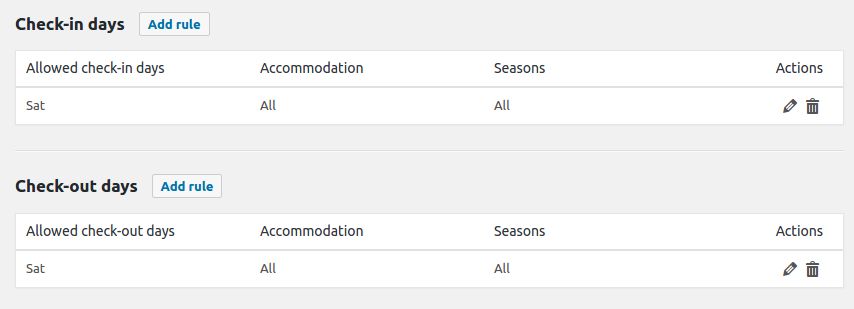
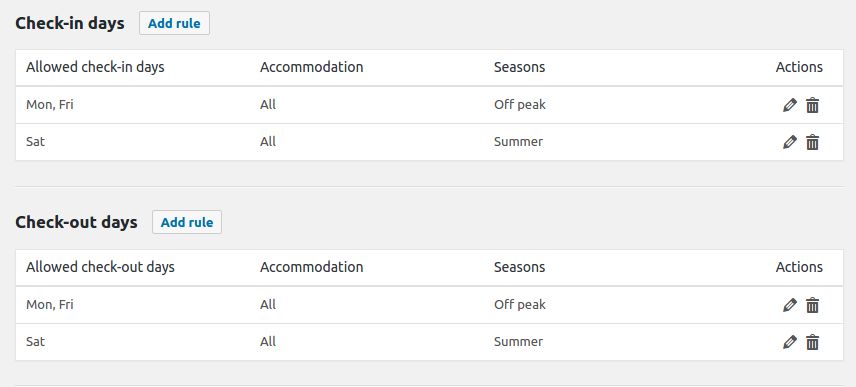
Allowed check-in and check-out days – Changeover days
With the Allowed check-in days and Allowed check-out days, you can indicate on which days your customers can arrive and leave. It can be set according to season and accommodation.
Examples:
- Changeover day on Saturday all year round for all accommodation types:

- Different check-in and check-out days depending on seasons:

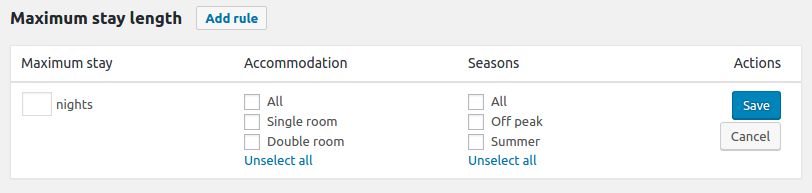
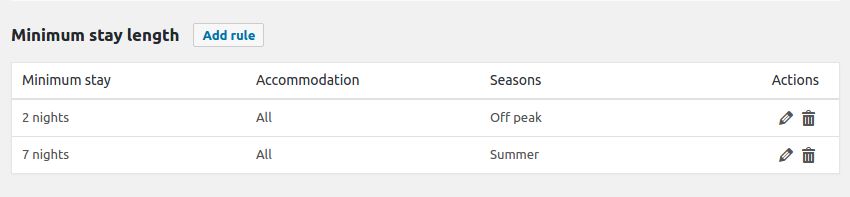
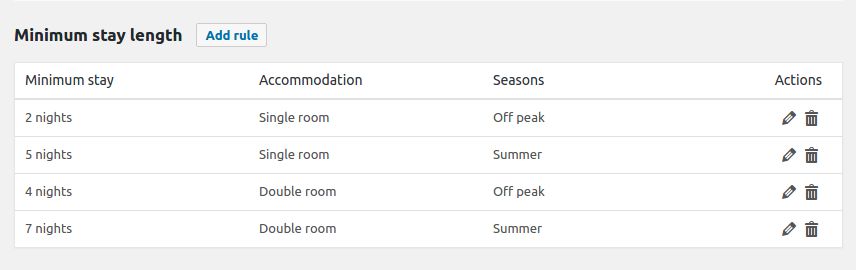
Minimum and maximum stay
With the Minimum stay and Maximum stay, you can indicate the minimum number of nights and the maximum number of nights allowed. It can be set according to season and accommodation.
Examples:
- Different minimum stays depending on the season (7 nights minimum stay on “Summer” season and 2 nights the rest of the year):

- Minimum stay depending on accommodation type and season:

- Maximum stay for all accommodation types and seasons:


Advanced booking rules
This is a powerful feature that will enable you to define settings conditionally. It has two different aims.
- to define the conditions for various booking situation that can not be set using only the settings above
- to define the conditions of discounts and coupons
There are 5 types of advanced rules:
- Compulsory: if the booking request has a check-in day that falls in one of the check-in days set in the rule then the booking request must comply with the rule.
- Special rate: if the booking request follows the rule a special rate is applied. You will indicate the rate for that rule in Rates page
- Compulsory and special rate: this rule is both a compulsory rule and a special rate rule.
- Discount: if the booking request follows the rule then a discount is applied. You will indicate the type of discount (percentage or fixed amount) and its value in Rates > Discount.
- Coupon : if the booking request follows the rule and the customer enter a valid coupon, a discount is applied. You will indicate the type of discount (percentage or fixed amount) and its value in Rates > Coupons.
Step 1: Create an advanced booking rule
To create an advanced rule click on Add rule.

Step 2: Set the attributes of the new rule
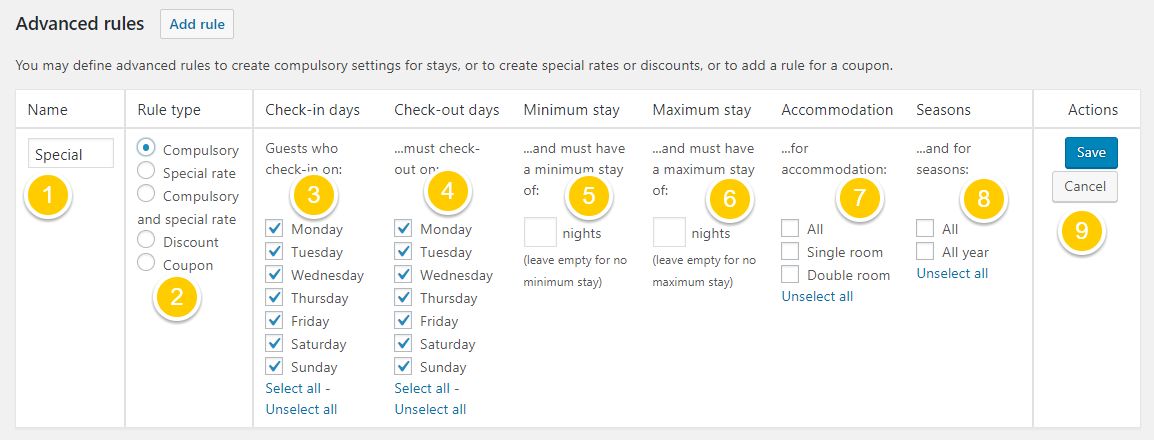
- Enter the name of the rule
- Select the rule type
- Select one or several check-in day(s)
- Select one or several check-out day(s)
- Enter a minimum stay if applicable
- Enter a maximum stay if applicable
- Select for which accommodation type this rule is for. This parameter will be displayed only for the advanced booking rules of type “Compulsory” and “Compulsory and Special rate”. For the other rule types, the seasons and accommodation types are selected directly when entering the rates in Rates.
- Select for which season this rule is for. This parameter will be displayed only for the advanced booking rules of type “Compulsory” and “Compulsory and Special rate”. For the other rule types, the seasons and accommodation types are selected directly when entering the rates in Rates.
- Click Save
Examples:
- Fixed length stay for specific check-in day (Compulsory check-out on following Friday if check-in on Monday):

- Discounts for more than 10-night stays and for more than 30-night stays:

- Coupons with conditions: only valid for stays between 3 and 7 nights:


3. Rates
You will find the page of the Rates in the menu HBook > Rates . Once you have created Accommodation type and Seasons you will be able to define rates.
Below is an example of a rate table for a user who has defined 2 types of accommodation and 3 seasons.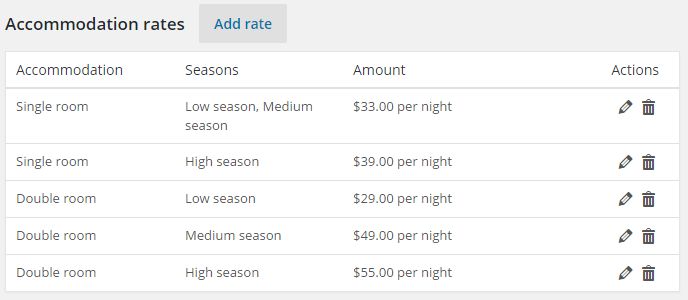
If you have set a different number of person for the normal occupancy and the maximum occupancy you can add rates for extra people in the Price per adult above normal occupancy table and the Price per child above normal occupancy table.
See example below.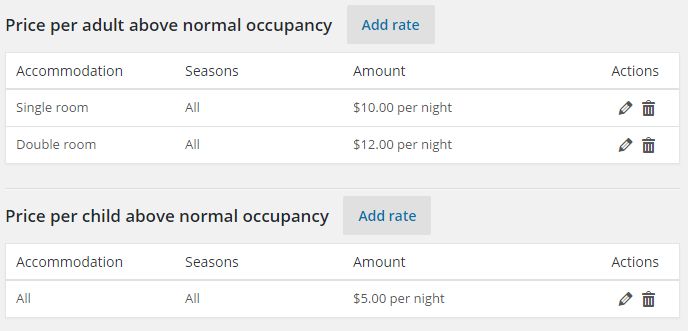
Special rates
If you have created Special rate rules you will need to define these rates by selecting the name of the rule in the rate tables. You can use a same rule for various seasons and accommodation types.
See example below.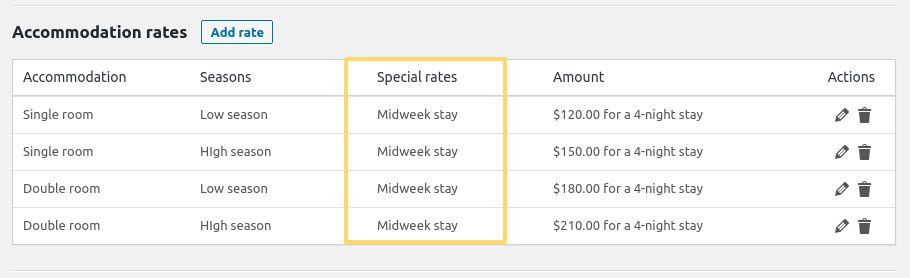
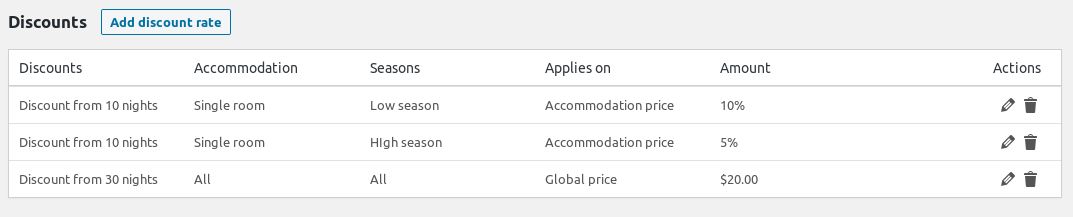
Discounts
Discounts are applied to the total price when the criteria of a search meets the criteria of a discount rule set in Booking rules > Advanced booking rules. If you have created Discount rules you will need to define the amount and type of discount by creating a new discount.
See example below.
Here are some “Discount” conditions we created in HBook > Rules > Advanced booking rules

And now we set the dicounts amounts in HBook > Rates > Discounts
Coupons
You can create coupon codes that you give to your customers so they can get a discount when they enter the coupon code at the time of the booking.
- You can create coupon code without linking them to any advanced booking rule. In that case, there is no conditions for the discount to be applied, as long as the customer enter the coupon code.
- You can create an advanced booking rule for a “Coupon” in order to set conditions for the coupon to be valid. In this case, the discount will be applied only if the customer enter the coupon code and the stay match the criteria set for the coupon to be valid.

- Enter the coupon code
- Select for which accommodation type the coupon is for
- If you wish to set some conditions for the coupon code to be valid, you will have created an Advanced booking rule and you will select it here
- Here you will see a counter for the number of times the coupon has been used
- You can set a maximum number of use
- You can set a date limit for the coupon to be valid. The coupon needs to be used before this date for the coupon to be still valid
- Set the amount and the type. If you wish to give a 10% off, you will indicate “10” as amount and type will be “Percent”. Is you wish to give a US$20 off, you will set “20” as amount, and “Fixed” as type.
You can use a same coupon name for different accommodation types and/or different seasons with different discount amount/types. See examples below. 
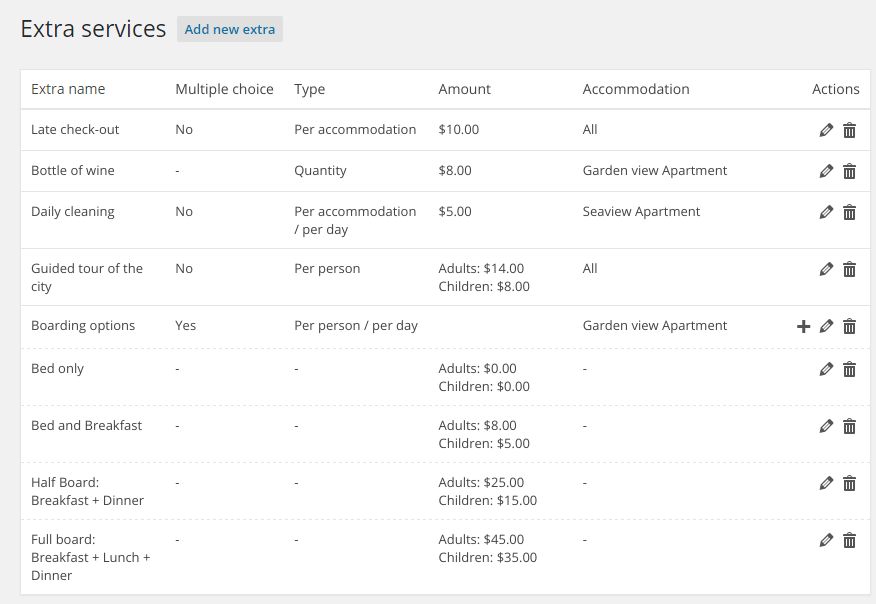
4. Extra services
You will find the page of the Extra services in the menu HBook > Extra-services . If you wish to offer your customer extra services that they can add to their booking, you will be able to set them in this page. An extra service can be a single option or can be a multiple options to pick from. There are different types of extra services that will lead to different price calculation:
- per person: you can set adult price and children price. It is charged once only.
- per person per day: you can set adult price and children price. It will be multiplied by the number of nights.
- once: it will be applied only once
- per accommodation: it will be multiplied by the number of accommodation booked.
- per accommodation per day: it will be multiplied by the number of nights and by the number of accommodation booked.
- quantity: you set the price for one item and the customer can enter the desired amount. You can set a maximum amount.
- quantity per day: you set the price for one and the customer can enter the desired amount. You can set a maximum amount. It will be multiplied by the number of nights.
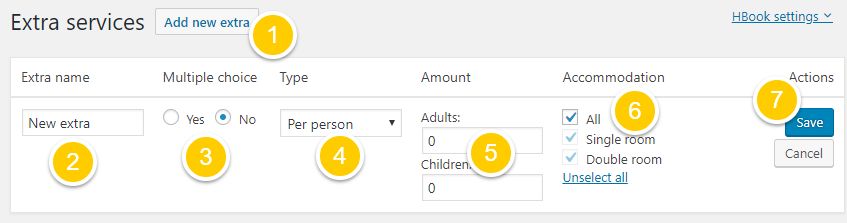
- To create an extra service:

- Click on Add new extra service
- Enter the name of the extra
- Indicate if there is a multiple choice for this extra. When selecting multiple choice, you will save and then add the choices.
- Select the type of extra
- Enter the amount
- Select the accommodation type that are concerned by the extra
- click Save
Below are examples of extra services and their settings:

5. Fees / Taxes
You will find the page to set Fees or Taxes in the menu HBook > Fees . A fee or a tax is compulsory and comes on top of the accommodation/extra-service/reservation price. Our fee/tax section is highly flexible. You can set fees/taxes that are calculated using :
- a fixed amount
- a percentage
The fees/taxes can be applied to:
- Accommodation prices
- Extra-services prices
- All prices
Steps to create a fee
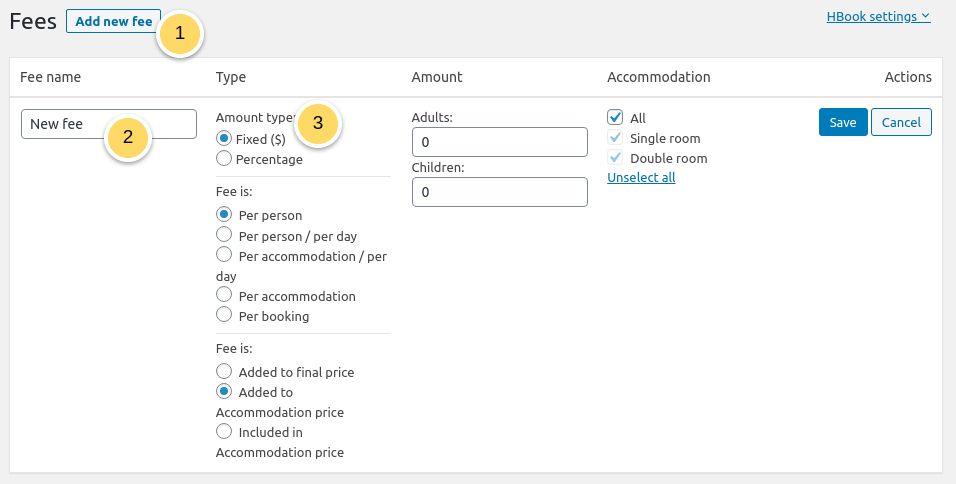
- click on Add new fee
- Enter the name of the fee
- Select the type of fee: it can be a fixed amount or a percentage
The settings are different if you use a fixed amount or a percentage to calculate the fees.
Fixed amount feesThere are different types of fixed fees that will lead to different price calculation:
- per person: you can set adult price and children price. It is charged once only.
- per person per day: you can set adult price and children price. It will be multiplied by the number of nights.
- per accommodation: it will be multiplied by the number of accommodation booked.
- per accommodation per day: it will be multiplied by the number of accommodation booked and by the number of nights.
- per booking: it is be charged once only
Depending on the type of fixed fee you choose, we automatically select where the price will be shown (included in the item price, added to the item price or added to the final price).
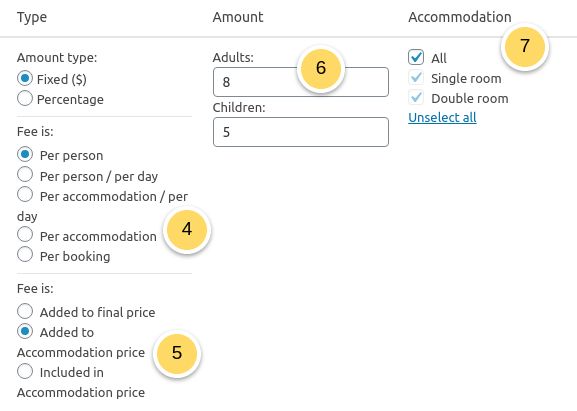
- Select the type of fixed fee
- Indicate if the fee amount should be added to total price (shown in summary), added to the accommodation/extras-services or is already included in the prices set
- Enter the amount of the fee
- Select the accommodation types for which the fee should be applied
Percentage fees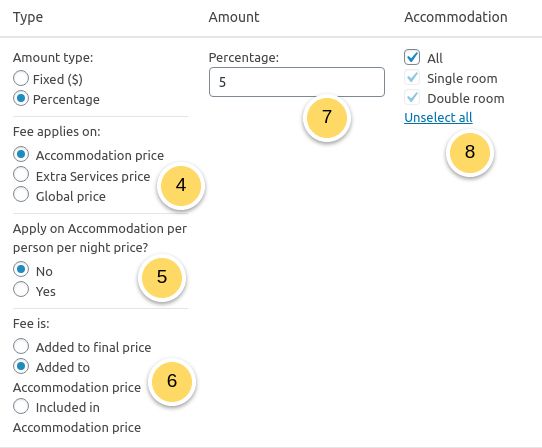
- Select on which prices the fee should be applied: the extra-services prices, the accommodation price, all prices
- If on Accommodation, indicate if the fee is calculated per person per night
- Indicate if the fee amount should be added to total price (shown in summary), added to the accommodation/extras-services or is already included in the prices set
- Indicate the percentage applied
- Select the accommodation types for which the fee should be applied
Complex taxes set up
To cater for some specific tax calculations, we have added the following additional settings when the fee is a percentage applied on accommodation price and with a price per person per night.
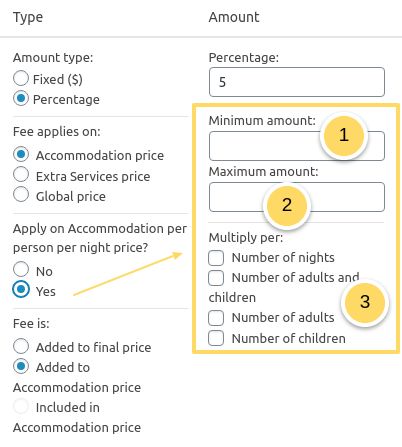
- Set a minimum amount
- Set a maximum amount
- Set if the fee calculated (accommodation price divided by number persons and number of nights) should be multiplied by the number of adults/children/nights.
Below are examples of fees and their settings: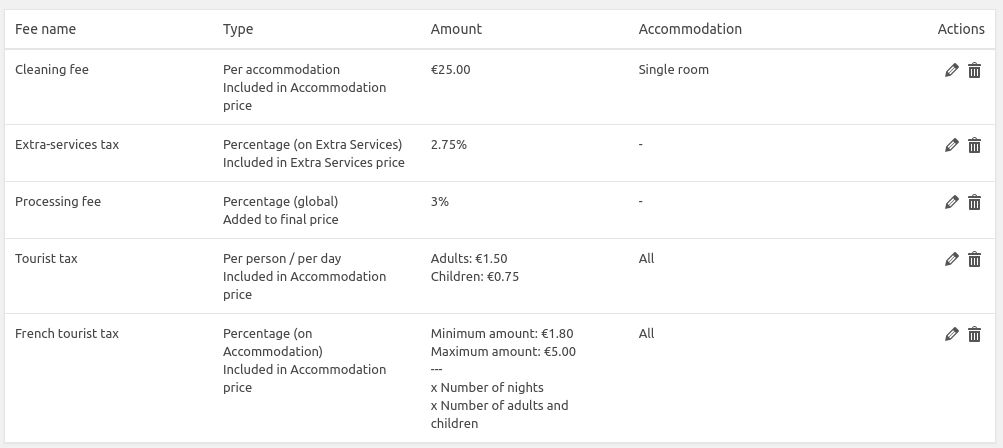
Payment settings
In this section of the documentation, you will find information regarding the Payment sub-menus of HBook menu.
Booking Payment settings
HBook allows you to offer your customer a choice of payment options.
- If customers can not choose between different payment options:

- If customers can not choose between different payment options:
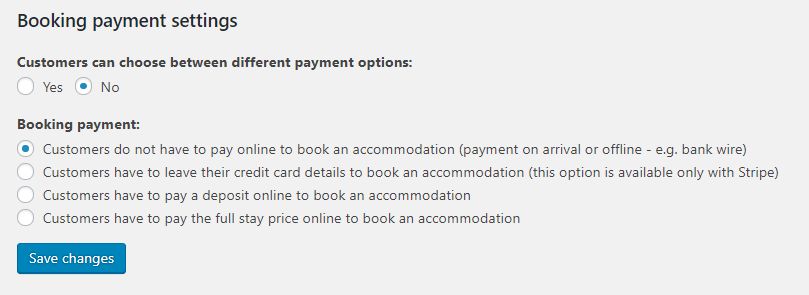
- If customers can choose between different payment options:

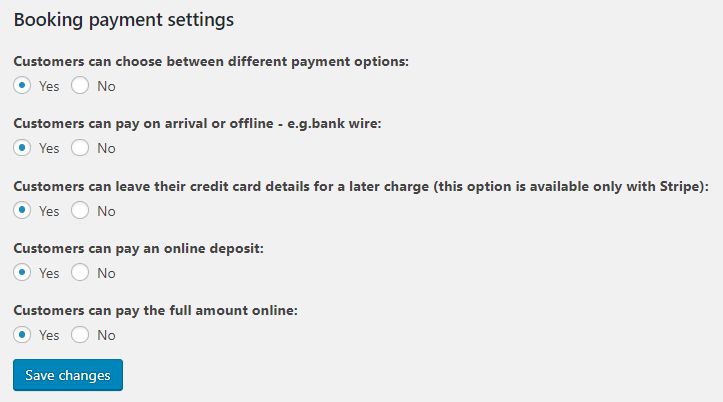
Here are the different payment options explained:
- Payment offline: the payment will take place outside of HBook. It can be that the customer pays via bank transfer, on arrival, etc.
- Leave credit card details: this is available only when Stripe gateway is activated. You need as well to enable “Store credit card details” in Stripe settings
- Pay deposit online: the customer will pay only a deposit at the time of the booking. You will set the deposit option and you can as well require full payment if the arrival is within “x” days.
- Pay full stay price online: the customer will pay the full amount online at the time of the booking.
Security bond
A security bond, sometimes called security deposit, is a sum of money which is held during the length of the stay to cover the cost of any damages or loss caused by the customer.
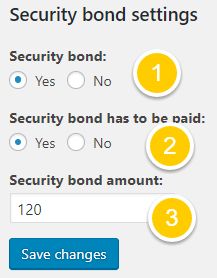 There are various options for the security bond to cover the different situations: you might wish to inform your client that there is a security bond but not ask for the payment of it, include it or not to the total amount, ask for it to be paid at the time of the booking or not…
- set if there is a security bond or not
- set if it needs to be paid by the customer: in that case, it will be added to the total price of the reservation (independenlty of the payment taking place online or not)
- set the amount of the security bond
If you set that you ask for the security bond to be paid and if you set that there is a deposit option (part of the payment of the reservation to be paid in advance), then you will see in the Deposit settings a new option to set if the security bond needs to be added to the deposit amount:
Deposit settings
A deposit corresponds to the part of the total price of the stay that is payed in advance by the customer to secure the booking.
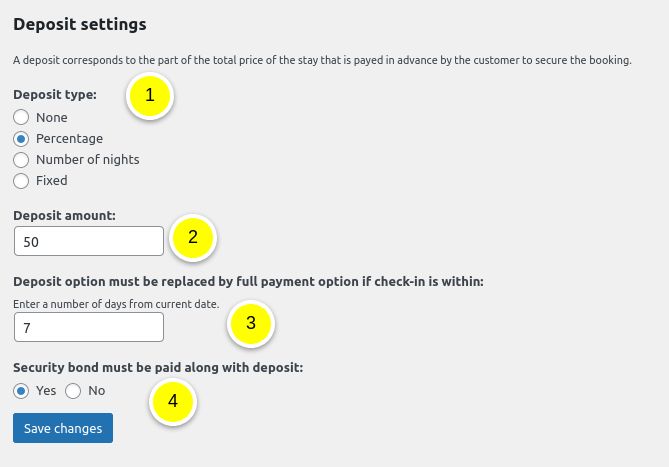
- There are different types of deposit options: none, percentage, one night and fixed amount.
- Here indicate the amount: for example, if you ask for 50%, you will write “50”.
- If you have set that there is a security bond that has to be paid, you will see this setting. It allows you to decide if you wish to require the payment of the security bond along with the deposit or not.
- If you offer deposit and full payment, but wish to require full payment for reservations with a close check-in date, here you can indicate the number of days from current date, for which the deposit option should be replaced by full payment option. For example, if you wish to show only full payment option (and not the deposit option) if check-in is within 7 days, you will enter “7” as value.
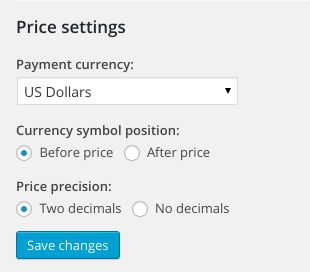
Price settings
Choose your currency and set options regarding price display.
Activate Payment gateways
You can choose which online payment gateway will be offered to your customers. PayPal and Stripe are already integrated to HBook.
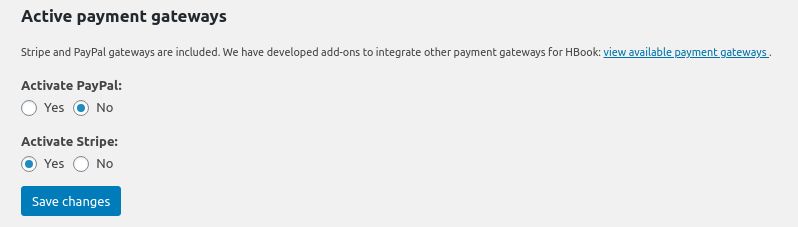
- Paypal settings: set your PayPal account information.

- Stripe settings: set your Stripe account information.
 If you wish to store the customer credit card details for a later charge, you should set “Store credit card” to “Yes”. This option is only available with Stripe payment gateway. You can opt for that:
- if you do not take payment at the time of the booking but wish to ask for credit card details to charge at a later stage
- if you have asked for a deposit to be paid at the time of the booking and wish to charge the remaining balance at a later stage
- to keep credit card details to be able to charge it in case of “no show”

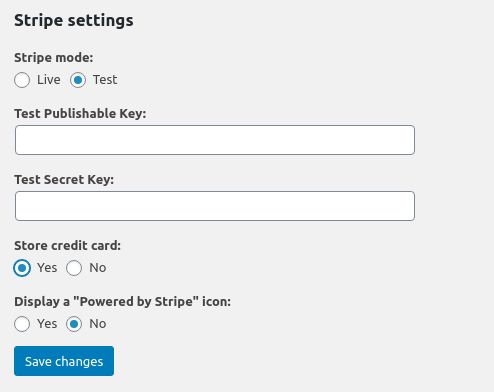 If you wish to store the customer credit card details for a later charge, you should set “Store credit card” to “Yes”. This option is only available with Stripe payment gateway. You can opt for that:
Email settings
In this section of the documentation, you will find information regarding the Emails settings:
- Create email templates
- Email logs
- List of variables
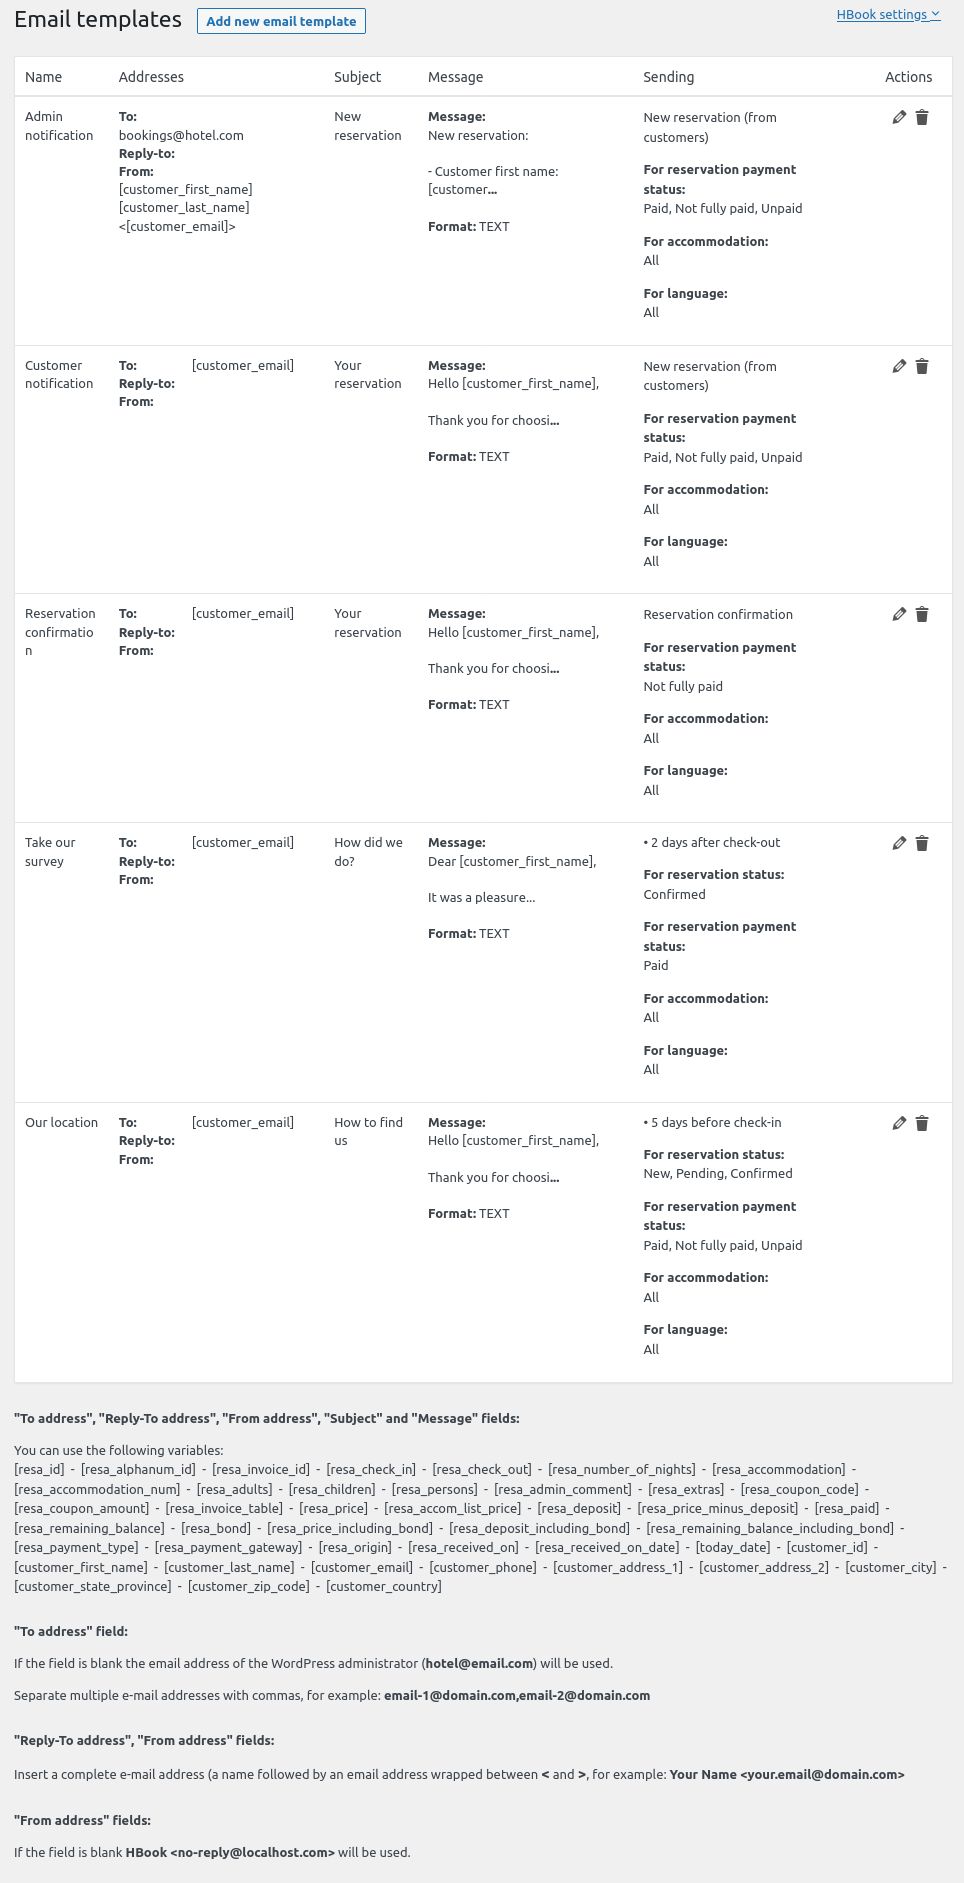
Create email templates
HBook allows you to create a diversity of email templates that can be sent out automatically or manually, taking into account the reservation status, the payment status, the language and the accommodation type.
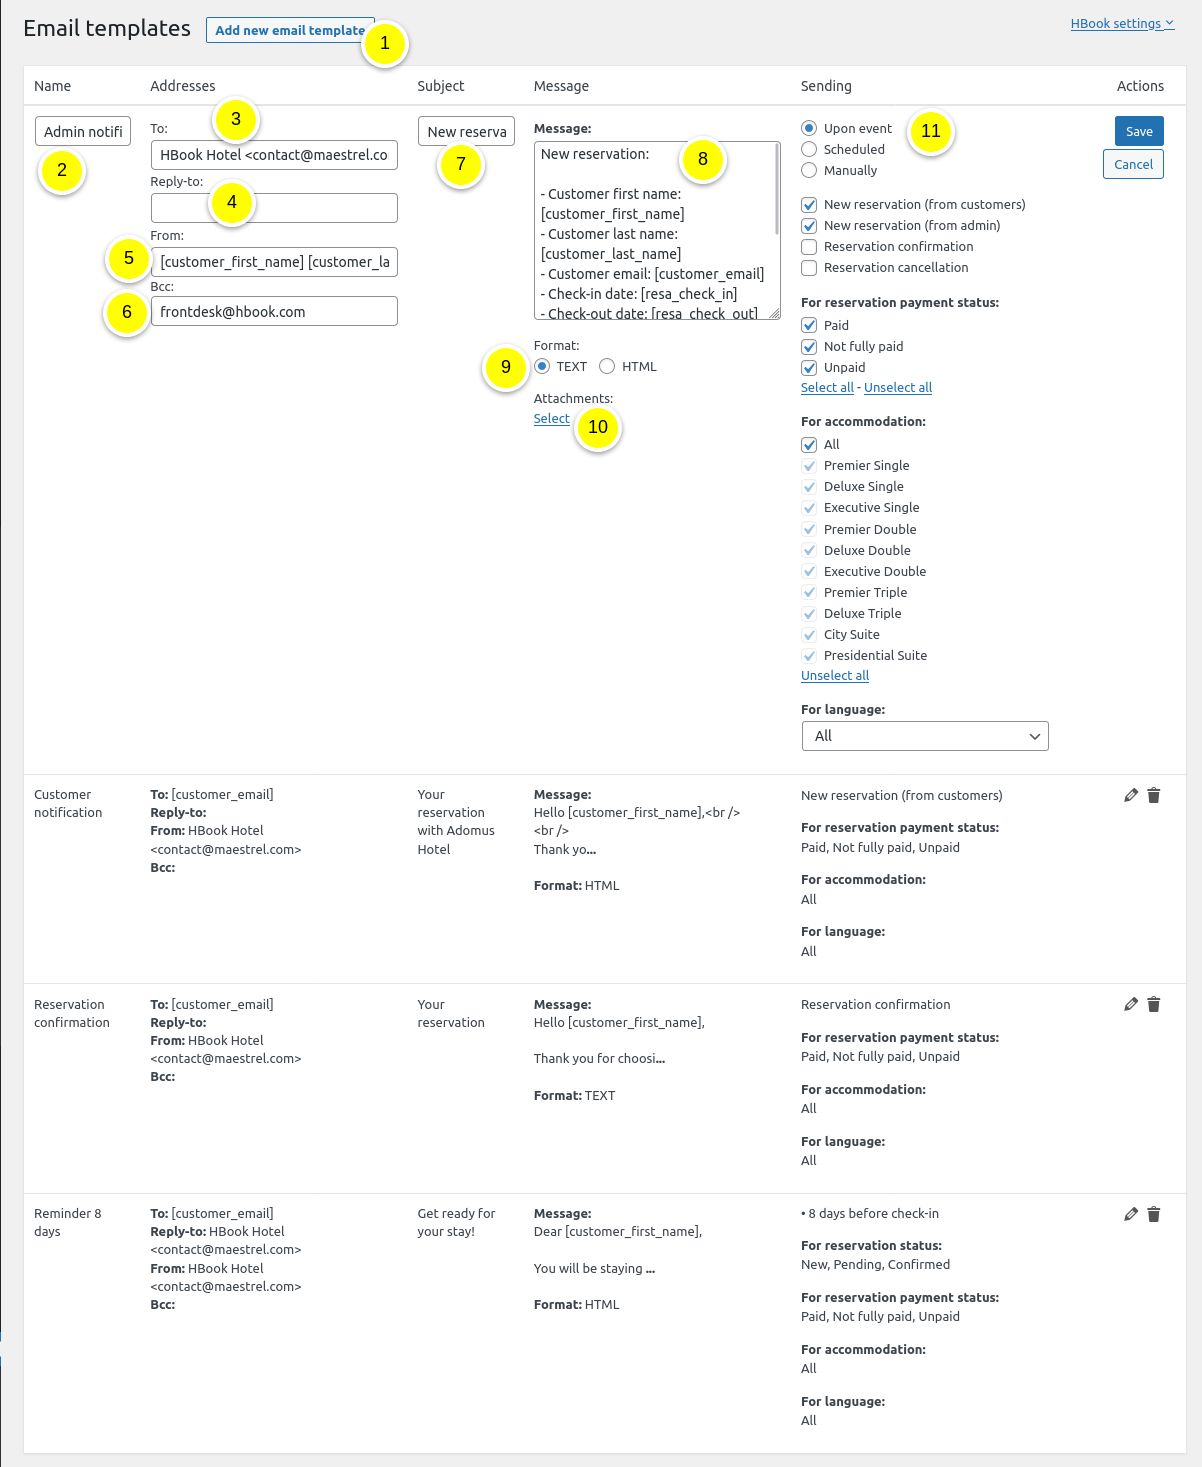
- To create email templates, just follow these steps:
- Click on Add new template
- Enter the name of the new template
- Enter the information for the To: Insert a complete e-mail address eg. Name <email@domain.com>. If the field is blank the email address of the WordPress administrator will be use.
- Enter the information for the Reply-to: This email wlll be used instead of the “From” email when replying to the email
- Enter the information for the From:. If the field is blank the default email address, as set in HBook > Misc will be used, or if not set, the WordPress administrator email will be use.
- Enter the information for the BCC:.
- Enter the subject for the new template
- Write the body of the message
- Select if you wish to use Text or HTML format
- If you wish to include attachments, you can select them here. It will open your Media library from which you can select all documents to attach
- It is possible to create email templates for the following situations:
- Upon an event: the email is automatically sent when a reservation is received, confirmed or canceled…
- Scheduled: the email is automatically sent “x” days before/after the check-in/check-out date
- Manually: the email is sent manually from the reservations list
The set-up is different for each case and details is provided below.
Upon an event
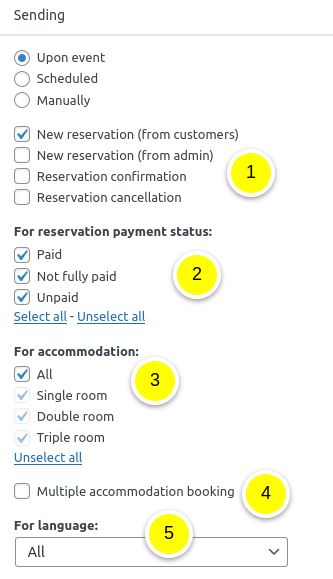
- Select the events that should trigger the sending of the email. There are 4 different actions and you can select several for the same template.
- Automatically when a new reservation is received: a customer has just booked on your website (front-end)
- Automatically when a new reservation is added from the back-end: a reservation has been added in the admin page Reservations.
- Automatically when a reservation is confirmed: when you click on the green tick in the reservation list. Note that clicking on the “Confirm” action will always trigger this action, even if you don’t require confirmation. See Confirmation settings for more details on this.
- Automatically when a reservation is canceled: when you click on the red cross in the reservation list
- Select the payment status for which the template should be sent. There are 3 different payment status and you can select several for the same template.
- Paid
- Not fully paid
- Unpaid
- Select for which accommodation type the template is
- If you have enabled multiple accommodation booking in HBook > Misc, you can select if this template is to be sent out for a multiple accommodation booking
- If your website is set with multiple language, you can select here for which language the template is
Scheduled
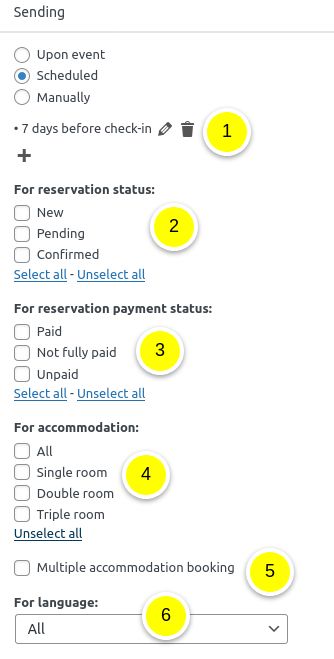
- Indicate the time frame for the scheduled event :
- indicate the number of days
- indicate if it is to be sent before check-in, after check-in, before check-out, after check-out
- Select the reservation status for which the template should be sent. There are 3 different reservation status and you can select several for the same template.
- New
- Pending
- Confirmed
- Select the payment status for which the template should be sent. There are 3 different payment status and you can select several for the same template.
- Paid
- Not fully paid
- Unpaid
- Select for which accommodation type the template is
- If you have enabled multiple accommodation booking in HBook > Misc, you can select if this template is to be sent out for a multiple accommodation booking
- If your website is set with multiple language, you can select here for which language the template is
Manually
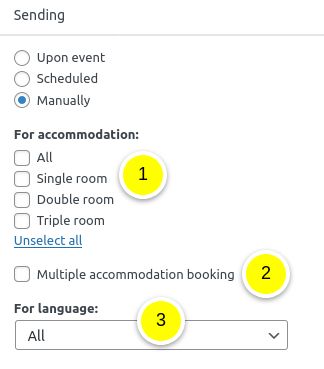
- Select for which accommodation type the template is
- If you have enabled multiple accommodation booking in HBook > Misc, you can select if this template is to be sent out for a multiple accommodation booking
- If your website is set with multiple language, you can select here for which language the template is
Here is an example of a list of email templates:
Email logs
HBook keep a log of the emails sent. They are displayed by reverse chronological order.
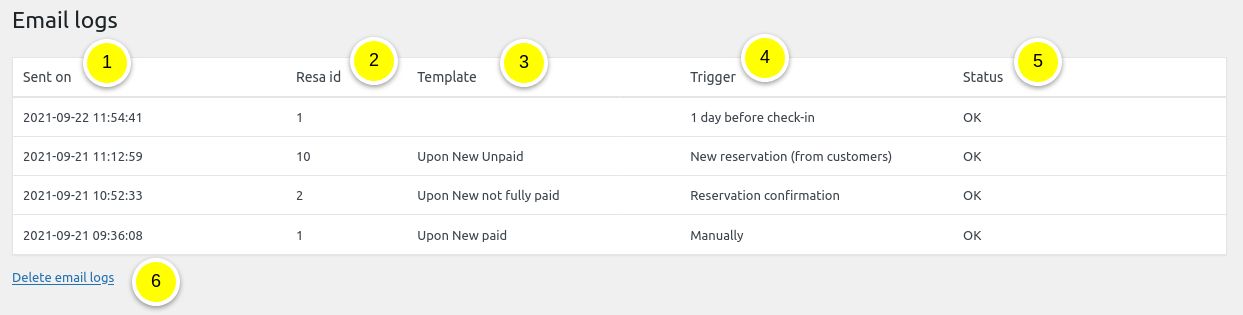
- This is the timestamp, local time
- Here is indicated for which reservation id the email was sent
- If a template was used, the template name is indicated here
- The trigger for the email is displayed here. You will see if it was sent manually, as part of the scheduled emails or upon an event
- The email sending status is shown here. If an email is not sent out, you will find the error here.
- You can delete all email logs
List of variables that can be used in the email templates, document templates or iCalexport
You will find the list of variables that can be used at the bottom of the email templates table (as well as the HBook > Documents table).
- For any new field you add for the customer and booking details form, you will see a new variable.
- Any variable associated to the Reservation starts with “[resa_…]”.
Here are some information about the reservation variables you can use:
- [resa_id]: the id of the reservation
- [resa_ids]: for multiple accommodation bookings, this is the list of ids of the individual reservations
- [resa_alphanum_id]: the random alphanumeric reservation number of the reservation
- [resa_invoice_id]: the invoice id of the reservation
- [resa_check_in]: the check-in date of the reservation
- [resa_check_out]: the check-out date of the reservation
- [resa_number_of_nights]: the number of nights of the reservation
- [resa_accommodation]: the name of the type of accommodation booked (ex : “Double room”)
- [resa_accommodation_num]: the number/name of the accommodation booked( ex: “201” if it is the Double Room 201)
- [resa_adults]: the number of adults
- [resa_children]: the number of children
- [resa_persons]: the number of persons
- [resa_admin_comment]: the content of the content diplayed in “Comment” section of the Reservations
- [resa_extras]: the list of extras selected
- [resa_coupon_code]: the coupon code validated
- [resa_coupon_amount]: the amount of the coupon validated
- [resa_invoice_table]: displays an invoice table with all price beakdown. Please note that it can be used only with HTML emails.
- [resa_price]: the total price of the reservation
- [resa_accom_list_price]: the accommodation list price. It is the price before any discounts or fees applied to the accommodation price.
- [resa_accom_list_price_per_night]: the accommodation list price, divided by the number of nights. It is the price before any discounts or fees applied to the accommodation price that is then divided by the number of nights.
- [resa_deposit]: the deposit amount as set in Deposit settings
- [resa_price_minus_deposit]: the price of the reservation once the deposit is deducted
- [resa_paid]: the amount already paid
- [resa_remaining_balance]: the outstanding amount that has not been paid yet
- [resa_bond]: the security bond amount as set in Security bond settings
- [resa_price_including_bond]: the price of the reservation with security bond included
- [resa_deposit_including_bond]: the deposit amount to which is added the security bond amount
- [resa_remaining_balance_including_bond]: the remaining amount to be paid to which is added the security bond amount
- [resa_payment_type]: the payment option chosen (offline, deposit, full amount)
- [resa_payment_gateway]: the payment gateway used for the payment (Stripe, PayPal,…)
- [resa_origin]: the origin of the reservation (website, ical calendar name)
- [resa_received_on_date]: the date of reception of the reservation
- [resa_received_on]: the date and time of reception of the reservation
- [resa_x_days_before_check_in]: the date corresponding to “x” days before the the check-in date. You would replace “x” with the number of days. For example [resa_21_days_before_check_in]
- [resa_x_days_after_check_in]: the date corresponding to “x” days after the the check-in date. You would replace “x” with the number of days. For example [resa_2_days_after_check_in]
- [resa_x_days_before_check_out]: the date corresponding to “x” days before the the check-out date. You would replace “x” with the number of days. For example [resa_1_days_before_check_out]
- [resa_x_days_after_check_out]: the date corresponding to “x” days after the the check-out date. You would replace “x” with the number of days. For example [resa_14_days_after_check_out]
- [today_date]: the date of the current day
Any variable associated to the Customer starts with “[customer_…]. Variables are usually straightforward, for example :
- [customer_id] : id of the customer
- [customer_first_name] : first name of the customer
- [customer_last_name] : last name of the customer
- [customer_email] : email of the customer
- …
Other settings
In this section of the documentation, you will find information regarding the Appearance and Misc ( settings for Multiple booking, confirmation, booking window, etc.) sub-menus of HBook settings.
1. Appearance
In the sub-menu Appearance of HBook menu, you can do the followings:
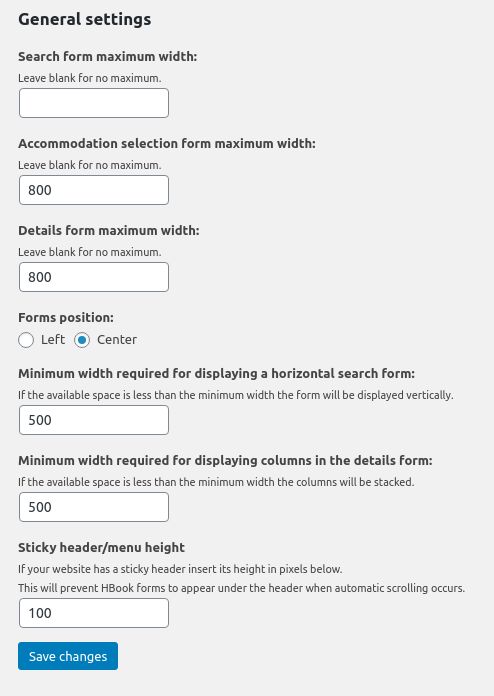
- set general settings (page padding top, horizontal layout for the search form…) :

- set general settings (page padding top, horizontal layout for the search form…) :
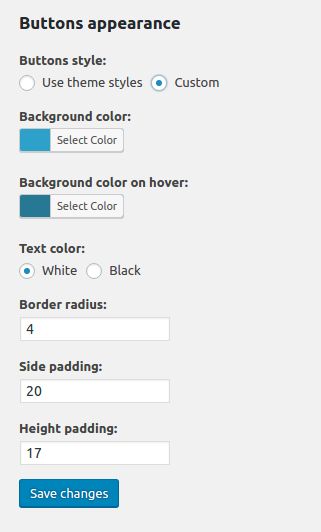
- customize the buttons appearance:

- customize the buttons appearance:
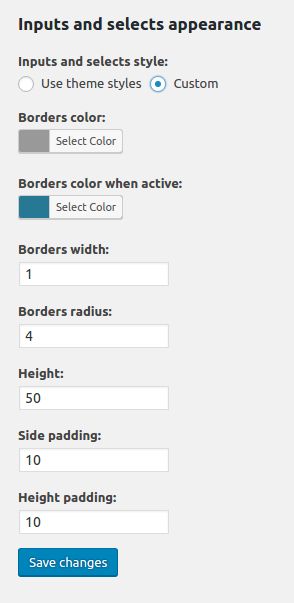
- customize the input and select appearance:

- customize the input and select appearance:
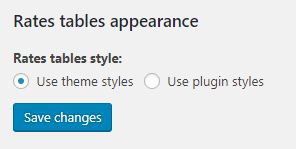
- customize the rate table appearance:

- customize the rate table appearance:
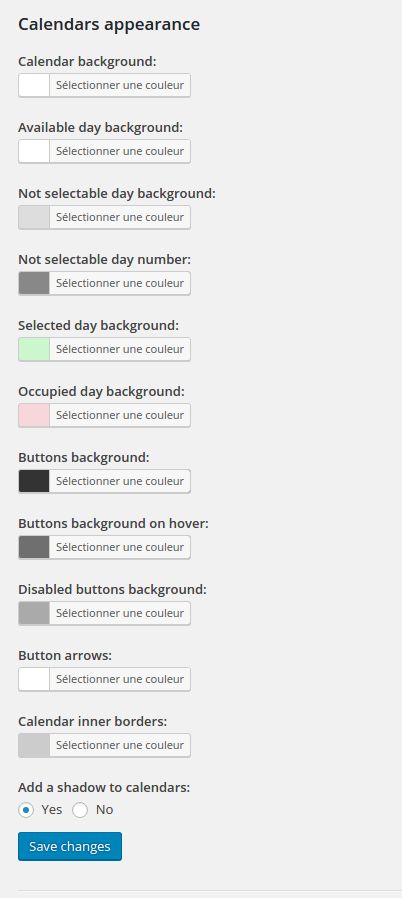
- change the calendar colors:

- change the calendar colors:
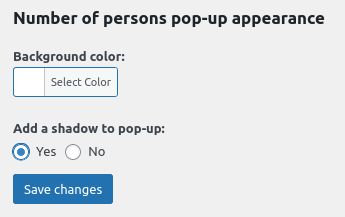
- change the “Number of persons” pop-up appearance:

- change the “Number of persons” pop-up appearance:
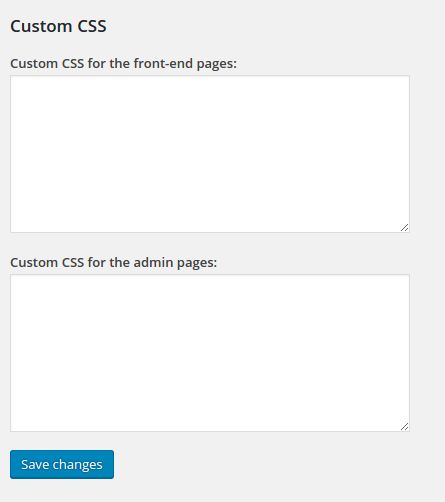
- add custom CSS:

2. Miscellaneous
In the sub-menu Misc of HBook, you will find the following sections:
- Multiple accommodation booking
- Confirmation settings
- Reservations status
- Invoice id and reservation number
- Booking window
- Dates settings (front-end)
- Terms and conditions, Privacy policy
- Import/Export settings
- HBook reset
- Misc
Multiple accommodation booking

- Set if you wish to enable multiple accommodation booking
- If you have enabled multiple accommodation booking, you can set if you wish to enable it for front-end or have the multiple accommodation booking only available for the back-end.
- Indicate if you prefer that HBook uses the normal occupancy or the maximum occupancy to fill in the accommodation when suggesting multiple accommodation in the search results.
- When using “Normal occupancy”, you can set if you wish to prevent singleton when possible.
HBook will show suggestions :
- when you have set that you do not wish to show a “Number of accommodation” field in the search form
- when there is no result for the number of accommodation specified (and number of persons for each accommodation), but it is actually possible to accommodation the number of persons searched at these dates, with a different combination of accommodation.
Confirmation settings
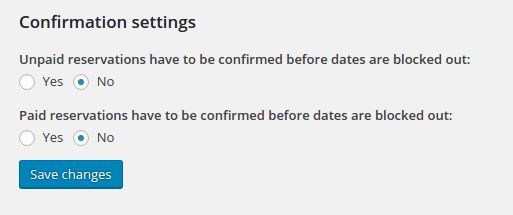
- You can set if a confirmation is needed before the dates are blocked out in the calendar. This setting can be different for reservations that have been paid online or that are unpaid.
- When a reservation requires confirmation, it means that the reservation will have “Pending” status and the accommodation will remain available until you click on “Confirm”. It is working as a reservation request that leaves the accommodation available so you can receive various reservation requests and decide which one you confirm and which ones you decline.
Reservations status
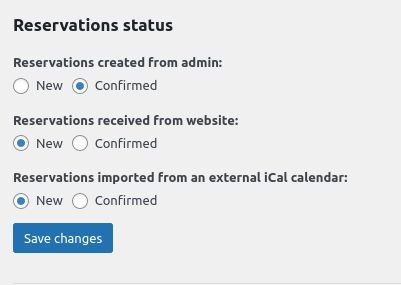 You can set the default reservations status depending on the origin of the reservation received (front-end, admin, ical).
Invoice id and reservation number
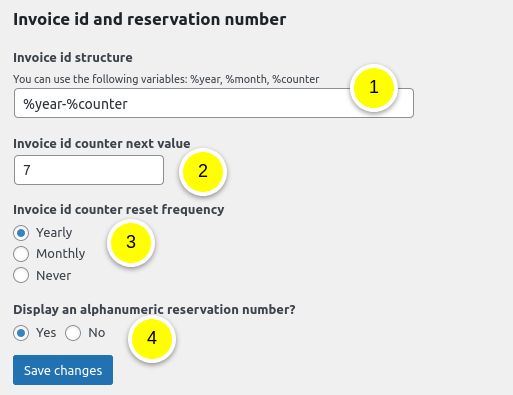
You can customize the invoice id :
- You will indicate here the structure of the invoice id. You can use the variables %year, %month and %counter
- You can manually set the counter to a specific number for the next invoice id.
- You can indicate the automatic reset frequency so HBook will automatically reset the %counter variable value to “1” either monthly, yearly or never.
HBook allows you to have a random reservation number, in addition to the reservation id and the invoice id. It will be displayed in the list of reservation, you can as well include the variable [resa_alphanum_id] in Documents or Emails
- You can add decide to use an additional alphanumeric reservation number.
Booking window
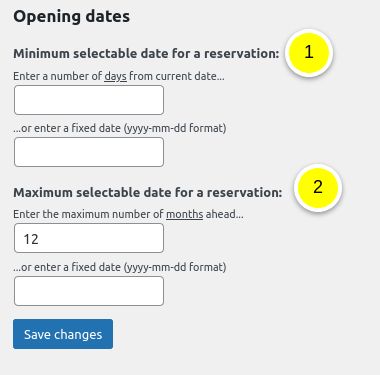
You can set here the booking window :
- You will indicate here the minimum selectable date. It can be set by defining:
- a number of days from current date. This is useful if you wish to prevent last minute booking.
- a fixed date. This is useful if you are not open all year round. This will be your opening date.
- You will indicate there the maximum selectable date. It can be set by defining:
- a number of months ahead of the current date. This is useful if you wish to set a booking window to allow bookings within 6 months only for example.
- a fixed date. This is useful if you are not open all year round. This will be your closing date.
Dates settings
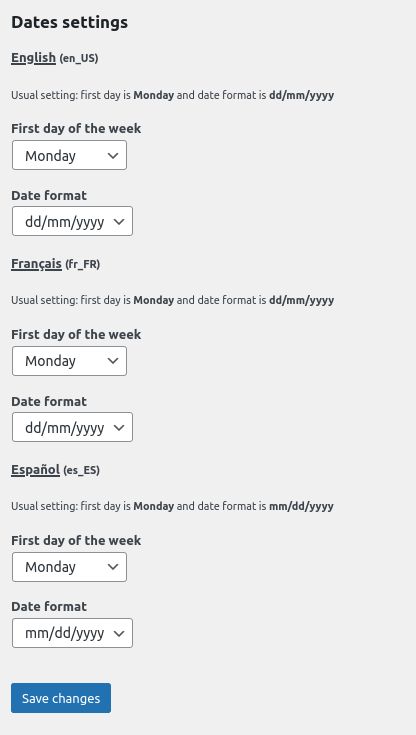
You can set the date format and the first day of the week. Note that if you have a multilingual site, you can set these for each language (as in screenshot).
Terms and conditions, Privacy policy
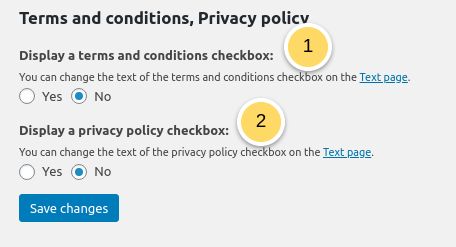
- If you wish to add terms and conditions checkbox: a compulsory “Terms and Conditions” section will be displayed just before the “Book now” button.
- If you wish to add a privacy policy checkbox: a compulsory “Privacy Policy” section will be displayed just before the “Book now” button.
Import/Export of HBook settings
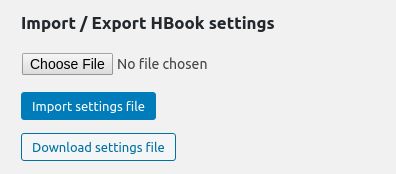
You can export or import a HBook settings file. It will be in a .json format and this can come in handy when you wish to move a HBook install with its settings, accommodation types, customers and reservations.
HBook reset
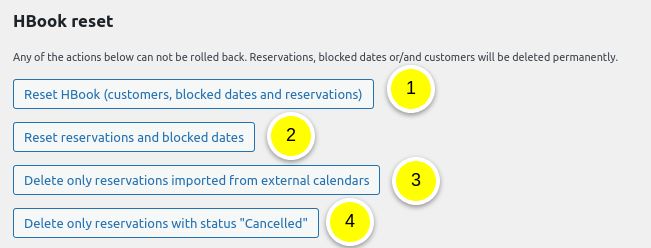
- Reset HBook: customers, blocked dates and reservations tables will be emptied. This is useful to delete any tests and start fresh. Reservation id and Customer id will start again from “1”
- Reset Reservations and blocked dates: Customers will be kept, but the reservation and blocked dates tables are emptied. Reservation id will start again from “1”.
- Delete reservations imported via ical: any reservation received on your website will be kept but all reservations imported from external calendars will be removed, whatever their status is. This can be handy when you have ical sync issues and need to have a clean reservation list to set up ical correctly.
- Delete reservations with status “Cancelled”: all reservations that have “Cancelled” status will be deleted from the reservation table.
Misc
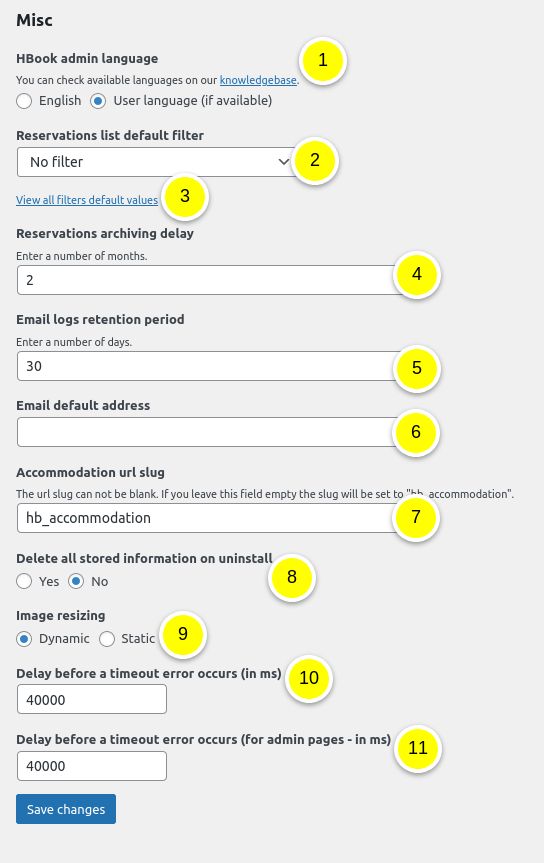
- HBook admin language: you can set here if you wish to use the existing translations of HBook admin menus (when available for your language). To see an updated full list of available translations.
- Reservations list default filter: you can set here the default filter for the Reservations list.
- Reservations list filters default values : you can set the default values for all the filters for the Reservations list.
- Archiving delay: HBook automatically archive your reservations. You can then find them in Reservations > Archived reservations. Here you will enter the delay in months before archiving should be done.
- Email default address: When no email address is set, HBook will use this email address. If empty, HBook will use the WordPress administrator email.
- Accommodation post slug: customize the slug for the posts in the url. Default is “hb_accommodation”
- Set if you wish that we remove all tables/rows of data added by HBook upon deletion of the plugin from the Plugins menu.
- Set if you wish to have a dynamic or static resizing of the images. HBook uses Aqua Resizer for resizing the images. If you need to use your own resizing functions, you will set this to static and you will use HBook filter “”
- Adjust the delay before a timeout occurs for front-end pages
- Adjust the delay before a timeout occurs for admin pages
Forms customization
In this section of the documentation, you will find information regarding the Search Form and Details form sub-menu of HBook menu.
The Search Form page allows you to customize the search form and accommodation selection forms:
- Search form: in this section you can customize the fields of the Search form.
- Accommodation selection: in this section you can customize the accommodation selection step.
The Details Form page allows you to customize the customer details and booking details form:
- Customer and Booking details form: in this section you customize the fields of the form customers used for entering their details.
1. Search form
Customize the fields of the Search form.
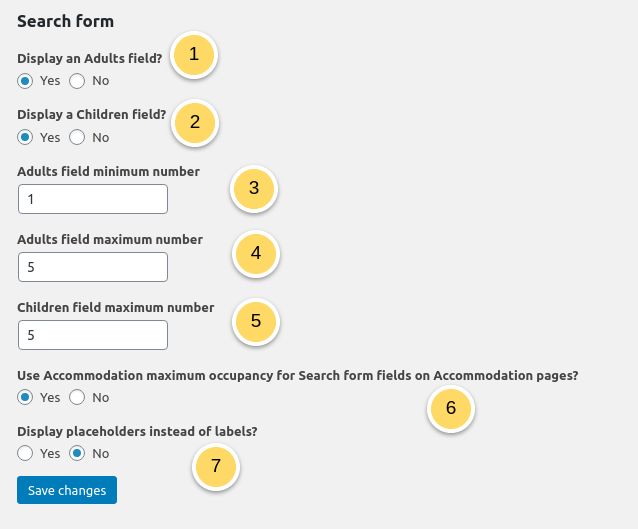
- Set if you wish to have a selection of the number of “Adults” in the search form
- Set if you wish to have a selection of the number of “Children” in the search form
- You can set a minimum number for the adult select
- You can set a maximum number for the adult select
- You can set a maximum number for the children select
- You can override the above settings when a search is for a specific accommodation type. Set here if you wish HBook to use the accommodation type occupancy settings instead of the settings above.
- In the search form, you can use placeholder instead of labels
2. Accommodation selection
Customize the Accommodation selection.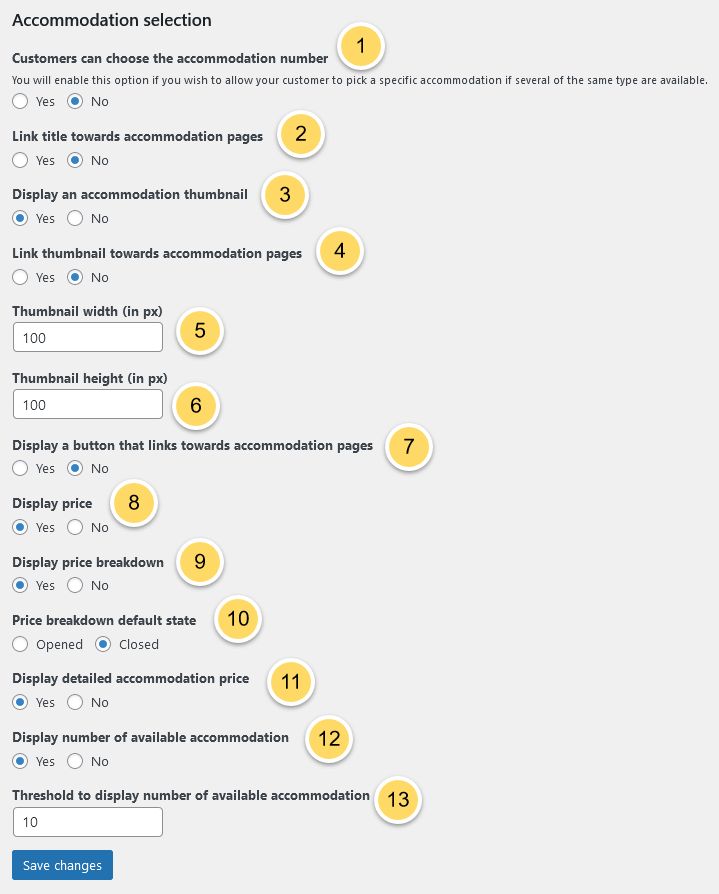
- Set if you wish to allow customers to select the accommodation number. For example, not only can they select the “Double room” but they can as well choose which double room they wish to book among the available ones. You can add an explanation text HBook > Text > Accommodation selection if you wish to provide more details at this reservation step.
- Set if the title of the accommodation type should have a link to the page used to showcase the accommodation type
- Indicate if you wish to display a thumbnail. The thumbnail is the featured image of the post used to showcase the accommodation type
- Set if the thumbnail of the accommodation type should have a link to the page used to showcase the accommodation type
- Indicate the thumbnail width in pixels
- Indicate the thumbnail height in pixels
- Set if a button “View accommodation” should be displayed. It will open the page used to showcase the accommodation type in a new tab.
- Set if any prices should be displayed. You always need to set rates for the booking system to work but you can decide not to show any prices on front-end
- Set if a breakdown of the price should be displayed
- Set if the default state of the price breakdown: if closed, the customer will click to view the price breakdown
- Set if the fully detailed accommodation breakdown should be displayed
- Set if you wish to display the number of available accommodation
- If you wish to display the number of available accommodation, but only from a specific number, you can set here the threshold. The message will be shown only when there are less or equal accommodation left than this threshold.
3. Customer and Booking details form
Customize the fields of the Customer and Booking details form. You can drag-and-drop the fields to re-order them. Field types are :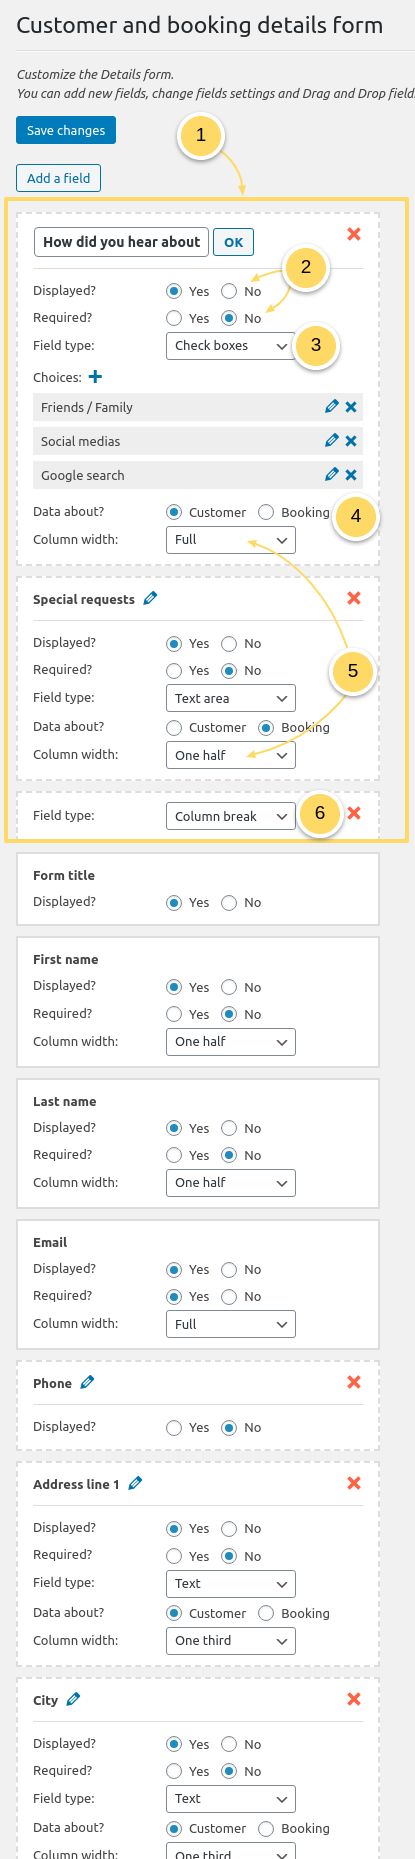
- If there are some information you wish to ask to your customer to provide further details about their booking, you can include some fields that will be displayed straight after the Extra-services selection. In this example, we set the Customer information form after these additional information about their reservation.
- You can set if a field is displayed : this is useful when you wish to modify your customer/booking details form, without having to delete and recreate the fields.
You can as well set that a field is required : it means that if it is not filled by the customer, a message will be displayed asking him to provide the information. - You can set that a field is for admin only purposes. It will not be displayed in the front-end details form, but only when you add a reservation from the admin, or when you edit customer or reservations details.
- Select the field type. Here are the possible fields :
- Text
- Number
- Text area
- Select
- Radio buttons
- Checkboxes
- Title
- Sub-title
- Explanation
You can as well set that you wish to add a column break or a separator
- Indicate if this information should be associated to the Customer or to the Booking.
When associated to Customer, this information will appear in the column “Customer”, in the list of customers in HBook > Customers and customer details will be updated each time the customer makes a new reservation on your website.
When associated to Booking, it will be displayed in the column “Information” and can be different for each reservation made by the same customer. - You can organize the form with columns and you will indicate the column width: it can be Full, One half or One third so you can organize the layout of the forms to your taste.
- You can add column break if you wish to force to jump to next line
Text customization and translation
In this section of the documentation, you will find information about :
- Front-end translations
- Back-end translations
1. Front-end
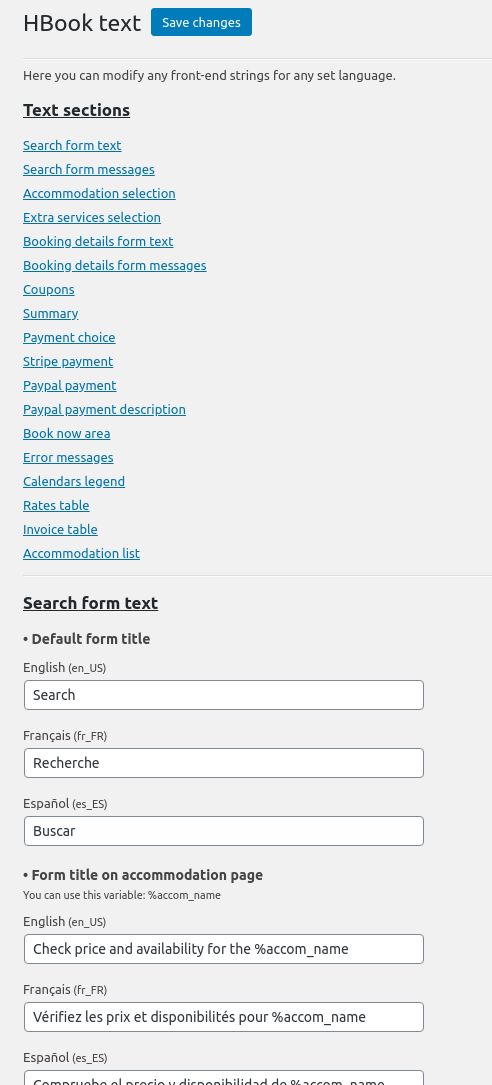
How to modify or/and translate text displayed on front-end by the plugin?
The Text page is dedicated to customizing and translating any text displayed by HBook. The Text page allows you to view and edit all front-end strings displayed by HBook, for all the languages you have set. There is a handy list of sections so you can easily identify the various sections and navigate to the section where you wish to modify/translate strings.
- If you use WPML plugin, Polylang plugin or QtranslateX, the languages will be automatically set in HBook->Text, once you have set them in the multi-language plugin.
- If your site language, as set in Settings->General->Site language is different than English(United States), it will appear automatically as well in HBook->Text.
To customize or translate a text string:
- Navigate to the section where the text appears and find the current text displayed by the plugin.
- Change or translate the text.
- Save your modifications.
How to import/export language files for front-end?
The Languages page allows you to import or export translation files for front-end:
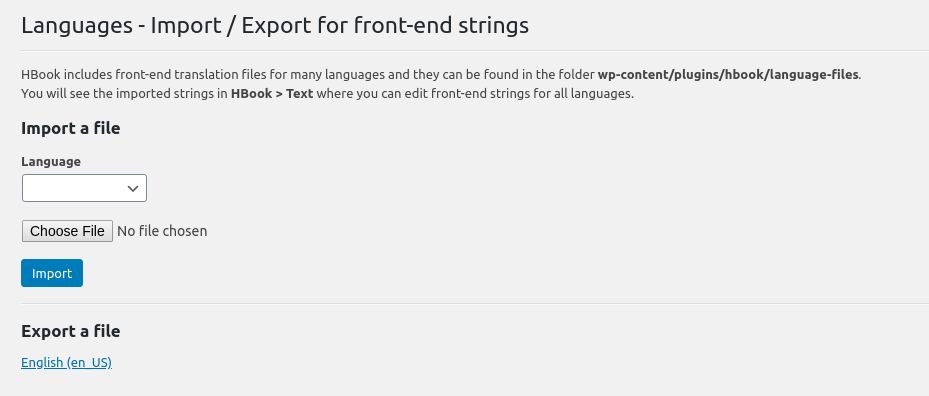
You can use the Languages (Import/Export language files) page to import or export a a .txt or a .po file (.po file are commonly used to store translations for multilingual softwares). Note that you do not have to use a .po file to translate the text displayed by HBook but the Import / Export might come in handy (for example if the translation is made by a third party).
2. Back-end
HBook includes back-end translation files for many languages.
How to switch HBook admin to a language for which translations are available?
You will find a setting “HBook admin language” in HBook > Misc > Misc and you can set it to “User language”
How to translate HBook admin in another language?
If your language is not available or if you wish to update the translations, you will need to create the translation files. HBook plugin follows the standards of WordPress internationalization. Below are instructions on how to translate HBook with Poedit.
- Download and install Poedit
- Select “Create New Translation”
If you wish to update a translation:
- Open the correct .po file from wp-content/plugins/hbook/languages/admin-language-files folder
- Translate the missing strings
- Save to update both .po and .mo files
If you create a new translation:
- Openthe .pot file
- Click on File -> Save as…: choose the wp-content/plugins/hbook/languages/admin-language-files folder and give the file hbook-admin- followed by your locale. For example if you want to translate the plugin admin in Swedish the file must be named hbook-admin-sv_SE.po . The hbook-admin-sv_SE.mo file will be created automatically on translation.
- Translate the strings you will use on your website
- Save again to update the .po and .mo files
You will find a setting “HBook admin language” in HBook > Misc > Misc and you can set it to “User language”
If you wish to share your translations for other languages, please do not hesitate to contact us at support@maestrel.com. This will be highly appreciated by your fellow citizens!
iCal import/export/synchronization
In this section of the documentation, you will find information regarding the iCal synchronization sub-menu of HBook menu:
- What is exactly the iCal synchronization?
- Presentation of iCal synchronization table
- Presentation of iCal synchronization settings
- Understanding the notifications displayed in the Reservations page
- Resources : step by step guides, troubleshooting
HBook allows you to import, export and synchronize calendars using iCal feeds or files. HBook synchronizes by default hourly with the calendars added.
What is exactly the iCal synchronization?
iCal is a handy format to exchange calendars. It is used by:
- Agenda/Calendar applications : iCal, Google Calendar, Outlook Calendar…
- Booking platforms and OTA: AirBnb, booking.com, TripAdvisor, Expedia, VRBO, HomeAway, etc…
What is called iCal synchronization is in fact an import of the iCal feed of the calendars that are “synced” made at a regular frequency by each calendar/booking software. Here is what happens:
- Every hour (or at a custom frequency set in HBook > iCal sync > iCal sync settings), HBook checks the iCal feeds from all the calendars you have entered in HBook > iCal sync > Synchronized calendars. You can refresh the calendars manually by clicking on “Update calendars” button. Any new reservation will be imported into HBook and appear in the list of reservation.
- At their own frequency, the external calendars (AirBnb, TripAdvisor, booking.com, HomeAway, Expedia, VRBO, etc…) do the same and check the HBook iCal feeds you have entered in their iCal sync settings. They will import the event (Google or iCal or any calendar software) or block the dates (AirBnb, TripAdvisor, booking.com, HomeAway or any booking platform). Some calendar software or booking platform have a refresh button/link to run the “sync”.
Presentation of iCal synchronization table
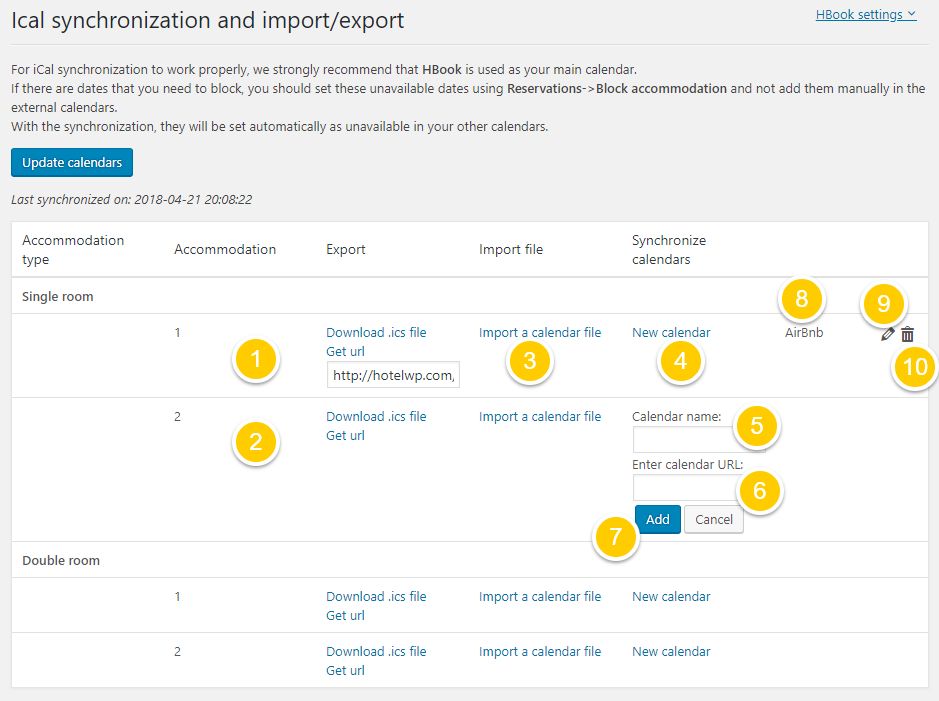
- To export a HBook calendar of an accommodation, you can:
- Click here to get the url of the calendar. You can copy it and paste it to provide the url of HBook calendar for that accommodation.
- Download an .ics file of HBook calendar for that accommodation.
- To export a HBook calendar of an accommodation, you can:
- To import an .ics calendar file for a certain accommodation:
- Click on Import a calendar file and select the .ics file to be imported. All future events of that calendar will be processed. A notice message will appear to inform you of the result of the import.
- To import an .ics calendar file for a certain accommodation:
- To synchronize HBook calendar with another iCal calendar:
- Click on New calendar
- Enter the Name you wish to give to the calendar you will synchronize with.
- Enter the url of the calendar
- Click Add
All future events of that calendar will be processed. A notice message will appear to inform you of the result of the import.
- To synchronize HBook calendar with another iCal calendar:
- The list of the calendars which are synchronized with HBook appears in the last column:
- The name of the calendar
- Click Edit to change the name or the url of the calendar
- Click Delete if you wish to stop synchronizing HBook calendar with this calendar
Presentation of iCal synchronization settings
To be able to deal with the diverstity of external calendars supporting iCal and to offer you synchronization options, you will find the following settings:
Notifications settings
HBook can record and display notifications regarding the synchronization.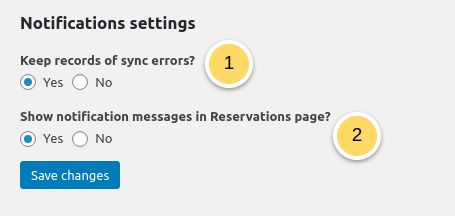
- Set if you wish to keep records of the notifications. We recommend to enable this at least when setting up the iCal sync and when doing debug.
- Set if you wish to display the notifications which will appear in Reservations page at the top of the page.
Import settings
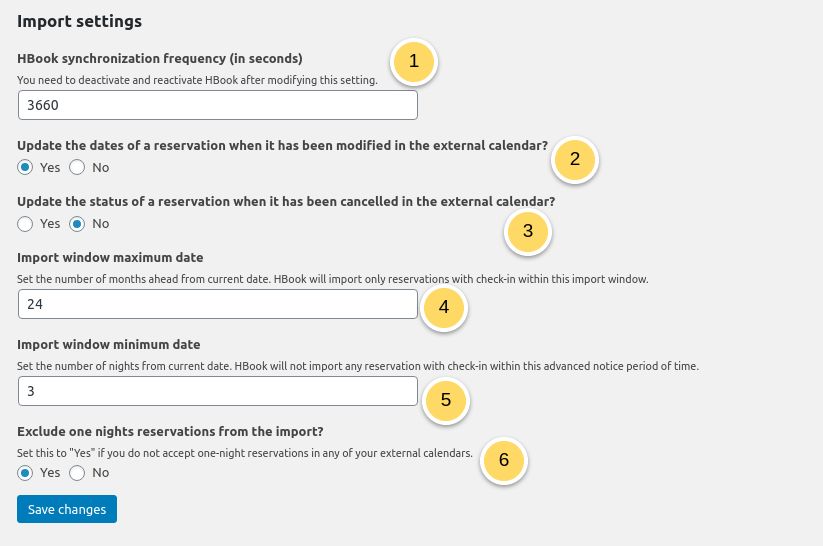
- Set the sync frequency. Please note that this impact only the frequency at which HBook checks the external calendars. It does not have any effect on the frequency of calendar updates on the external calendars (AirBnb, booking.com, Expedia…)
- If the dates of a reservation has been modified in the external calendar, they can be updated automatically in HBook. This option is to be disabled if your external calendar does not follow iCal standards.
You might need in some circumstances to prevent HBook from importing some dates that are included in the export of an external calendar. This is usually the case with external calendars who add to their exports dates that are blocked due to settings of their own. This can be for examples when there is no rates set for a future period, when some days are unavailable due to a booking window or an advanced notice setting. This will typically create “fake” or “phantom” reservations imported in your reservation list. You will use the following settings to set the iCal import window:
- Indicate the number of months ahead from current date to set a maximum date.
- Indicate the number of days from current date to set a minimum date.
- If you do not accept one night reservations in any of your external calendars, you can set it here. HBook will ignore any 1-night event during the iCal import
Export settings
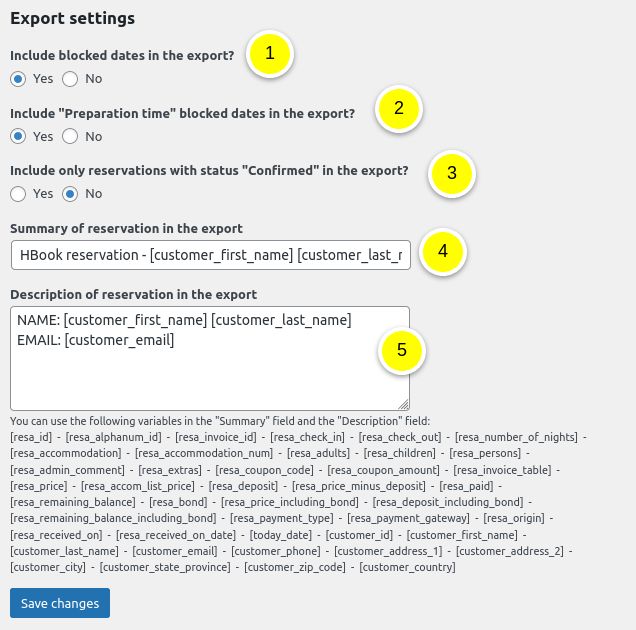
- You can choose to include blocked dates (as added in Reservations > Block accommodation) in the export or not.
- You can choose to include the dates blocked as “Preparation time” in the export or not.
- You can choose to include only the reservations with status “Confirmed” in the export or not.
- The Summary is a short description for the reservation. You can use the available variables to customize it. Some external calendar show the Summary to help you identify the reservation.
- The Description is a more detailed description for the reservation. You can use the available variables to customize it. Some external calendar show the Description but not all of them.
Understanding the notifications displayed in the Reservations page
Once set up, the iCal sync is completely automated. It still requires regular checks to verify that everything is running well. We display notifications on top of the Reservations page when there are any sync errors and it is a good idea to check these messages when they appear and dismiss them once you have verified the issue.
These messages are here to help you to monitor the sync. It can be:
- a connection error: this simply means that HBook could not communicate with the external calendar. As the sync is run by default again 1h later (or at your own frequency), you can ignore it unless it is repeatedly showing up at every sync. In that case, you should check with your host provider why access is refused by the external calendar when request is done by your server.
- a reservation could not be imported: you should check why it is not available on HBook. Dates are given to help you check this further.
- a reservation has been modified: you should check if it is possible to modify the reservation on HBook and update accordingly.
Resources : step by step guides, troubleshooting
Since the iCal sync is involving connections between HBook and other platforms/agenda, the set up can be tricky.
Do not hesitate to email us via the contact page here. I will be delighted to help if needed!
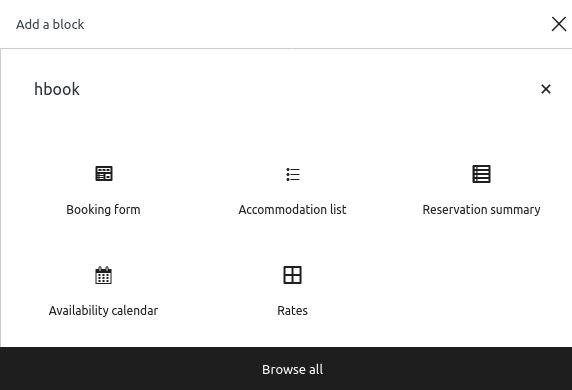
Shortcodes / Blocks
To display a search form, a booking form, an availability calendar, a rate table or a list of accommodation, HBook uses shortcodes but you can as well use the Gutenberg editor blocks. You can display these HBook elements anywhere on your website : in a page, a post, a widget, a sidebar…
- If you use the Gutenber editor blocks, you will easily find all HBook blocks by typing “HBook” in the search for blocks :

- If you prefer to use the shortcodes, you will write them in the content of a post/page/widget. For example :

- If you use the Gutenber editor blocks, you will easily find all HBook blocks by typing “HBook” in the search for blocks :
We will present in details each shortcode and the matching Gutenberg block for each shortcode.
- Booking form
- Shortcode [hb_booking_form]
- Booking form block – Gutenberg
- Booking form
- Accommodation list
- Shortcode [hb_accommodation_list]
- Accommodation list block – Gutenberg
- Accommodation list
- Availability calendar
- Shortcode [hb_availability]
- Availability calendar block – Gutenberg
- Availability calendar
- Rates table
- Shortcode [hb_rates]
- Rates table block – Gutenberg
- Rates table
- Reservation summary
- Shortcode [hb_reservation_summary]
- Reservation summary block – Gutenberg
- Reservation summary
1. Booking form
You will use the booking form shortcode or bloc to display a search/booking form. The reservation process has different steps and some redirection can be implemented at the following steps:
- Search results: once the guest has indicated his dates, number of guests and number of accommodation. This redirection can be implemented for global search only.
- Customer/Reservations details form: once the guest has selected the accommodation type
- Thank you and Summary: at the last reservation step, once the confirmation screen is shown
Shortcode [hb_booking_form]
Use the [hb_booking_form] shortcode to display a booking form on your website.
Parameters:
- all_accom: when displayed on an accommodation page, the search form will only look for that accommodation. If you want the search form to look for all accommodation set the all_accom parameter to yes.
- accom_id: use this parameter to make the search form to only look for a specific accommodation type. You will find the accommodation ID in the accommodation type post right under the title.
- search_only: use this parameter to display a search form only. Once they have clicked on the “Search” button customers will be redirected to the page whose url is entered in the redirection_url parameter. This parameter can only be used in global searched, not when used on an accommodation page or with the “accom_id”.
- redirection_url: add this parameter if you use the search_only parameter or if you use the shortcode on an accommodation page. This parameter must contain the url of your main booking page (this page will have a [hb_booking_form] shortcode).
- force_display_thumb: add this parameter if you wish to display the accommodation thumbnail when the search is for a specific accommodation type. By default, HBook does not display the thumbnail and description if there is only one accommodation type searched. You can set this parameter to yes and the thumbnail will be displayed.
- force_display_desc: add this parameter if you wish to display the Description displayed in the search results when the search is for a specific accommodation type. By default, HBook does not display the thumbnail and description if there is only one accommodation type searched. You can set this parameter to yes and the description will be displayed.
- form_id: add this parameter to be able to set the identifier of the form to your desired id. This can be useful if you wish for example to style differently one specific form or have specific js interacting with this form.
- search_form_placeholder: this parameter is useful if you wish to override the general setting for using labels or placeholders for the search form. You can find the general setting in HBook > Search Form.
- thank_you_page_url: this parameter is useful if you wish to redirect the customer to a different page for the reservation confirmation screen, usually called “Thank you page”. On that “Thank you page”, you need to have a [hb_reservation_summary] shortcode or a bloc “Reservation summary”.
If you use the “redirection_url” parameter, then you should include this parameter only in the booking form shortcode on the page to which your customer is redirected.
Examples:
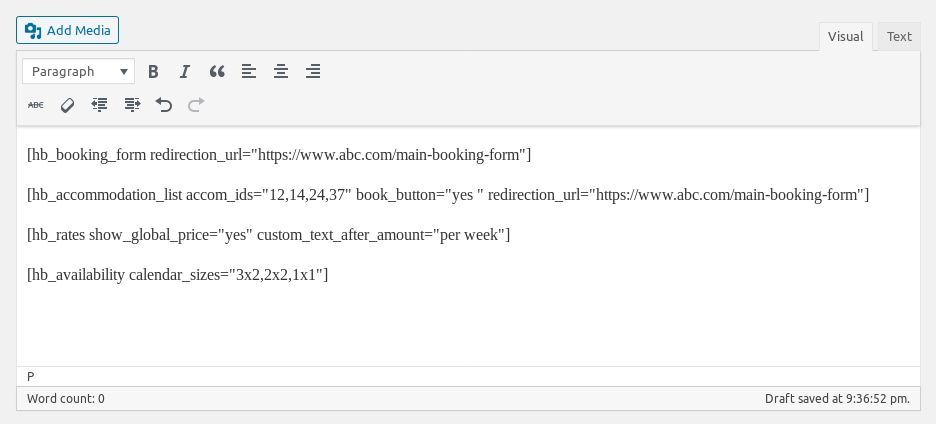
[hb_booking_form search_only=”yes” redirection_url=”https://www.abc.com/main-booking-form”]
With this shortcode, your customer enter the check-in and check-out dates as well as the number of adults and children if requested. When he press the “Search” button, he is redirected to another page for the next step of the booking (selection of accommodation and extra-services, customer details, payment, confirmation).
[hb_booking_form redirection_url=”https://www.abc.com/main-booking-form”]
With this shortcode, your customer enter the check-in and check-out dates as well as the number of adults and children if requested. The results of the search appear and is it after having selected the accommodation type that he is redirected to another page. He will be able to select extra-services, enter customer details, etc…
You need to have a [hb_booking_form] shortcode on the page to which the customer is redirected.
[hb_booking_form thank_you_page_url=”https://www.abc.com/thank-you”]
With this shortcode, the customer is redirected to the “Thank you” page at the last step, where the reservation confirmation screen is displayed. On that “Thank you page”, you need to have a [hb_reservation_summary] shortcode or a bloc “Reservation summary”
[hb_booking_form force_display_desc=”yes” force_display_thumb=”yes”]
With this shortcode, the thumbnail and description will be displayed even if the search is for only one accommodation type.
[hb_booking_form force_display_desc=”yes” force_display_thumb=”yes”]
With this shortcode, the thumbnail and description will be displayed even if the search is for only one accommodation type.
Booking form block – Gutenberg
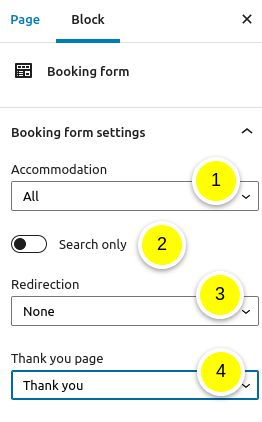
- Select for which accommodation type the booking form is
- Indicate if you wish to display a Search only booking form. With “Search only” parameter enabled, you need to indicate the Redirection page below. Your customer enter dates and number of guests searched. Once they have clicked on the “Search” button they will be redirected to the page indicated in the parameter Redirection below. This parameter can only be used in global searched, not when used for a search for a specific accommodation type.
- Indicate the Redirection page. You can use this combined with “Search only” parameter above enabled or disabled. When used alone, your customers will enter the dates and number of guests searched for, then select the accommodation. They will be redirected to the page indicated in this parameter to enter their customer details.
- Indicate the Thank you page. You can use this parameter to redirect your customers to a specific page at the “Thank you” step, which is when the reservation confirmation screen is displayed, with the summary and the thanks messages.
2. Accommodation list
You will use the accommodation list shortcode or bloc to display a list of accommodation types. You can decide the number of columns to use, if you wish to include a booking form and a button to link to the detailed presentation of the accommodation type, which accommodation types you wish to display in the list (with shortcode only)…
You will include the “Description displayed in the Accommodation list” in the Descriptions section of the accommodation type settings.
Shortcode [hb_accommodation_list]
Use the [hb_accommodation_list] shortcode to display a list of accommodation.
Parameters:
- accom_ids: use this parameter to choose to display only some accommodation types in the list. Indicate the ids of the accommodation types you wish to display. Default : empty (so all accommodation types will be displayed)
- book_button: use this parameter to add a booking form below the accommodation presentation. Default: yes.
- view_button: use this parameter to add a button “View details” which will open the accommodation page in a new tab. Default: no.
- redirection_url: if you set “book_button” to “yes”, you might wish to redirect your clients to your main booking page for the next booking steps. Indicate here the url of the page you wish to redirect them to
- nb_columns: use this parameter to specify how many columns you wish to be used to display the list of accommodation. This will be the maximum number of columns used. Default: 2.
- show_thumbnail: use this parameter to choose whether to display an accommodation thumbnail. Default: yes.
- thumbnail_link: here you can set if you wish the thumbnail to have a link to the accommodation page or not. Default: yes.
- title_link: here you can set if you wish the title to have a link to the accommodation page or not. Default: yes.
- title_tag: use this parameter to change the title heading (h1, h2, h3, h4,…). Default is h2.
- thumb_width: use this parameter to change the width of the thumbnail. Default is 150px.
- thumb_height: use this parameter to change the height of the thumbnail. Default is 150px.
Examples:
[hb_accommodation_list view_button=”yes” book_button=”yes” redirection_url=”https://mywebsite.com/booking-form/” nb_columns=”4″ ]
[hb_accommodation_list thumbnail_link=”no” title_link=”no”]
[hb_accommodation_list title_tag=”h4″ thumb_width=”300″ thumb_height=”200″]
[hb_accommodation_list accom_ids=”12,14,24,37″ book_button=”no”]
Accommodation list block – Gutenberg
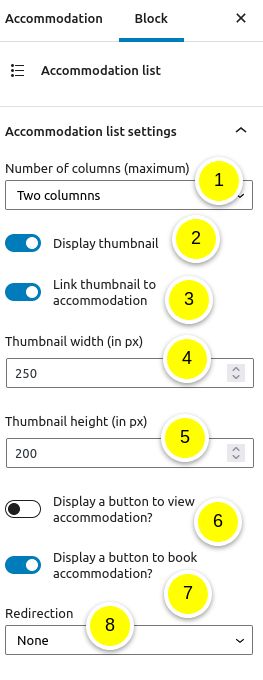
- Select the number of columns to use
- Indicate if you wish to display the thumbnail of the featured image
- Indicate if you include a link to the accommodation page for the thumbnail
- Specify the width of the thumbnail
- Specify the height of the thumbnail
- Indicate if you wish to display a button View the accommodation, which will open a new tab with the accommodation page.
- Indicate if you wish to display a button Book now, which will display the booking form once clicked
- If you have set that you wish to display a “Book now” button, indicate the Redirection page. Customers will be redirected to the page indicated in this parameter to enter their details and continue the booking process.
3. Availability calendar
You will use the availability calendar shortcode or bloc to display a calendar of availability. You can decide for which accommodation type the calendar is as well as the layout(with the shortcode only).
Shortcode [hb_availability]
Use the [hb_availability] shortcode to display an availability calendar.
Parameters:
- accom_id: this parameter can be used to specify which accommodation type is concerned
– add this parameter and set it to “all” if you wish to display a global availability calendar (are you fully booked or not?)
– specify the accommodation id if you want to display the availability calendar of a specific accommodation type
– if you are in the page used to display the accommodation type, you do not need to specify the accommodation id.
You will find the accommodation ID in the accommodation type post right under the title.For example: [hb_availability accom_id=”5″] or [hb_availability accom_id=”all”] - calendar_sizes: add this parameter if you want to specify the sizes of the calendar. Default is “2×1, 1×1”. It means that the calendar will have 2 columns if there are enough space to display them otherwise it will have one column.For example: [hb_availability calendar_sizes=”3×2,2×2,1×1″] (3 columns and 2 rows, or 2 columns and 2 rows, or 1 colum and 1 row, depending on the available space)
- accom_id: this parameter can be used to specify which accommodation type is concerned
Availability calendar block – Gutenberg
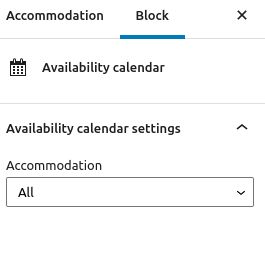
- Select for which accommodation type the availability calendar is
4. Rates table
You will use the rates table shortcode or bloc to display a pricing table. There are various options for the organization of the rates as well as the type of rates to display.
Shortcode [hb_rates]
Use the [hb_rates] shortcode to display a rates table.
Parameters:
- accom_id: add the accom_id parameter if you want to display the calendar outside of an Accommodation page. You will find the accommodation ID in the accommodation type post right under the title. For example: [hb_rates accom_id=”5″]
- type: you can choose to display only one type of rate with the type parameter. There are 3 types of rates: normal (when there isn’t more people than the normal occupancy), adult (rate per adult above the normal occupancy), child (rate per child above the normal occupancy). Default : normal
For example the following shortcode [hb_rates type=”child”] will only display the rate per extra child. - seasons: use this parameter to display a rates table for one or several seasons only. For example the following shortcode [hb_rates seasons=”low,middle”] will display the rates only for low and middle seasons.
- rule: use this parameter to display a rates table for one “Special rate” booking rule only.
- days: use this parameter to display a rates table for a set of days only
(for example [hb_rates days=”4,5″] will display the rate for the Friday night and the Saturday night only). - show_global_price: set this parameter to yes to show global price instead of a price per night. For example, if you have a weekly rate, you might prefer to display the rate for 7 nights than the nighly rate. Default: no.
- custom_text_after_amount: thanks to this parameter you can display a custom text after the price.
- show_season_name: set this parameter to yes include a column that will show the name of the season. You can customize and translate the name of your seasons (if you have a multi-language site) in HBook > Text > Rate table Default : yes.
- chronological: set this parameter to “yes” to order the seasons in chronologiCal order in the rate table. Default : no.
Examples:
[hb_rates show_global_price=”yes” custom_text_after_amount=”per week”] will display a global price with “per week” appended after the rate amount.
[hb_rates season=”high” rule=”midweek”] will display a table rate for “High” season and “Midweek” special rate rule only.
[hb_rates show_season_name=”no” chronological=”yes”] will display a table rate for all my seasons for the accommodation base rate. The table will order the season by chronologiCal order and it will not show the name of the season.
Rates table block – Gutenberg
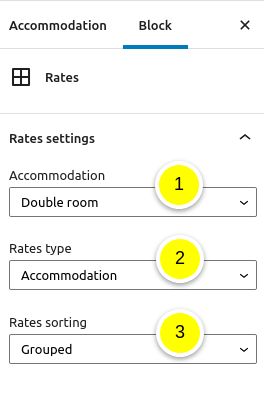
- Select for which accommodation type the availability calendar is
- Select for which rate type you wish to display : the accommodation rate, the extra adults or extra children rates
- Select how the rates should be sorted: chronologically or grouped by seasons. This setting is important only if you have seasons that have different periods.
5. Reservation summary and Thank you page
You will use the Reservation summary shortcode or bloc only if you use a Thank you page where you redirect the customer for the reservation confirmation screen, known as “Thank you” page.
Shortcode [hb_reservation_summary]
Use the [hb_reservation_summary] shortcode in your “Thank you” page, if you use the “thank you_page_url” parameter in a booking form shortcode. When customers are redirected to your “Thank you” page, they will see the reservation confirmation screen with the summary of the reservation.
Parameters: none
Reservation summary block – Gutenberg
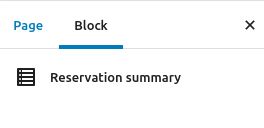 There are no parameters for this block
Reservation page
In this section of the documentation, you will find information regarding the Reservations sub-menus of HBook menu. 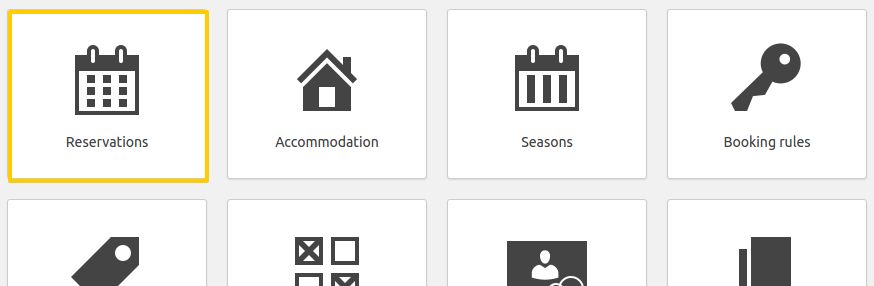
All reservations made on your website will appear in the Reservation page. The reservation page is separated in 6 parts.
- Calendar
- Block accommodation
- Add a reservation
- Reservations list
- Archived reservations
- Export Reservations
A notice can appear at the top of the Reservations page if there has been any errors of synchronization. See here to best understand what the notifications means. You can disable the display of notifications in iCal sync settings menu.
1. Calendar
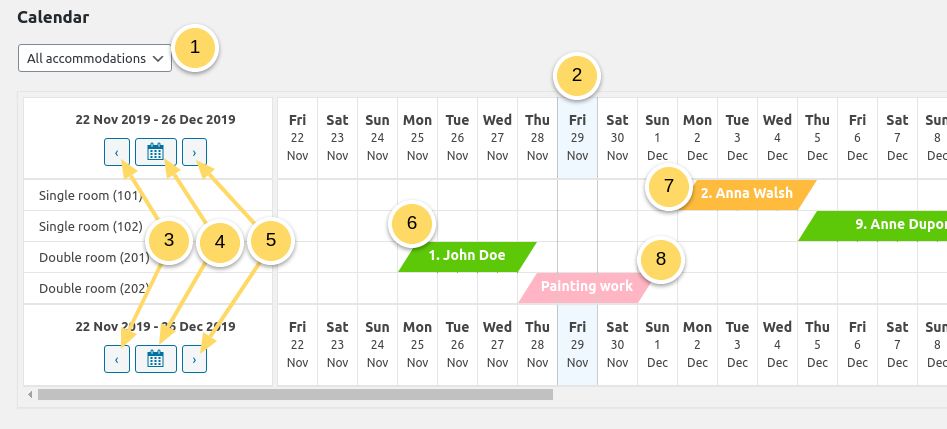
- Select which accommodation type you wish to be displayed
- The current day is highlighted in light blue
- Go two weeks backward.
- Select a month of a year from the pop-up calendar
- Go two weeks forward.
- A confirmed reservation will appear in green
- A new reservation will appear in yellow.
- A blocked accommodation will appear in pink
2. Block accommodation
This is the tool you can use to set accommodations as unavailable. It can be useful if you have several closure periods during the year for example or if you receive booking from other source and wish to update availability without entering the reservation details. 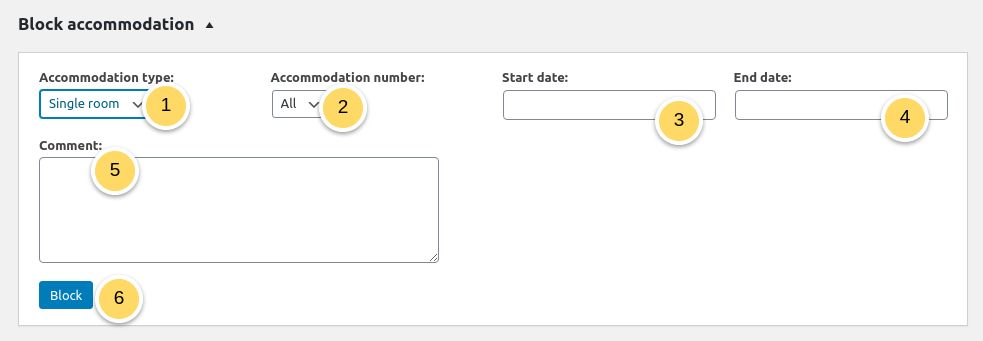
- Select which Accommodation types are concerned.
- Select which Accommodation numbers are concerned.
- Select the date From when the accommodation is unavailable.
- Select the date up To when the accommodation is unavailable.
- Add a comment if you wish.
- Click on Block accommodation
A list of the accommodation you have blocked will be shown.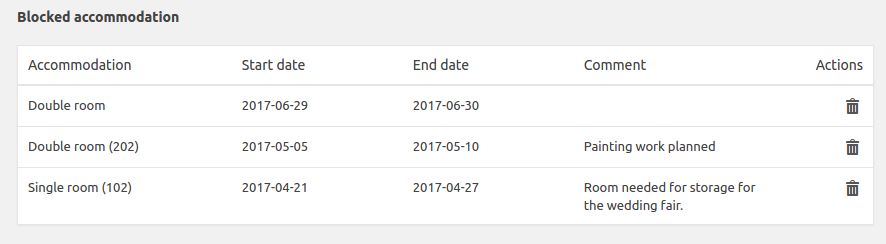
3. Add a reservation
- Here you can manually add reservation. It can be used if you receive reservations from other source (phone, email…) and wish to enter the full details of the booking.

- Select a check-in date.
- Select a check-out date.
- Select the number of adults and children.
- Select the accommodation type.
- Click on Check price and availability
- Here you can manually add reservation. It can be used if you receive reservations from other source (phone, email…) and wish to enter the full details of the booking.

- A list of available accommodation types will be displayed and you will select the accommodation:
- A list of available accommodation types will be displayed and you will select the accommodation:
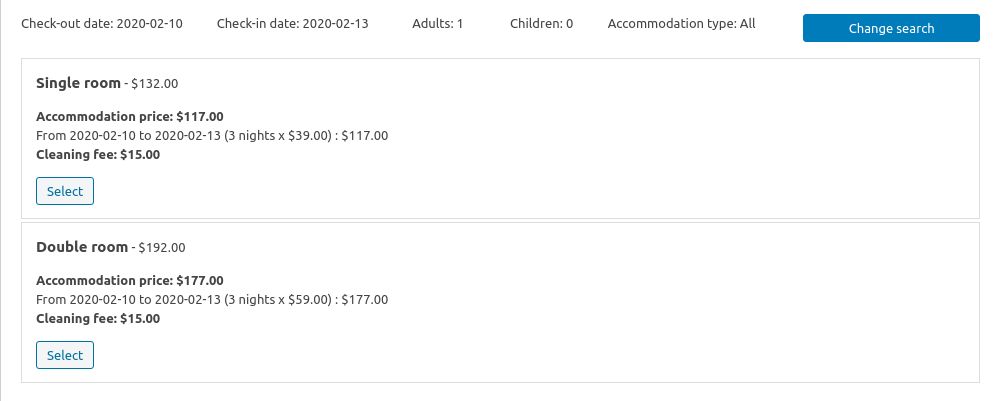
- Once you have selected the accommodation type, you will provide the booking and customer information:

- Select the accommodation number
- Select the extra services
- You can set a different price than the one calculated by HBook. For this you will use a discount (fixed or percentage).
- You will be shown with the details of the global fees calculated for the booking
- You will provide customer information: you can select the customer for a returning customer or enter full customer details
- Here you can add a comment for the reservation
- If you have a multi-language plugin, you will as well be able to select the reservation language for the reservation
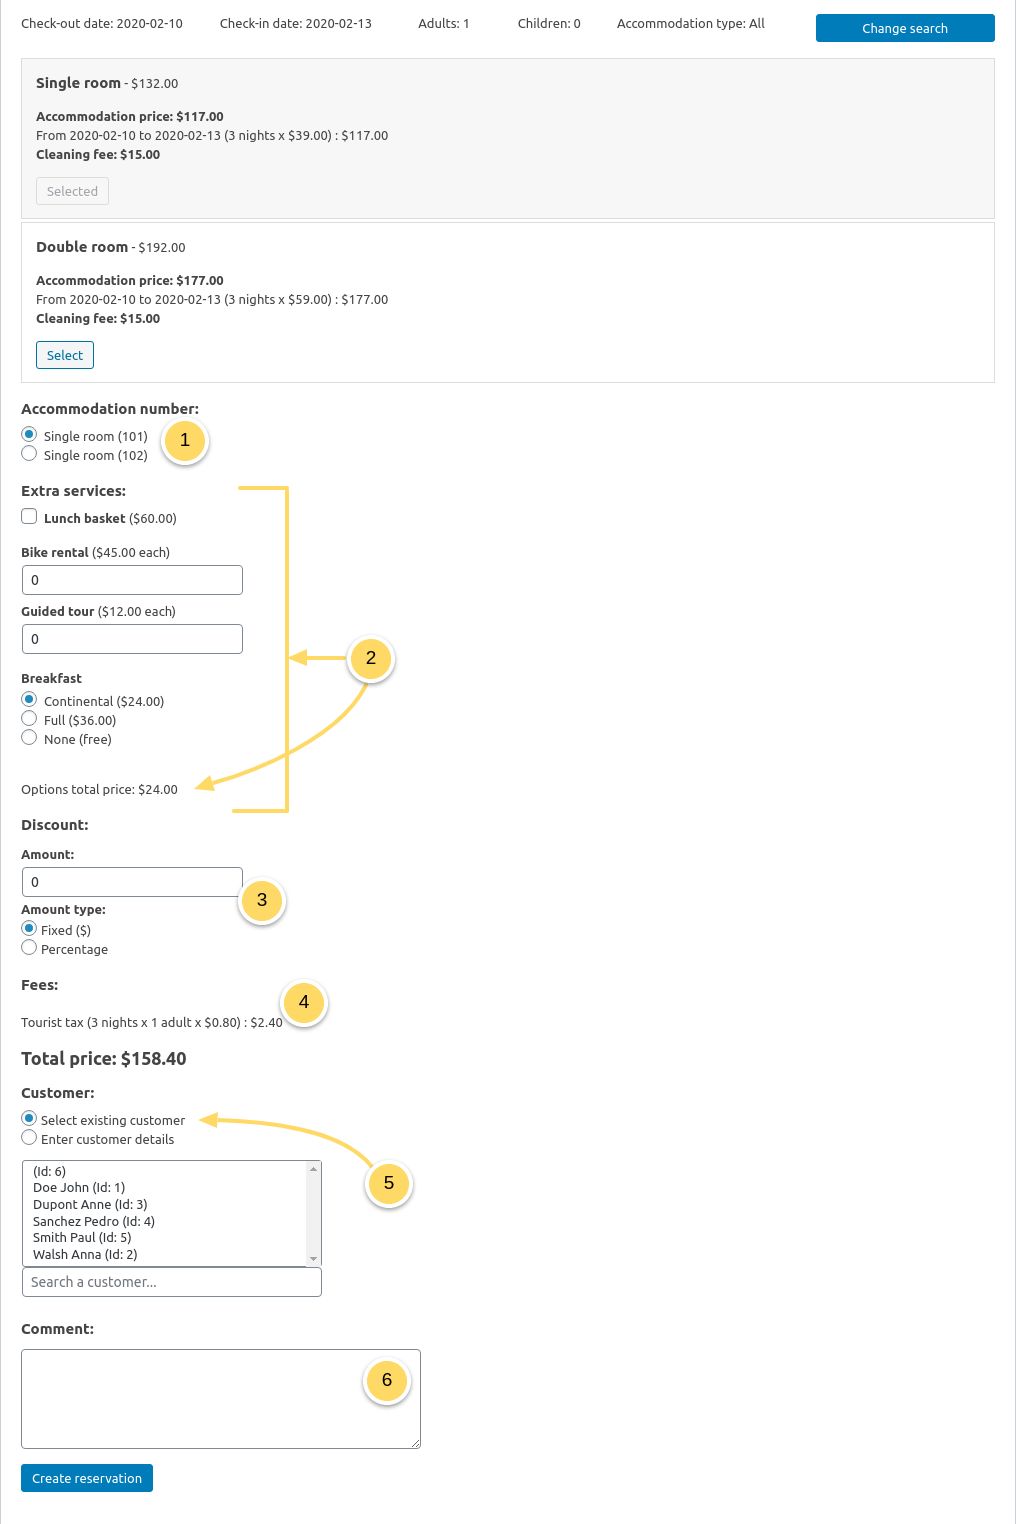
4. Reservation list
Below is an example of what could be a reservation list: 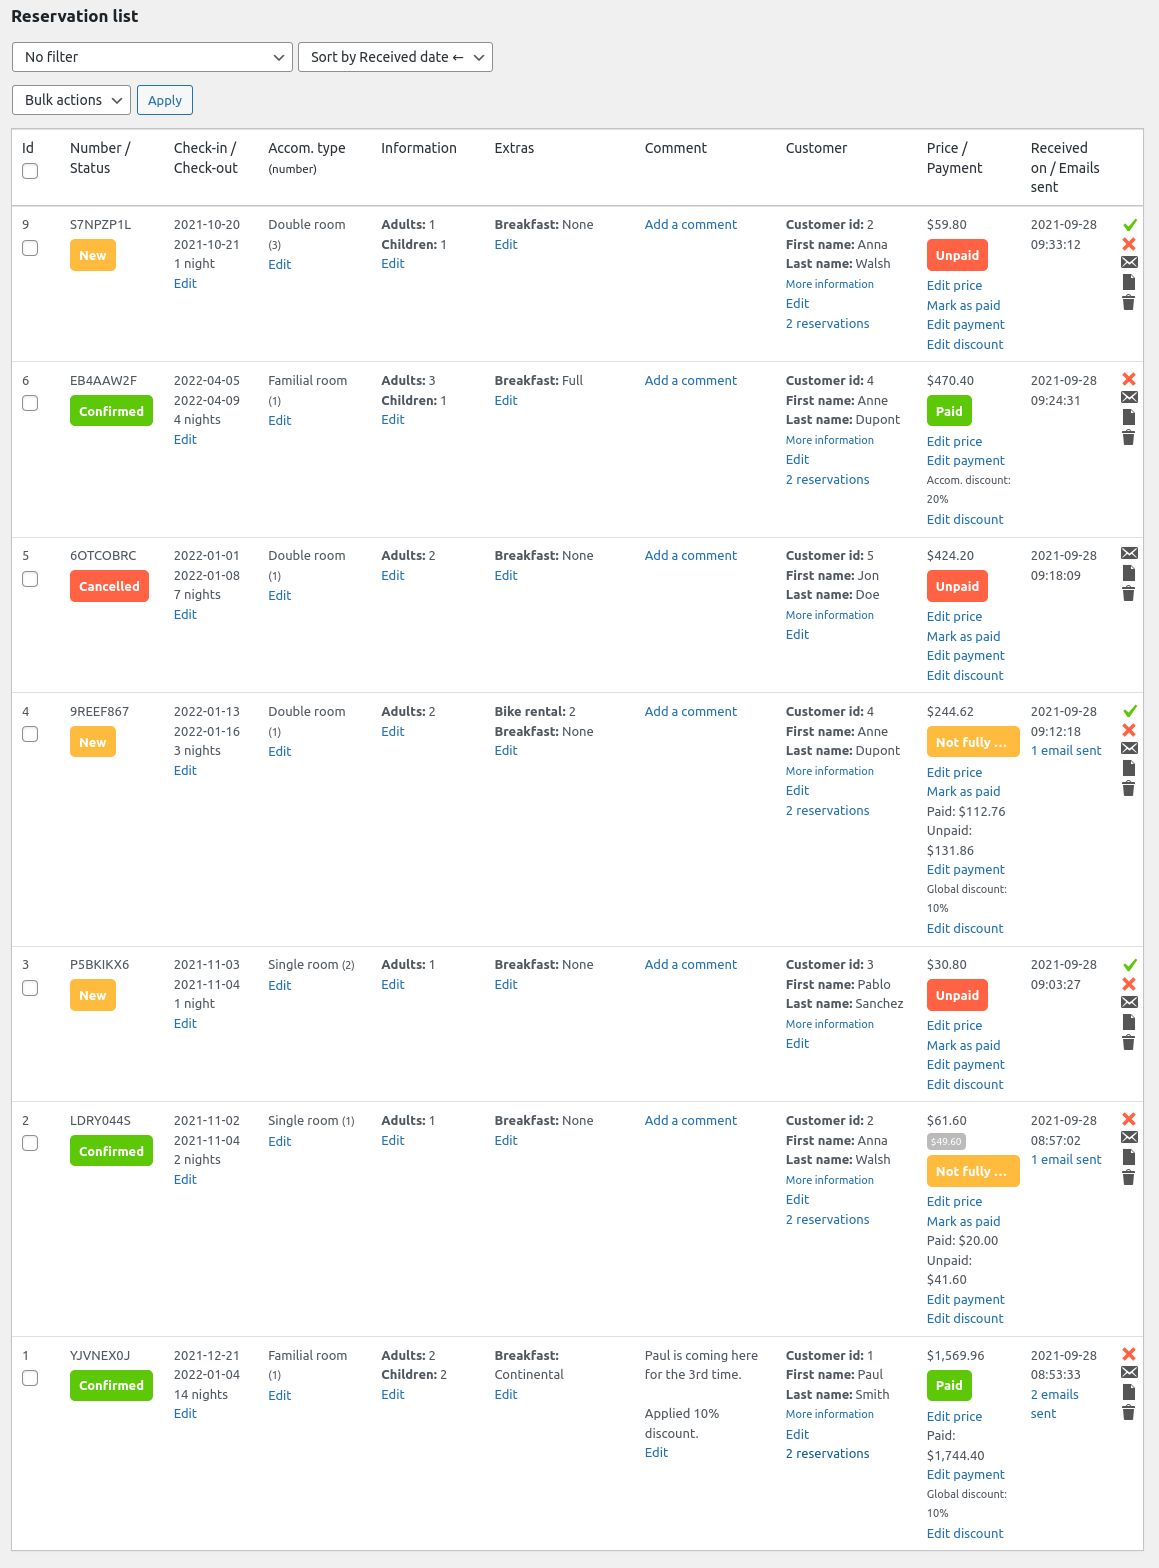
Reservation sorting and filtering

- You can filter reservations by id, by reservation number, by customer, by status, by check-in date, by check-out date or by check-in and check-out date, by active reservation, by accommodation.
- You can sort reservations by received date or check-in date.
Column “Reservation status”
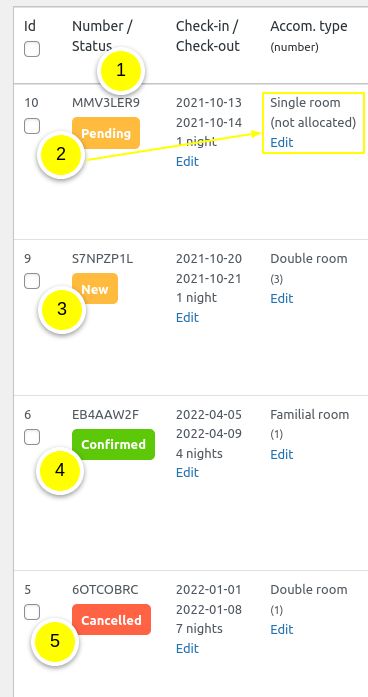
- If you have set in that you wish to display a reservation number it will be shown here.
In HBook > Misc > Status of reservations, you can set the default status of the reservations when they are done on your website front-end, added from the admin or imported with the iCal sync.
A reservation can have 4 different status:
- Pending: the reservation needs confirmation. A pending reservation do not appear in the calendar of reservation. You can view that status only if you have set in HBook settings->Confirmation settings that a reservation have to be confirmed before dates are blocked out.
- Cancelled: the reservation has been cancelled but has not been deleted (you can still access details about this reservation but it will not appear in the calendar).
- Confirmed: this can be set as the default reservation status. When clicking on the “Confirm” action, a reservation can change status from “Pending” to “Confirmed” if you accept the request (See Confirmation settings or from “New” to “Confirmed” to ackowledge you read it.
- New: this can be set as the default reservation status. The reservation has just been received and you have not yet acknowledged you read it (by clicking the green tick).
Columns “Check-in/Check-out”, “Accommodation type”, “Information”, “Extras” and “Comment”
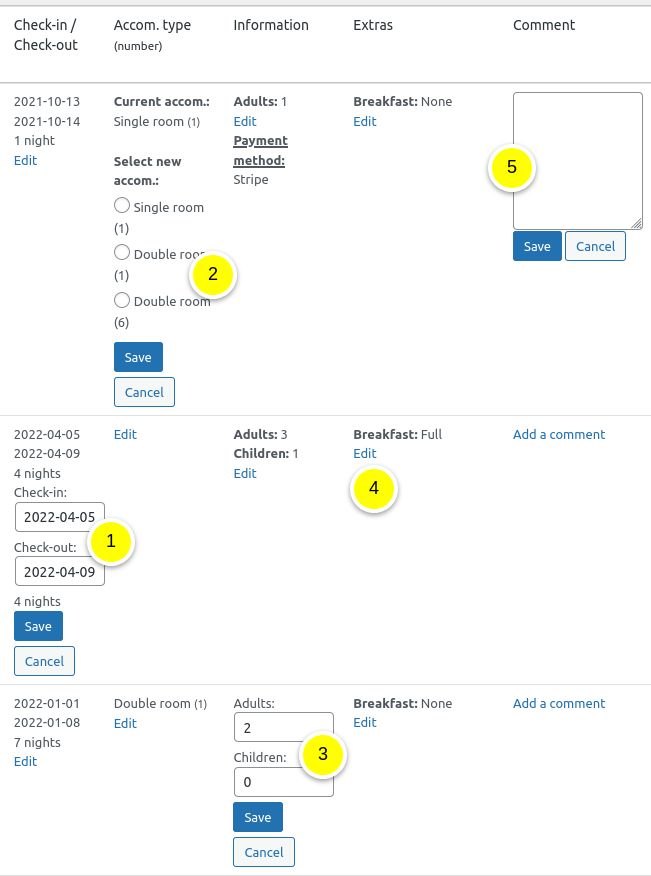
- To edit the dates of a reservation: click on Edit and then enter the new dates.
- To change the accommodation type/number that has been allocated to a reservation: click on Edit and select the new accommodation type/number amongst the available accommodations
- To change the number of guests: click on Edit and modify
- Here you can see the extra-services selected
- To add a comment, click on Add a comment. Comments can be edited too.
Columns “Customer”, “Price/Payment”, “Actions”
- By clicking on “More information”, you will see the full customer details. To edit the customer details: click on Edit and add/edit the information.
- A reservation can have three payment status:
- Unpaid: no payment has been made for this reservation
- Not fully paid: the reservation has been only partly paid (for example only deposit has been paid)
- Paid: the reservation has been fully paid
- All payments information are displayed : amount paid, amount unpaid, discount value, security bond amount.
- You can edit the price, the price paid and the remaining balance by clicking on Edit payment. You can as well Mark as paid.
- It is possible to add or edit a Discount on the accommodation price or on the global price. You will see the discount info.
- If there has been a modification in the price of the reservation (you have edited the dates, number of persons or set a discount), the previous price will be shown with grey background.
- You will see an email log for the reservation
- There are various actions that can be done for a reservation : Confirm, Cancel, Delete, Send an email, Open a document or Delete. We provide details about each below.
With Stripe payment gateway (only), you can charge or refund a credit card that has been saved: click on Charge and enter the amount to be charged. Or click on “Refund” and enter the amount to refund.
Actions on a reservation
- You can do
5 types of actions
- on a reservation:
- Mark as Confirmed:
- If you have set that a reservation have to be confirmed before dates are blocked out, this action will add the reservation to the calendar
- If reservation do not have to be confimed, then this action will not do anything apart changing the statut to Confirmed which in this case mean that you acknowledge you have read the reservation.
- If you have set email templates that are sent upon confirmation, they will be automatically sent.
- Cancel
- Send an email
- Select the template you wish to use. You can set different email templates in Emails
- Edit the message if you wish to customize it.
- Select any attachment you wish to send
- Mark as Confirmed:
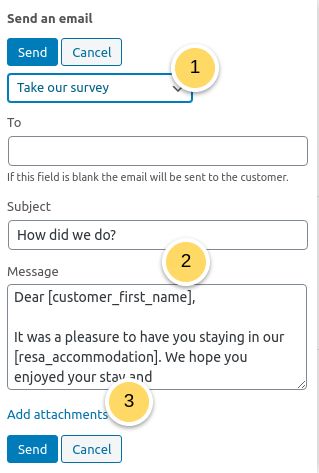
- Open a document: you can select among the documents set in Documents

- Delete: note that a deleted reservation can not be restored as it is erased from the database.

5. Archived Reservations
In order to maintain a readable list of reservation and to improve loading speed, HBook can automatically archive past reservations.
- Archived reservations are listed per month and when clicking on the month, you will be able to view all reservations from this specific month.
- By default, reservations are automatically archived when check-out was in the second-last month from current month. You can customize the archiving delay in HBook > Misc > Misc

6. Export Reservations
It is possible to export your reservation in .csv file, which can be used for example with Excel. 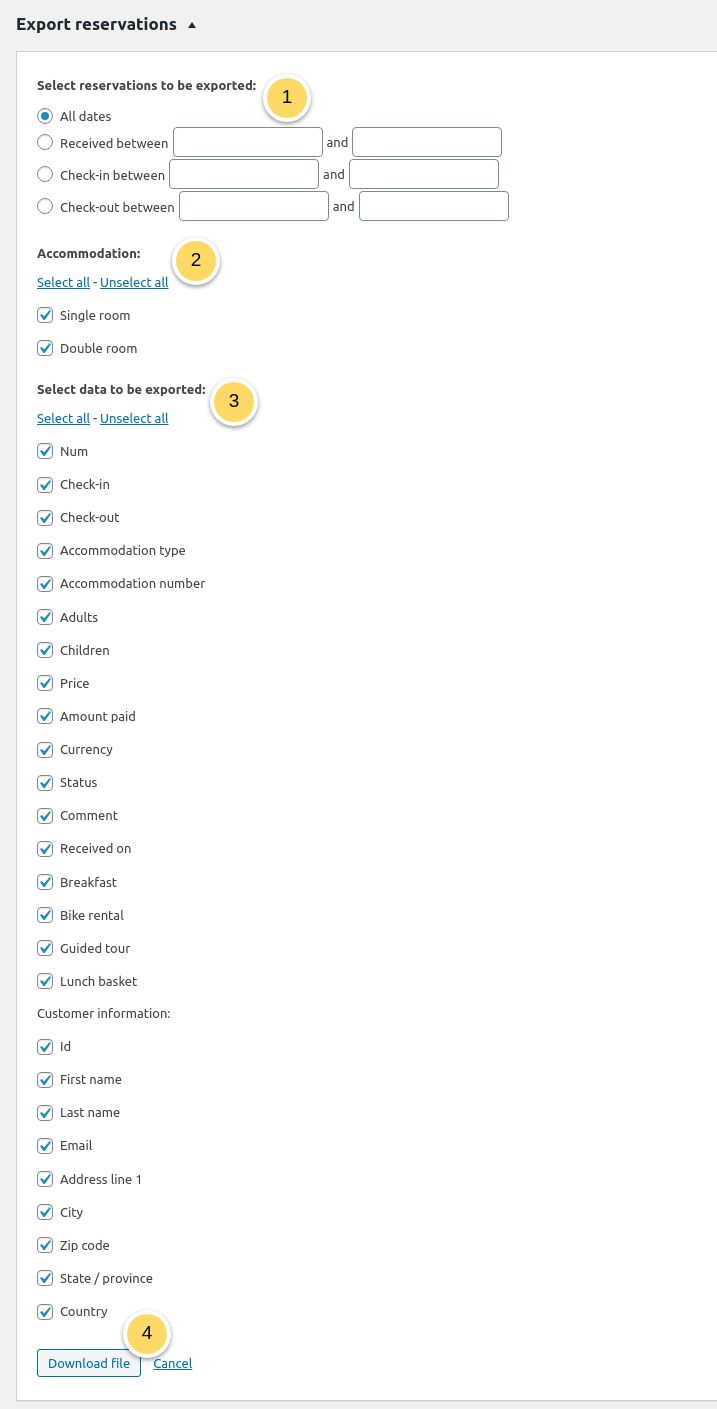
- Filter the reservations you wish to export
- Select the Accommodation for which you wish to export
- Select the data to be exported from all the reservation and customer info
- Click on Download
Customers
In this section of the documentation, you will find information regarding the Customers sub-menu of HBook menu. You can here manually manage the customer details and list.

This is where are listed all your customers. A customer id is associated to a customer email, which means that if a reservation is done with an existing customer email, any information associated to the “Customer” in HBook > Details Form will be updated by HBook if modified. 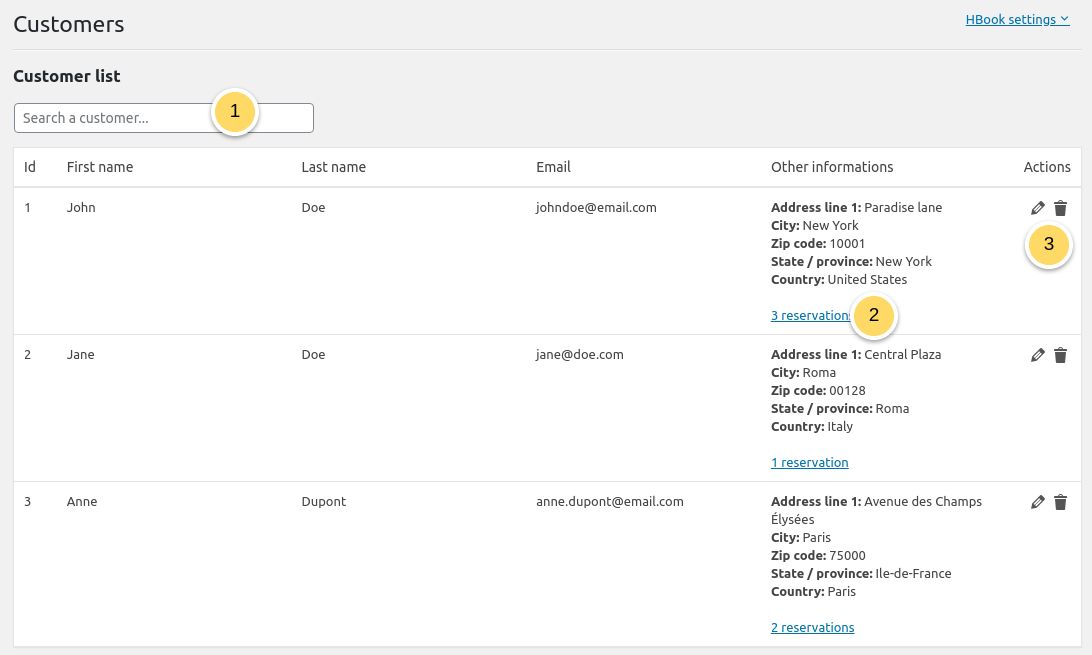
- You can search the customers table. You can as well sort the customers by id or last name
- You can check the history of reservations of a customer. If you click on the number of reservations, you will see the list of his reservations with all details
- It is possible to edit customer details or as well to delete the customer which will remove it definitely from the list.
Documents
In this section of the documentation, you will find information regarding the Documents sub-menu of HBook menu. You can here manually manage the customer details and list.
This is where you can create document templates. In the list of reservation, you will find an action which is “Open document”. You can select one of the template documents created and HBook will generate it dynamically. This can be very useful if you wish to print out invoices, contracts, booking record, receipts, etc… 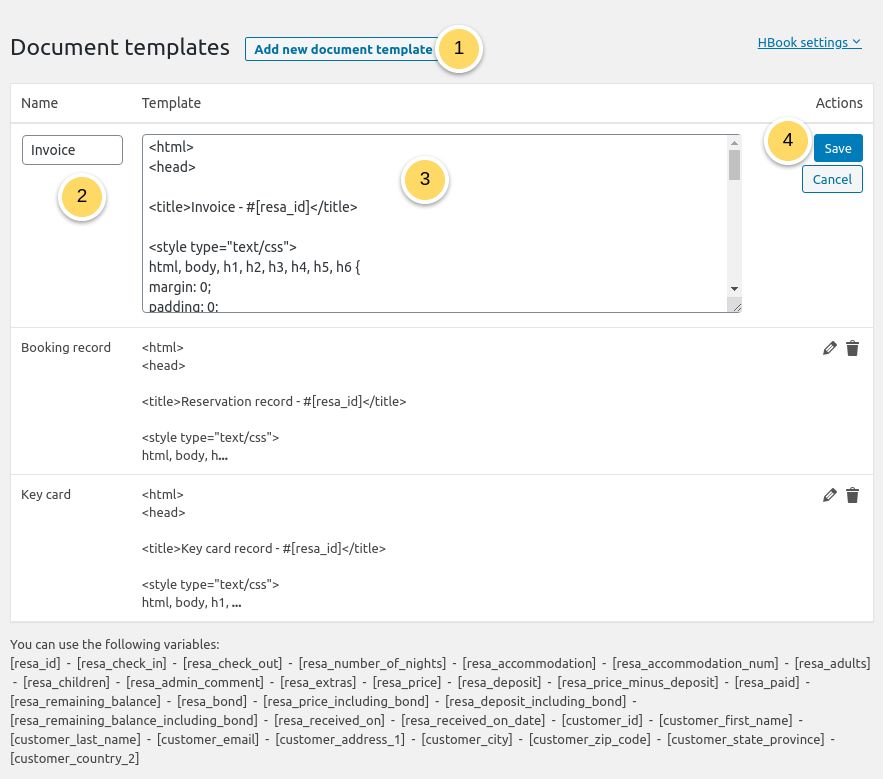
- Click on Add new document template
- Give a name to the template.
- Add the HTML content of your template. You can use all variables listed.
- Do not forget to save.
Payment gateways add-ons for HBook
HBook includes Stripe and PayPal. We support as well other payment gateways for which we have developped add-ons.
Please find below documentation for the installation and set up of our add-ons for HBook:
- 2Checkout
- Authorize.net
- Axepta – BNP Paribas
- BarclayCard
- BillPlz
- CardLink – Eurobank and Alphabank
- Cecabank
- Clic&Pay – Crédit du Nord Group
- Converge
- E-Transactions Up2Pay – Crédit Agricole
- Instamojo
- Iyzipay
- Lyra
- Mercadopago
- Mercanet
- Mollie
- Monetico – Crédit Mutuel, CIC, Desjardins
- Montonio
- OnePay Vietnam
- PayBox
- PayFast
- PayLine
- PayPlug
- Payrexx
- Paysera
- PayU Poland/Hungary/Czech Republic
- PayU Romania/Rusia
- PayU Latam
- PayU Money
- PayZen
- Razorpay
- RedSys
- Scellius – La Banque Postale
- Sogecommerce – Société Générale
- Square
- SystemPay – Caisse d’Épargne and Banque Populaire
- Viva Wallet
Once you have downloaded the zip of the add-on, you can upload it and activate it in Plugins menu as you would do with any other plugin.
For all payment gateways, two environments are possible:
- Test or Sandbox: these are fake payments to test that everything is working as expected
- Live: these are real payments
You can modify any text displayed by the add-ons in HBook > Text. You can add some text at the bottom of the form and for some payment gateways display icons as well.
2Checkout for HBook
- Once you have activated 2Checkout for HBook plugin in you need to validate the licence in HBook > Licence.
- Set 2Checkout as active payment gateways in HBook > Payments > Active payment gateways
- Enter your 2Checkout information in HBook > Payment > 2Checkout settings These settings are the same for Sandbox and Live environment. Only the setting “Live” or “Test” will change the 2Checkout payment environment to real or sandbox payments. You can view both environments transactions in your 2Checkout dashboard.

- Once you have activated 2Checkout for HBook plugin in you need to validate the licence in HBook > Licence.

- In your 2Checkout dashboard, -you will find your Merchant ID and your Secret key in Integrations > Webhook and API.

- In your 2Checkout dashboard, -you will find your Merchant ID and your Secret key in Integrations > Webhook and API.
- You need to indicate under Integrations > Webhook and API that you “Enable return after sale” and to check the option “Header URL”. We take care of the return url ourselves, nothing else to do. This is very important as it will force the redirect to your website once the payment is completed and HBook needs it process the result of the transaction, update the reservation details, send the emails, etc…. See screenshot below:

Authorize.net for HBook
- Once you have activated Authorize.net for HBook plugin, you need to validate the licence in HBook > Licence.

- Set Authorize.net as active payment gateways in HBook > Payments > Active payment gateways
- Enter your Authorize.net information for “Sandbox” or “Live” environment in HBook > Payment > Authorize.net settings These settings are different in Sandbox and Live environment.

- Once you have activated Authorize.net for HBook plugin, you need to validate the licence in HBook > Licence.


- In your Authorize.net dashboard, you will need to create a Webhook in Account > Business settings > Webhooks. Please check screenshot below to understand how to set up the Webhook. The “name” does not really matter but the url structure is important : you append “/confirmation-authorize” to your WordPress site url.
 You will indicate it as “www.domain.com/confirmation-authorize”, changing “www.domain.com” to your actual WordPress site url. If you have pre-production and production sites, please make sure you enter each time the correct webhook. In Sandbox Authorize.net dashboard, you enter the pre-production webhook url. In Live Authorize.net dashboard, you enter the production webhook url
- In your Authorize.net dashboard, you will need to create a Webhook in Account > Business settings > Webhooks. Please check screenshot below to understand how to set up the Webhook. The “name” does not really matter but the url structure is important : you append “/confirmation-authorize” to your WordPress site url.
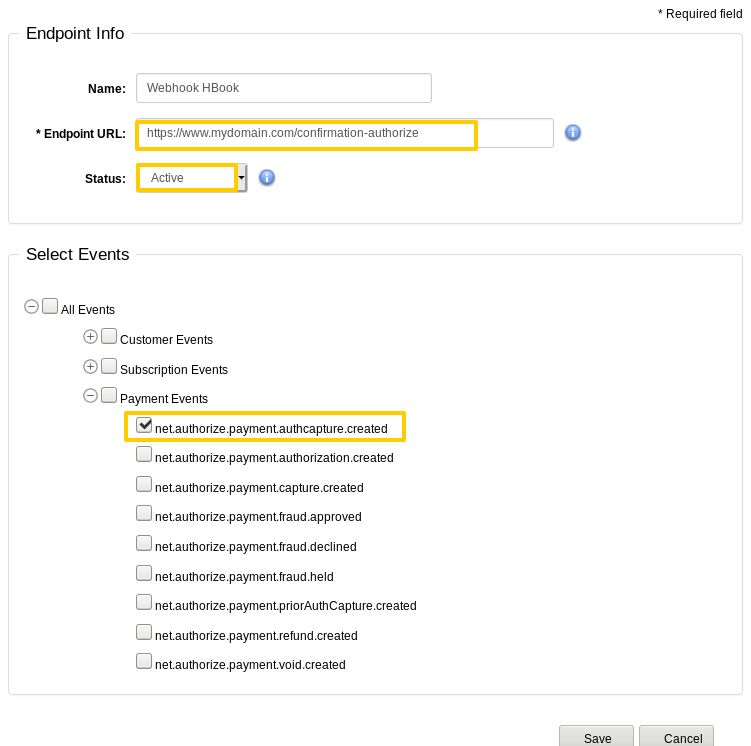 You will indicate it as “www.domain.com/confirmation-authorize”, changing “www.domain.com” to your actual WordPress site url. If you have pre-production and production sites, please make sure you enter each time the correct webhook. In Sandbox Authorize.net dashboard, you enter the pre-production webhook url. In Live Authorize.net dashboard, you enter the production webhook url
- Make sure that you are in “Live” mode in Account > Security settings > Test mode. This needs to be always in “Live” even when on Sandbox environment ; else the webhooks are not called. No real transactions will take place when using Authorize.net Sandbox account, even when set to “Live” in Test mode settings. 😉


How to create a Sandbox Authorize.net and a Live Authorize.net account?
- You can create a Sandbox Account from here.
- You can sign up for a Authorize.net account from here and the login url is : https://account.authorize.net/
Where to find the Authorize.net API information to be added in HBook > Payments > Authorize.net settings?
- You will find the API information in your Authorize.net dashboard : Account > Security Settings > API Credentials & Keys. You will need the “API Login ID” and the “Transaction Key”. You will as well need to generate a “Signature Key”.
- You need to use the “API Login ID”, “Transaction Key” and to create a “Signature Key”.
- Please note that these are different for Sandbox and Live
Which test card can I use?You can check the list of test cards here.
What to do when moving from Sandbox to Live transactions for Authorize.net?
- Enter the Live Authorize.net “API Login ID”, “Transaction Key” and create a “Signature Key”
- Add the production webhook url in your Authorize.net dashboard
Axepta for HBook – BNP Paribas
- Once you have activated Axepta for HBook plugin in you need to validate the licence in HBook > Licence.

- Set Axepta as active payment gateways in HBook > Payments > Active payment gateways
- Enter your Axepta information in HBook > Payment > Axepta settings For the Test environment, the BNP_DEMO_AXEPTA test account is used by default. The Merchant ID, Blowfish Key and HMAC Key are provided by BNP Paribas. If you only allow credit card payments, you can indicate it in the settings. The customer will be redirected directly to Axepta credit card form screen. Else, the customer will go through Axepta payment method selection screen.


BarclayCard for HBook
- Once you have activated BarclayCard for HBook plugin in you need to validate the licence in HBook > Licence.
- Set BarclayCard HBook as active payment gateways in HBook > Payments > Active payment gateways
- Enter your BarclayCard information in HBook > Payment > BarclayCard settings
The “SHA-IN passphrase” and “SHA-OUT passphrase” are different for each environment.
- Once you have activated BarclayCard for HBook plugin in you need to validate the licence in HBook > Licence.
- In your BarclayCard dashboard, you will find your SHA-IN passphrase in Confirguration > Technical information > Data and origin verification .

- In your BarclayCard dashboard, you will find your SHA-IN passphrase in Confirguration > Technical information > Data and origin verification .
- You will need to set correctly BarclayCard for the “Transaction feedback” and to get your “SHA-OUT passphase”. Please check below what needs to be set in Confirguration > Technical information > Transaction feedback This is very important as it will force the redirect to your website once the payment is completed and HBook needs it process the result of the transaction, update the reservation details, send the emails, etc…. See screenshot below:

- You will need to set correctly BarclayCard for the “Transaction feedback” and to get your “SHA-OUT passphase”. Please check below what needs to be set in Confirguration > Technical information > Transaction feedback This is very important as it will force the redirect to your website once the payment is completed and HBook needs it process the result of the transaction, update the reservation details, send the emails, etc…. See screenshot below:
- It is advisable to do the following for a better design of the payment page :
- In Configuration > Template > Template selection, choose the “BarclaysResponsivePaymentPageTemplate”
- In Configuration > Template > File manager, upload a logo.jpg for the logo of the website to be added to the payment page
BillPlz Malaysia for HBook
- Once you have activated BillPlz for HBook plugin, you need to validate the licence in HBook > Licence.

- In HBook > Payments > Active payment gateways, you will activate BillPlz.
- In HBook > Payments > BillPlz settings, you will need to add the Secret Key, the X-Signature key, and the Collection ID.


How can I find the Collection ID?You will create a Collection in the menu “Billing” on your BillPlz dashboard. Then you will be able to copy the Collection ID. 
Where to find the Secret Key and the X-Signature key?You will find them in the menu Settings of your BillPlz account. 
CardLink for HBook – Eurobank and Alphabank
- Once you have activated CardLink for HBook plugin, you need to validate the licence in HBook > Licence.
- In HBook > Payments > Active payment gateways, you will activate CardLink.
- In HBook > Payments > CardLink settings, choose if you are using Alphabank or Eurobank payment gateway. You will need to add the following information that is communicated by your bank:


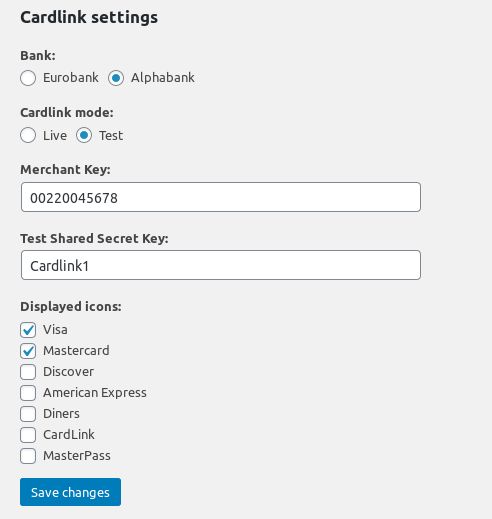
Cecabank for HBook
Cecabank add-on include translation files for Spanish language. If your website/user is in Spanish, you will see the admin and the front-end already translated to Spanish.
- Once you have activated Cecabank for HBook plugin, you need to validate the licence in HBook > Licence.
- In HBook > Payments > Active payment gateways, you will activate Cecabank.
- In HBook > Payments > Cecabank settings, you will need to add the following information to set Cecabank correctly : Merchant ID, Adquirer BIN and Terminal ID.

- You will find all this information in Cecabank > TPV Virtual > Datos generales. Please make sure you are checking the correct environment : “Datos de pruebas” for the Test environment, and “Datos reales” for the Live environment.

- Here are where you can find the Merchant ID, Adquirer BIN and Terminal ID
- This is how you need to setup Cecabank for the transaction status to be communicated by Cecabank to your “URL online OK”. It will always be following the format: https://mywebsite.com/confirmation-cecabank. You will modify “mywebsite” with your own domain name.
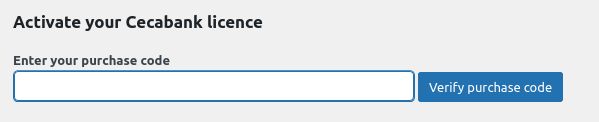
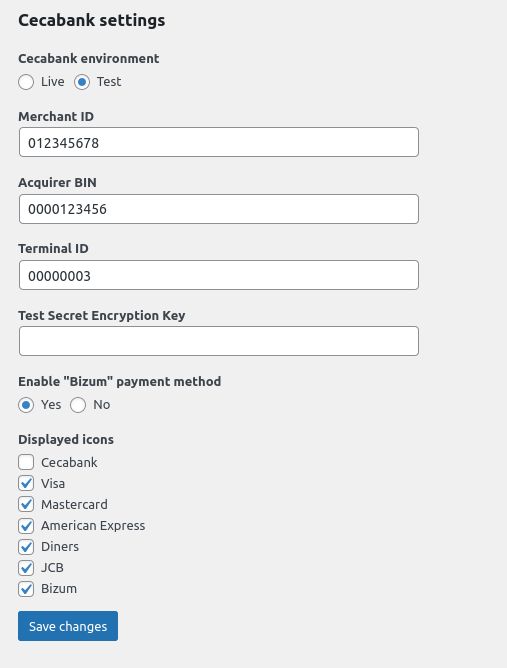
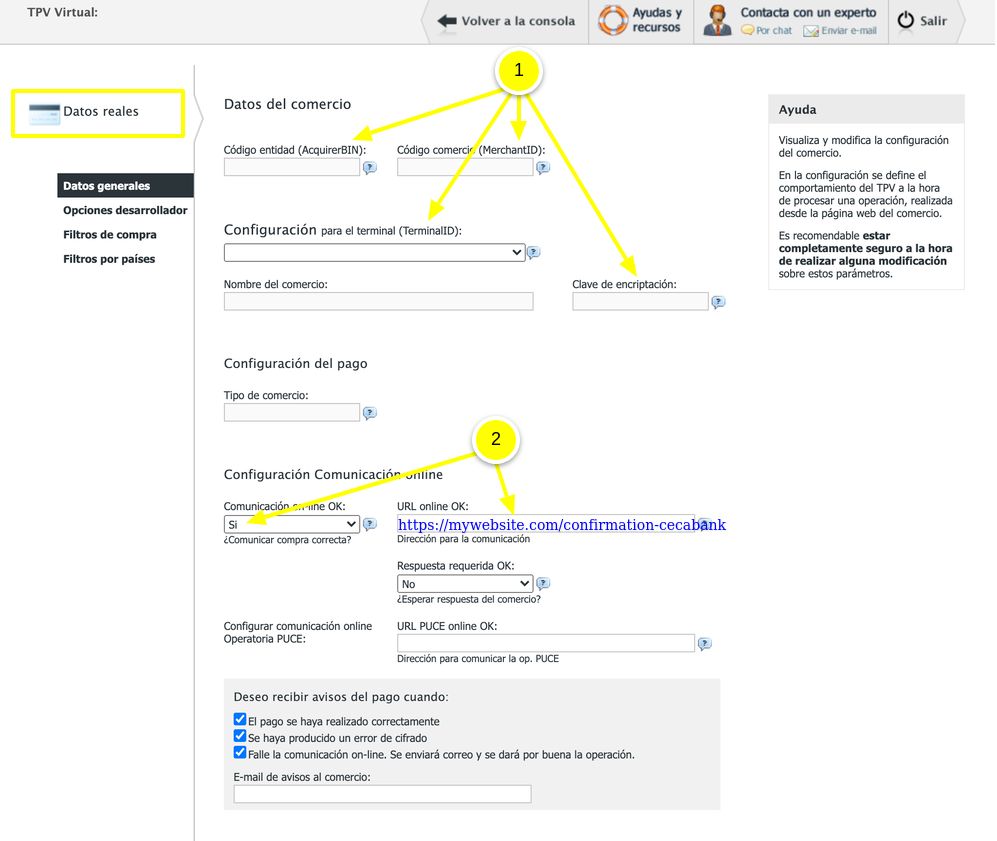
What to do when moving from Test to Live for Cecabank?
- Enter the Live Cecabank “Secret encryption key”
- Add the production “URL online OK” in your Cecabank dashboard
Clic&Pay for HBook – Crédit du Nord Groupe
Clic&Pay add-on include translation files for French language. If your website/user is in French, you will see the admin and the front-end already translated to French.
- Once you have activated Clic&Pay for HBook plugin, you need to validate the licence in HBook > Licence.
- In HBook > Payments > Active payment gateways, you will activate Clic&Pay.
- In HBook > Payments > Clic&Pay settings, set Clic&Pay payment gateway. You will need to add the following information:

- You will find the Shop ID and Keys in Paramétrage > Boutiques > Clés. If you wish to enable “Cheques-Vacances Connect” payment method on HBook, make sure that you are providing the “Shop ID” and “Key” of your CVCO account on Clic&Pay Back Office.

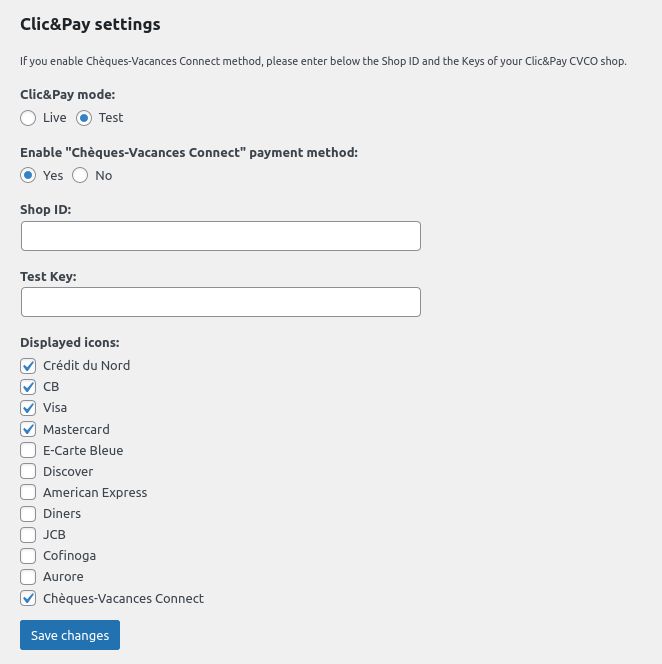
Elavon Converge for HBook
- Once you have activated Elavon Converge for HBook plugin, you need to validate the licence in HBook > Licence.
- In HBook > Payments > Active payment gateways, you will activate Elavon Converge.
- In HBook > Payments > Elavon Converge settings, you will need to add the “Merchant ID”, “User ID”, “Pin”

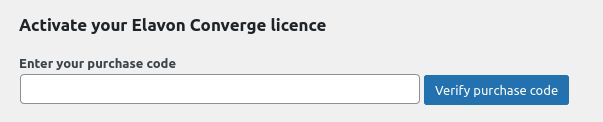
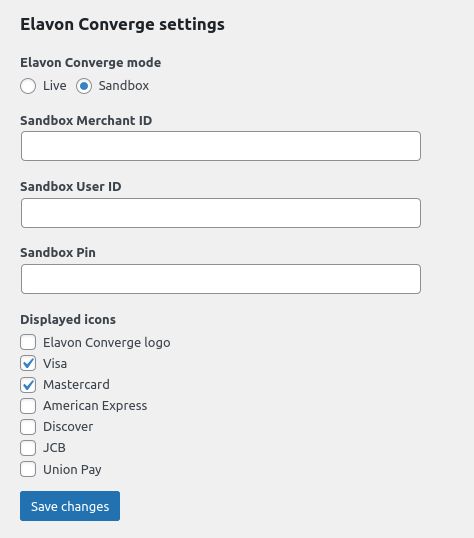
How to create a Sandbox/Demo Elavon Converge account?
- To create a Sandbox/Demo Account, you would need to contact Elavon Converge. You can check what information you need to provide https://developer.elavon.com/na/docs/converge/1.0.0/integration-guide/api_introduction. You will need to communicate your IP address, website URL, and the URL for the Exports script
- The URL for the Exports script will always be created using the following structure: https://mysite.com/confirmation-converge.
Where can I find the PIN for the Elavon converge account?The PIN is associated to the user of the terminal. Go to Employees, then select the User. You will be able to find the PIN. 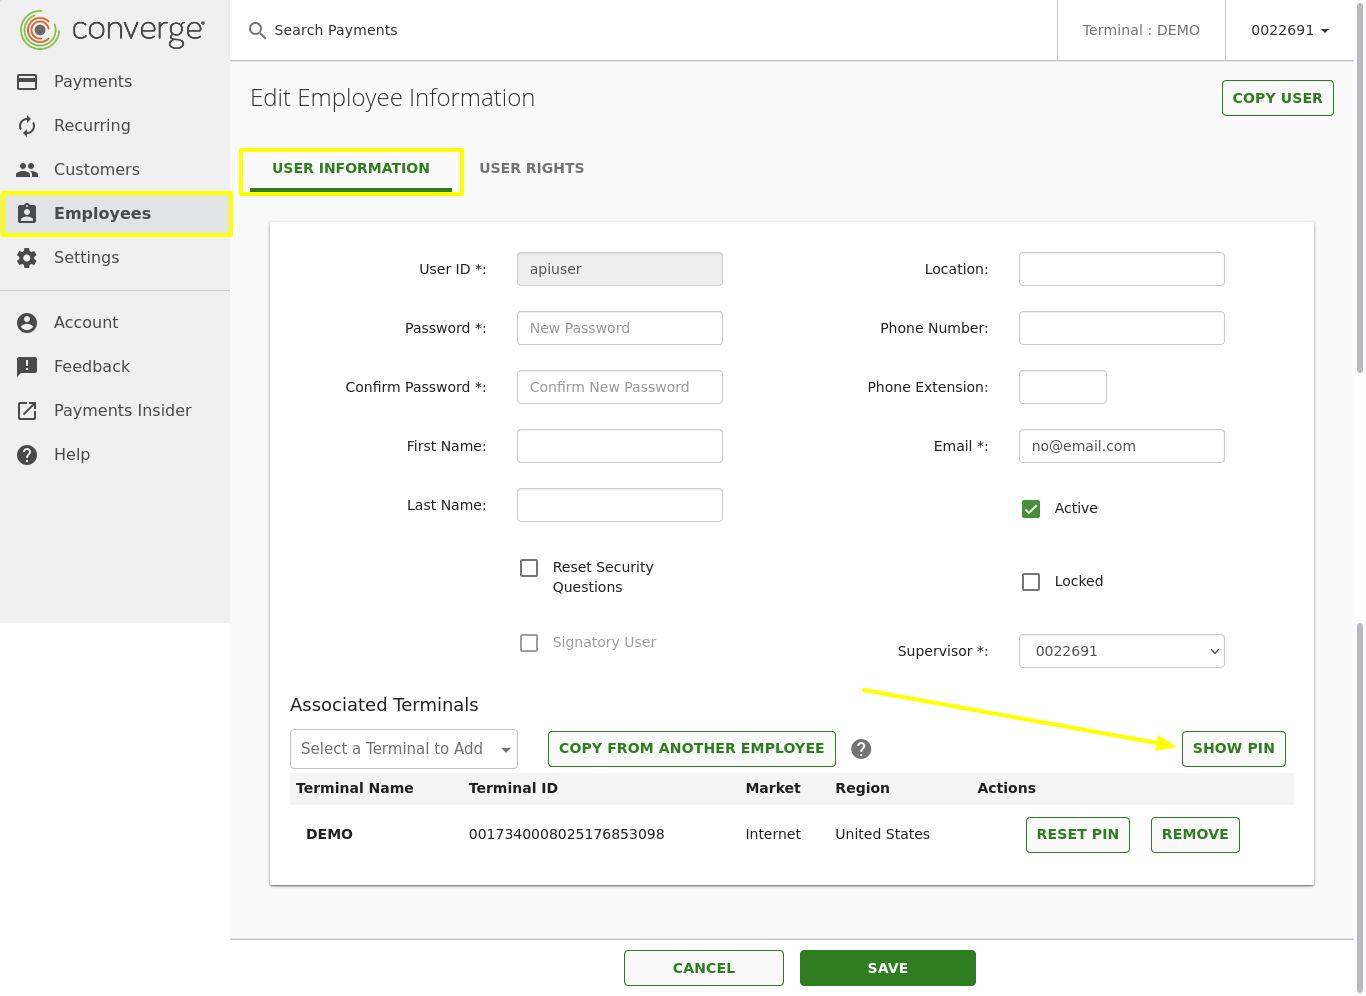
How can I customize the Payment form on Elavon converge?
- Go to Settings > Advanced API Settings > Hosted Payments

- We use the “Payment modal”. Click on Set up
- You can now add customize the payment modal form. We recommend that you add your logo for a better user experience.
What to do when moving from Sandbox to Live for Elavon Converge?
- You will need to make sure that you contact Elavon to provide them with your IP address, website URL, and the URL for the Exports script
E-Transactions Up2Pay for HBook
E-Transactions add-on include translation files for French language. If your website/user is in French, you will see the admin and the front-end already translated to French.
- Once you have activated E-Transactions Up2Pay for HBook plugin, you need to validate the licence in HBook > Licence.

- In HBook > Payments > Active payment gateways, you will activate E-Transactions Up2Pay.
- In HBook > Payments > E-Transactions settings, set E-Transactions Up2Pay payment gateway. You will need to add the following information that is communicated by your bank:

- You can activate “Chèques Vacances Connect” method. You would need to have signed a contract with ANCV and make sure that you inform E-Transactions that you wish to enable this payment method.
Where to find the HMAC?You will need to generate the HMAC Key from Vision dashboard. Please note that the HMAC key is different for Test (Pré-production) and Live(Production).
Instamojo for HBook
- Once you have activated Instamojo for HBook plugin, you need to validate the licence in HBook > Licence.
- In HBook > Payments > Active payment gateways, you will activate Instamojo.
- In HBook > Payments > Instamojo settings, you will need to add the API Key and the Auth token:

Where to find the API Key and Auth token?You will find them in the menu Developers of your Instamojo dashboard.. 
Iyzipay for HBook
- Once you have activated Iyzipay for HBook plugin, you need to validate the licence in HBook > Licence.

- In HBook > Payments > Active payment gateways, you will activate Iyzipay.
- In HBook > Payments > Iyzipay settings, you will need to add the API Key and the Secret Key:

- In HBook > Details form, you will need to create a new field “buyer_identity”. This is a required field for Iyzipay and you have to name it this way in the details form fields, for HBook to be able to recognize it. You can modify the displayed label in HBook > Text > Details form, so you have a proper label for it for your customers.


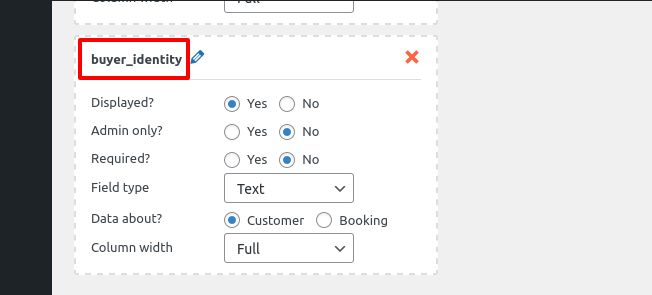
How to create a Sandbox Iyzipay and a Live Iyzipay account?
Where to find the API Key and Secret Key?You will find them in the menu Settings > Merchant settings of your Iyzipay dashboard.. 
Lyra for HBook
Lyra add-on include translation files for French language. If your website/user is in French, you will see the admin and the front-end already translated to French.
- Once you have activated Lyra for HBook plugin, you need to validate the licence in HBook > Licence.
- In HBook > Payments > Active payment gateways, you will activate Lyra.
- In HBook > Payments > Lyra settings, set Lyra payment gateway. You will need to add the following information:

- You will find the Shop ID and Keys in Paramétrage > Boutiques > Clés. If you wish to enable “Cheques-Vacances Connect” payment method on HBook, make sure that you are providing the “Shop ID” and “Key” of your CVCO account on Lyra Back Office.
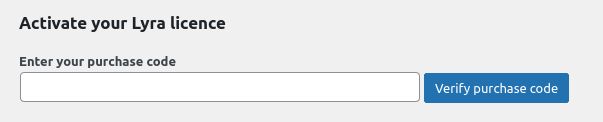
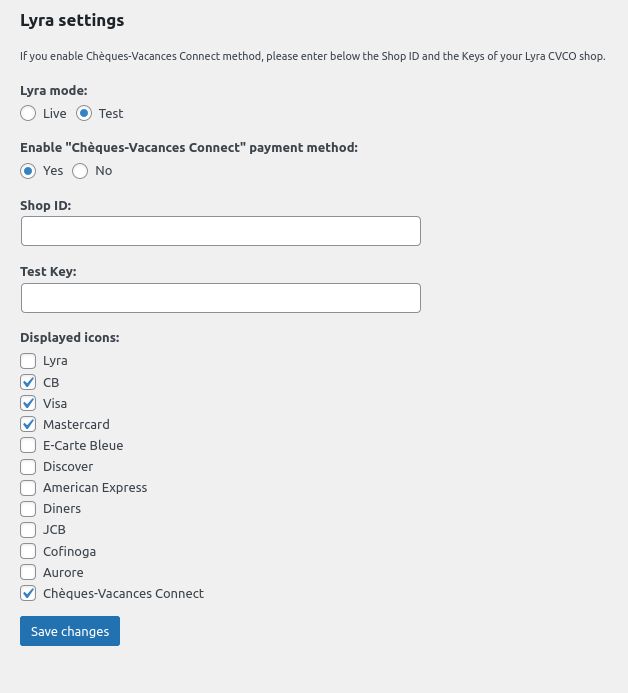
MercadoPago for HBook
MercadoPago add-on include translation files for Spanish language. If your website/user is in Spanish, you will see the admin and the front-end already translated to Spanish.
- Once you have activated MercadoPago for HBook plugin, you need to validate the licence in HBook > Licence.
- In HBook > Payments > Active payment gateways, you will activate MercadoPago.
- In HBook > Payments > MercadoPago settings, you will need to add the following information:


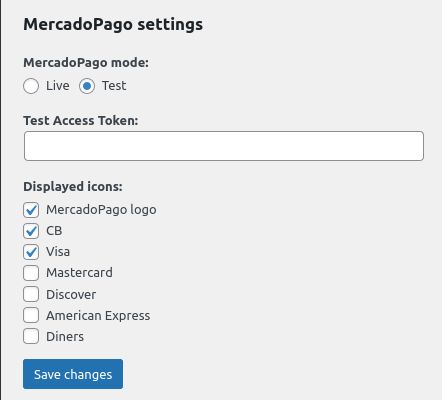
Where to find the Access Token?You will find the Access Token in the Dashboard or in the MercadoPago menu Tu Negocio> Configuración> Gestión y Administración> Credenciales.
Mercanet for HBook
Mercanet add-on include translation files for French language. If your website/user is in French, you will see the admin and the front-end already translated to French.
- Once you have activated Mercanet for HBook plugin, you need to validate the licence in HBook > Licence.
- In HBook > Payments > Active payment gateways, you will activate MercadoPago.
- If you are in Test environment, there is no other settings needed.

- If you are in Live environment, you will need to add the following information. The Merchant ID is providede by BNP Paribas Mercanet.

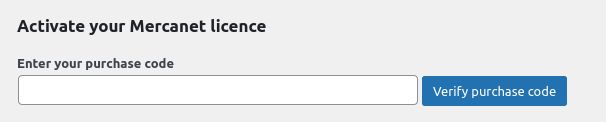
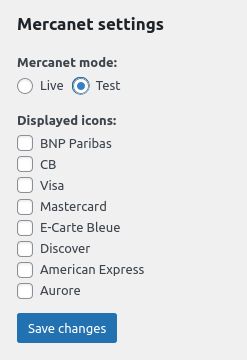
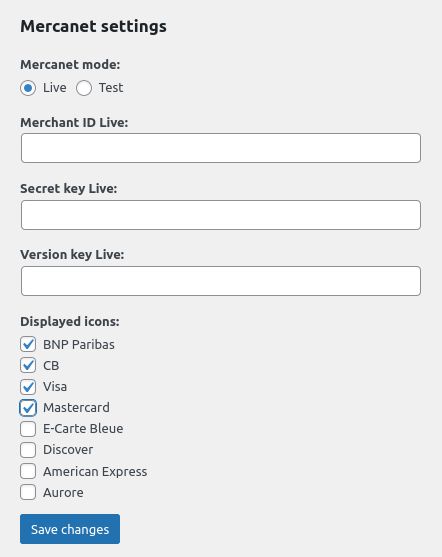
Where to find the Secret Key and Version Key for Live environment?You will find instructions to retrieve your Secret Key and Version Key here on BNP Paribas Mercanet documentation.
Which Test cards to use?You can find the test card details in this section from BNP Paribas Mercanet documentation.
Mollie for HBook
Mollie add-on include translation files for Dutch language. If your website/user is in Dutch, you will see the admin and the front-end already translated to Dutch.
- Once you have activated Mollie for HBook plugin, you need to validate the licence in HBook > Licence.

- In HBook > Payments > Active payment gateways, you will activate Mollie.
- In HBook > Payments > Mollie settings, set Mollie payment gateway. You will need to add the following information:

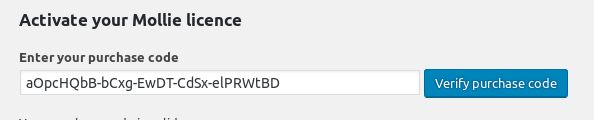
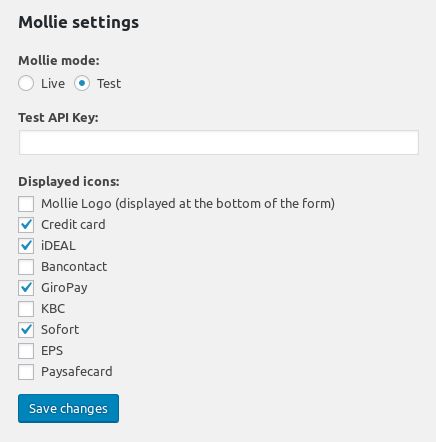
Where to find the API Keys?You will find them in the menu Developers of your Mollie dashboard.
Which payment methods available on Mollie are supported by HBook? Please find below the list of payment methods you can activate and that will work with HBook:
- Credit card
- Ideal
- Bancontact
- GiroPay
- KBC
- Sofort
- EPS
- PaySafeCard
The following methods are not supported:
- PayPal: you would need to use PayPal gateway already included in HBook
- ING and Belfius Pay button
- Bank transfer : you would need to use the “Payment offline” option in HBook
Montonio for HBook
- Once you have activated Montonio for HBook plugin, you need to validate the licence in HBook > Licence.
- In HBook > Payments > Active payment gateways, you will activate Montonio.
- In HBook > Payments > Montonio settings, set Montonio payment gateway. You will need to add the following information:

- If you wish to show the Credit cards option in the payment methods, you will need to have completed the Stripe onboarding through Montonio’s Partner System, for your customers to pay with Credit cards.

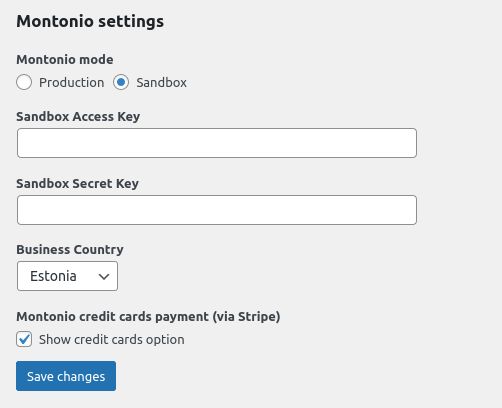
Where to find the API Keys?You will find them in the menu API Keys of your Montonio Store dashboard. Please note that you will have a set of keys for the “Sandbox” environment and another set for the “Live” environment..
Monetico – Crédit Mutuel, CIC, Desjardins
Monetico add-on include translation files for French language. If your website/user is in French, you will see the admin and the front-end already translated to French.
- Once you have activated Monetico for HBook plugin, you need to validate the licence in HBook > Licence.

- In HBook > Payments > Active payment gateways, you will activate Monetico.
- In HBook > Payments > Monetico settings, you will need to add the following information:

- If you have selected the “Retour immediat” option of Monetico, contact Monetico to provide them with your return url. It will always be following the format: https://mysite.com/confirmation-monetico. Please note that you will need to contact them again to update the “Url de retour” if you have a live environment different than your test environment.

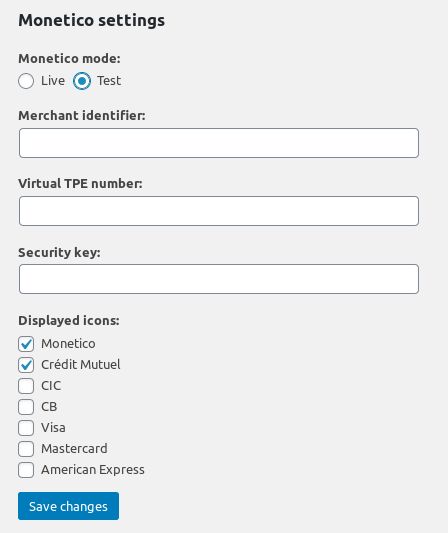
Which credit card can I use for Test environment?When redirected to the Monetico page to pay, you will see a “Test cards” button. This will autofill the credit card data for testing. You can simulate various situation. More details here.
OnePay Vietnam for HBook
- Once you have activated OnePay for HBook plugin, you need to validate the licence in HBook > Licence.
- In HBook > Payments > Active payment gateways, you will activate OnePay.
- In HBook > Payments > OnePay Vietnam settings, set if you are in “Test” or “Live” mode.
- If you are in Test environment, there is no other settings needed.

- Once you have activated OnePay for HBook plugin, you need to validate the licence in HBook > Licence.
If you are in

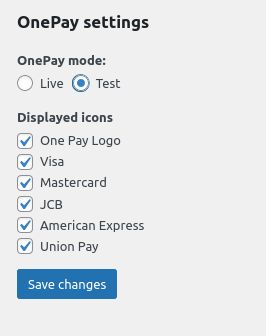
Test
- environment, you will need to add the following information that is communicated by OnePay: Merchant ID, Access code and Hash key.
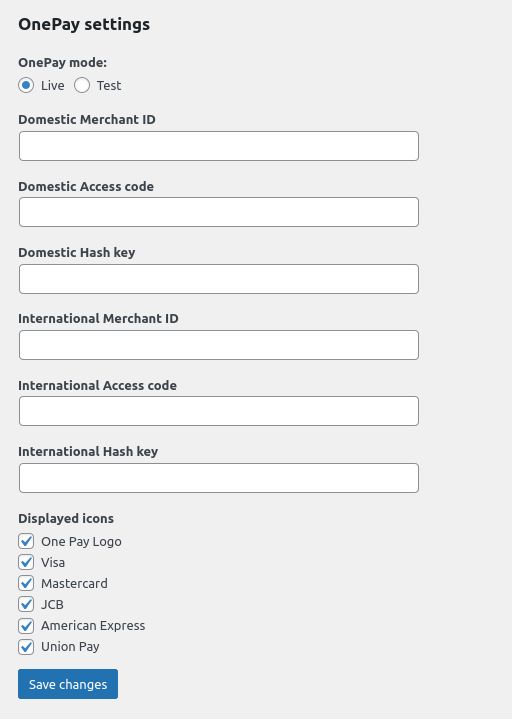
- You will need to set these for each Domestic and International payments.
PayBox for HBook
PayBox add-on include translation files for French language. If your website/user is in French, you will see the admin and the front-end already translated to French.
- Once you have activated PayBox for HBook plugin, you need to validate the licence in HBook > Licence.
- In HBook > Payments > Active payment gateways, you will activate PayBox.
- In HBook > Payments > PayBox settings, set PayBox payment gateway. You will need to add the following information that is communicated by your bank:


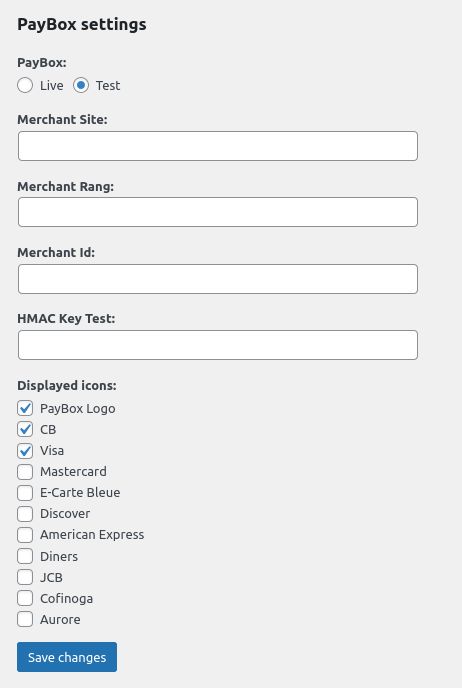
Where to find the HMAC?You will need to generate the HMAC Key from Vision dashboard. Please note that the HMAC key is different for Test (Pré-production) and Live(Production).
Activate the Automatic return to the merchant siteYou will need to contact PayBox to activate the automatic return to the merchant site (“retour immédiat vers la boutique”).
PayFast for HBook
- Once you have activated PayFast for HBook plugin, you need to validate the licence in HBook > Licence.
- In HBook > Payments > Active payment gateways, you will activate PayFast.
- In HBook > Payments > PayFast settings, you will need to add the following information that is communicated by PayFast: Merchant ID, Merchant Key and Salt Passphrase.
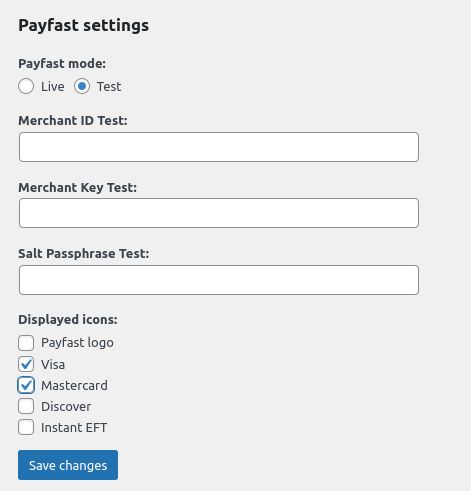
Where to find my Merchant ID and Merchant key?You can find the steps to create your Merchant ID and Merchant Key in in this help article from PayFast.
How do I create my Salt Passphrase to use?You can find the steps to create your Salt Passphrase in in this help article from PayFast.
PayLine for HBook
PayLine add-on include translation files for French language. If your website/user is in French, you will see the admin and the front-end already translated to French.
- Once you have activated PayLine for HBook plugin, you need to validate the licence in HBook > Licence.
- In HBook > Payments > Active payment gateways, you will activate PayLine.
- In HBook > Payments > PayLine settings, set PayLine payment gateway. You will need to add the following information that is communicated by PayLine:

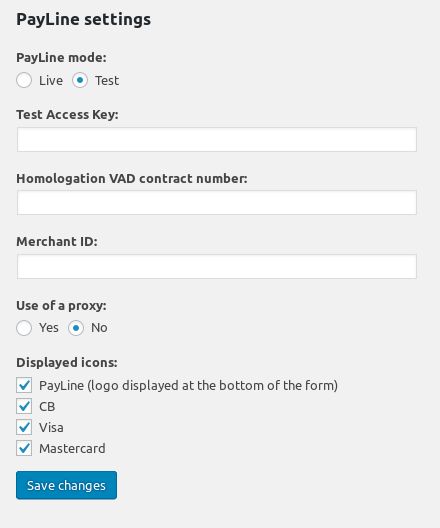
Which Test cards to use?You can find the test card details in this help article fromPayLine.
PayPlug for HBook
PayPlug add-on include translation files for French language. If your website/user is in French, you will see the admin and the front-end already translated to French.
- Once you have activated PayPlug for HBook plugin, you need to validate the licence in HBook > Licence.
- In HBook > Payments > Active payment gateways, you will activate PayPlug.
- In HBook > Payments > PayPlug settings, set PayPlug payment gateway. You will need to add the Secret Key that can be found in PayPlug dashboard:

- You can customize the look and feel of the PayPlug payment page directly in PayPlug dashboard.

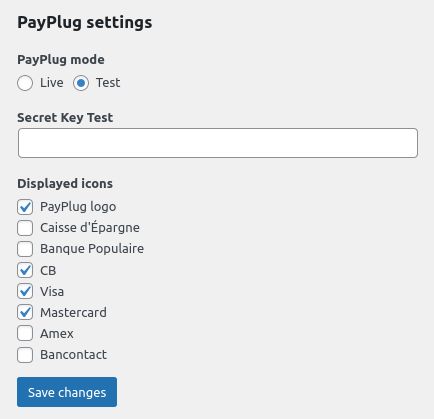
Where to find the Secret Key?You will find it in the menu Settings > API keys of your PayPlug dashboard. Make sure you enter the “TEST key” in “Test” mode and the “LIVE” key in “Live” mode. 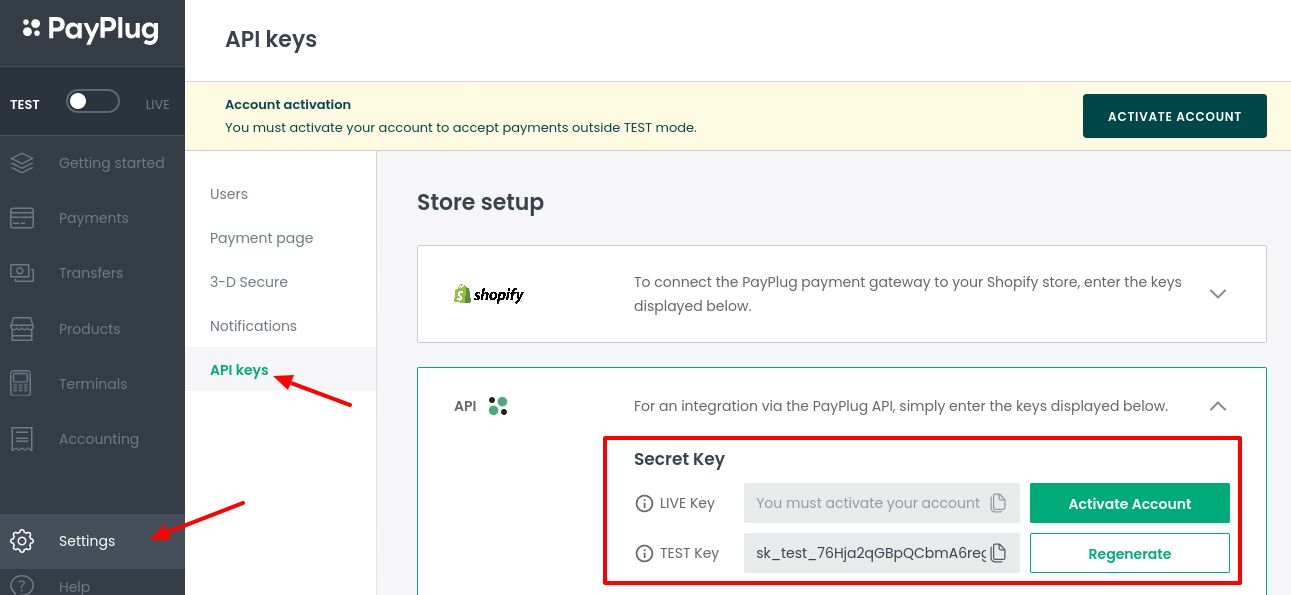
Which Test cards to use?You can find the test card details in this help article from PayPlug.
Payrexx for HBook
Payrexx add-on include translation files for French language. If your website/user is in French, you will see the admin and the front-end already translated to French.
- Once you have activated PayRexx for HBook plugin, you need to validate the licence in HBook > Licence.
- In HBook > Payments > Active payment gateways, you will activate Payrexx.
- In HBook > Payments > Payrexx settings, set Payrexx payment gateway. You will need to add the following information that is communicated by Payrexx:

- You can customize the look and feel of the Payrexx payment page directly in Payrexx dashboard.

How to switch from Test to Live mode?
Payrexx works with one account only, not a demo/test account and a live account. To set that an API integration is in “test” mode, you actually need to set each PSP in test mode individually.You will do so in your Payrexx Account under Payment Provider – Configure. We recommend generating a second API integration, alongside the default one. One would be used for “Test” environment and the other for the “Live”. In HBook Payments – Payrexx settings, you will then be able to indicate the instance name and API key for both “Test” and “Live”.
Where to find the Instance name and API key?
- The Instance name is created when you open your Payrexx account. You can as well find it with the Payrexx payment page URL that they communicate in the signup email. For example, with “hbook” as instance name, and the url is https://hbook.payrexx.com.
- The API Key can be found in Integrations > API & Plugins in your Payrexx dashboard.

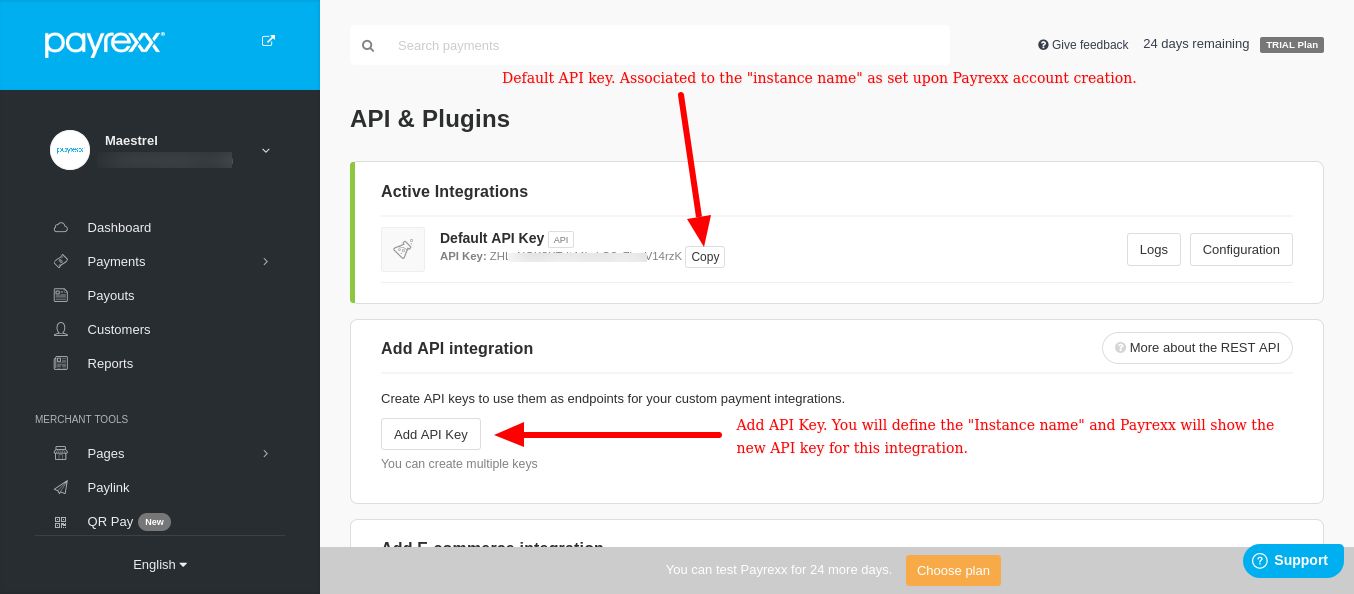
Which Test cards to use?You can find the test card details in this help article from Payrexx.
PaySera for HBook
- Once you have activated PaySera for HBook plugin, you need to validate the licence in HBook > Licence.
- In HBook > Payments > Active payment gateways, you will activate PaySera.
- In HBook > Payments > PaySera settings, you will need to add the following information that is communicated by PaySera: Project ID and Sign password.

- In your Paysera account, go to
- Projects and Activities > My projects
- , click on
Project settings > Payment collection service settings
- and check the following boxes:
- Allow test payments
- Accept inflows from any informational system (query website address will not be checked)
Where to find my Project ID and Sign password?You can find the steps to create your Project ID and Sign password in this help article from PaySera.
Which payment methods available on Paysera are supported by HBook?
- Credit card
- PaySera Wallet
PayU for HBook (Poland, Hungary, Czech Republic)
- Once you have activated PayU for HBook plugin, you need to validate the licence in HBook > Licence.
- In HBook > Payments > Active payment gateways, you will activate PayU.
- In HBook > Payments > PayU settings, you will need to add the following information that is communicated by PayU: POS ID, MD5 Key, Client ID and Client Secret.


How to create a Sandbox PayU.com account?You can create a Sandbox Account from here.
Which Test cards to use?You can find the test card details in this section of PayU documentation.
Where to find my POS ID, MD5 Key, Client ID and Client Secret?You can find these credentials in the POS tab, once you edit your Shop in Online payments > My shops. 
PayU for HBook (Romania, Rusia)
- Once you have activated PayU for HBook plugin, you need to validate the licence in HBook > Licence.
- In HBook > Payments > Active payment gateways, you will activate PayU.
- In HBook > Payments > PayU settings, you will need to add the following information that is communicated by PayU: POS ID, MD5 Key, Client ID and Client Secret.

- In Pay U dashboard, in the IPN settings tab in Account management > Account settings, you need to setup PayU IPN. It will always be following the format: https://mywebsite.com/confirmation-payuroru. You will modify “mywebsite” with your own domain name.
- Once you have activated PayU for HBook plugin, you need to validate the licence in HBook > Licence.
.
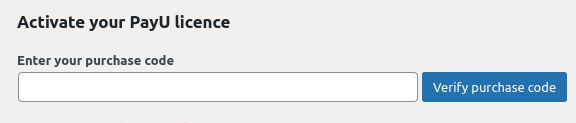
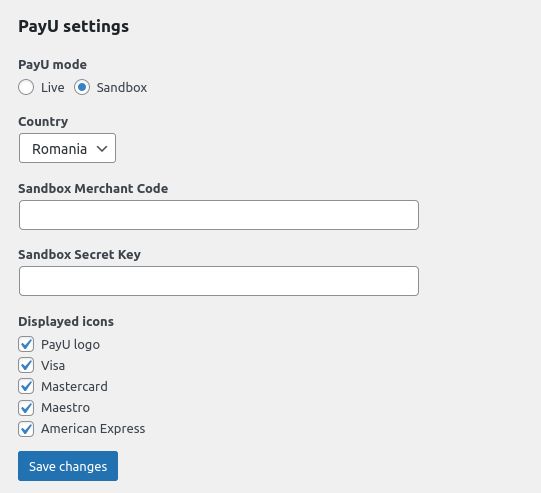
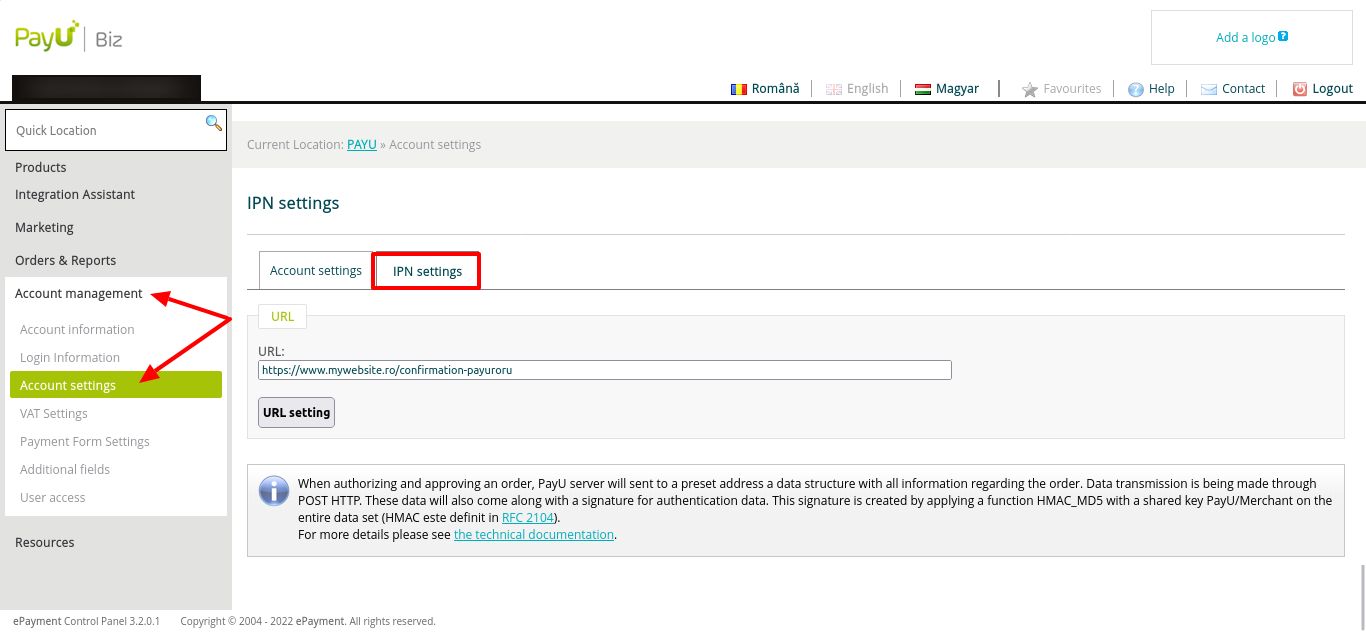
Which Test cards to use?You can find the test card details in this section of PayU documentation.
Where to find my Merchant Code and Secret Key?You can find these credentials in the API Keys tab in Account management > Account settings. 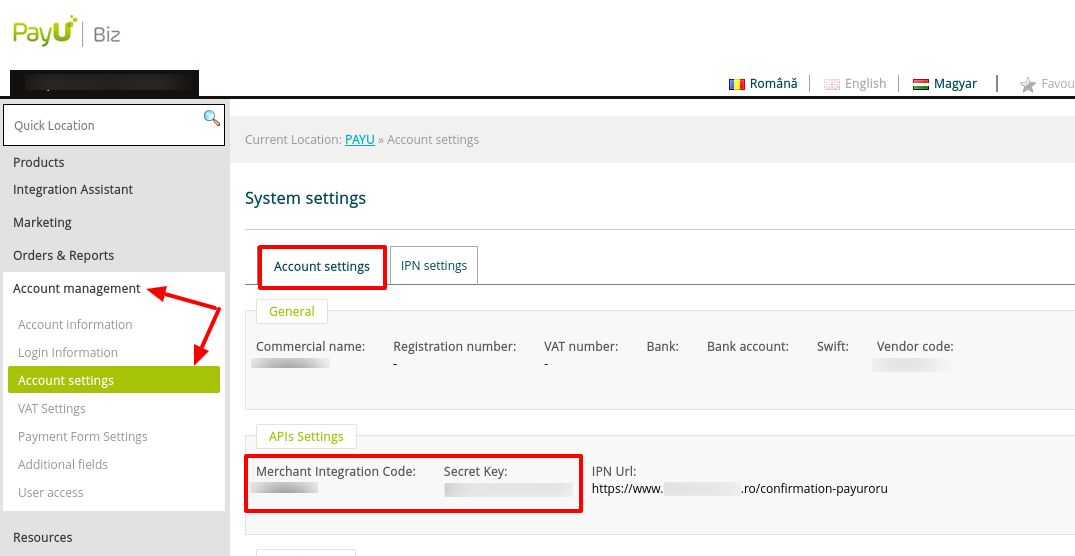
PayULatam for HBook
PayULatam add-on include translation files for Spanish language. If your website/user is in Spanish, you will see the admin and the front-end already translated to Spanish.
- Once you have activated PayULatam for HBook plugin, you need to validate the licence in HBook > Licence.

- In HBook > Payments > Active payment gateways, you will activate PayULatam.
- In HBook > Payments > PayULatam settings, you can set PayULatam payment gateway. You will select your country.
- If you are in Test environment, there is no other settings needed.

- If you are in Live environment, you will need to add the following information:


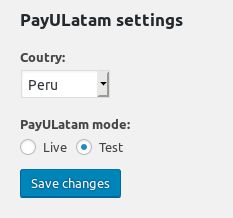
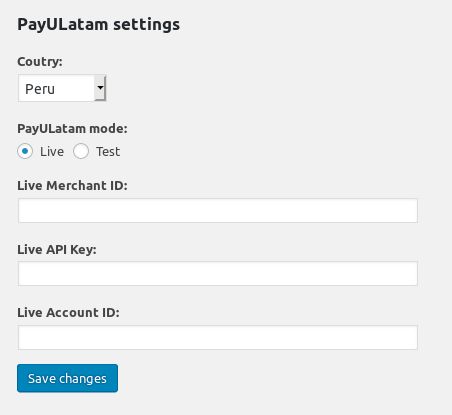
Where to find the Merchant ID, API Key and Account ID?Please refer to this help article from PayULatam.
PayUMoney for HBook
- Once you have activated PayUMoney for HBook plugin, you need to validate the licence in HBook > Licence.
- In HBook > Payments > Active payment gateways, you will activate PayUMoney.
- In HBook > Payments > PayUMoney settings, you can set PayUMoney payment gateway.


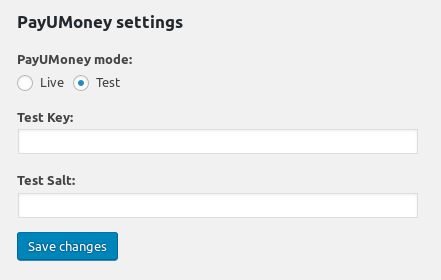
Where to find the Key and Salt?You will find the Key and Salt values in your PayUMoney dashboard. Please make sure you enter Test Key and Test Salt when you are in Test environment but Live Key and Live Salt when you switch to Live environment.
PayZen for HBook
- Once you have activated PayZen for HBook plugin, you need to validate the licence in HBook > Licence.
- In HBook > Payments > Active payment gateways, you will activate PayZen.
- In HBook > Payments > Payzen settings, set PayZen payment gateway. You will need to add the following information:

- You will find the Shop ID and Keys in Paramétrage > Boutiques > Clés. If you wish to enable “Cheques-Vacances Connect” payment method on HBook, make sure that you are providing the “Shop ID” and “Key” of your CVCO account on PayZen Back Office.

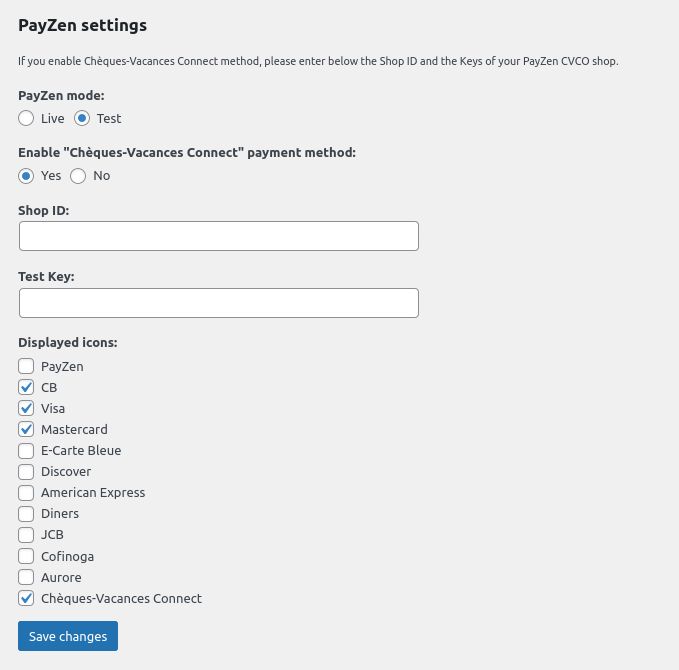
RedSys for HBook
RedSys add-on include translation files for Spanish language. If your website/user is in Spanish, you will see the admin and the front-end already translated to Spanish.
- Once you have activated RedSys for HBook plugin, you need to validate the licence in HBook > Licence.
- In HBook > Payments > Active payment gateways, you will activate RedSys.
- In HBook > Payments > RedSys settings, set RedSys payment gateway. You will need to add the following information that is communicated by your bank:


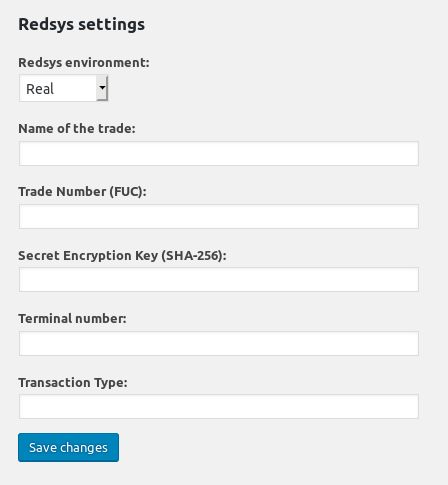
Scellius for HBook – La Banque Postale
Scellius add-on include translation files for French language. If your website/user is in French, you will see the admin and the front-end already translated to French.
- Once you have activated Scellius for HBook plugin, you need to validate the licence in HBook > Licence.
- In HBook > Payments > Active payment gateways, you will activate Scellius.
- In HBook > Payments > Scellius settings, set Scellius payment gateway. You will need to add the following information:

- You will find the Shop ID and Keys in Paramétrage > Boutiques > Clés. If you wish to enable “Cheques-Vacances Connect” payment method on HBook, make sure that you are providing the “Shop ID” and “Key” of your CVCO account on Scellius Back Office.

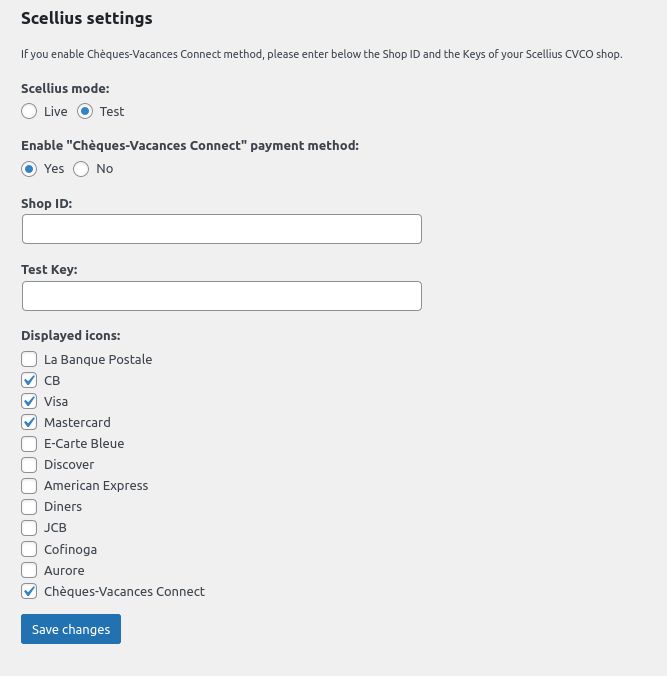
SogeCommerce for HBook – Société Générale
SogeCommerce add-on include translation files for French language. If your website/user is in French, you will see the admin and the front-end already translated to French.
- Once you have activated SogeCommerce for HBook plugin, you need to validate the licence in HBook > Licence.
- In HBook > Payments > Active payment gateways, you will activate SogeCommerce.
- In HBook > Payments > SogeCommerce settings, set SogeCommerce payment gateway. You will need to add the following information:

- You will find the Shop ID and Keys in Paramétrage > Boutiques > Clés. If you wish to enable “Cheques-Vacances Connect” payment method on HBook, make sure that you are providing the “Shop ID” and “Key” of your CVCO account on SogeCommerce Back Office.
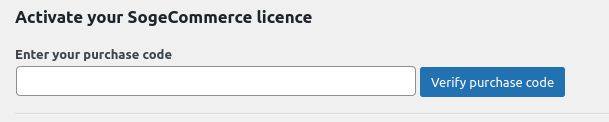
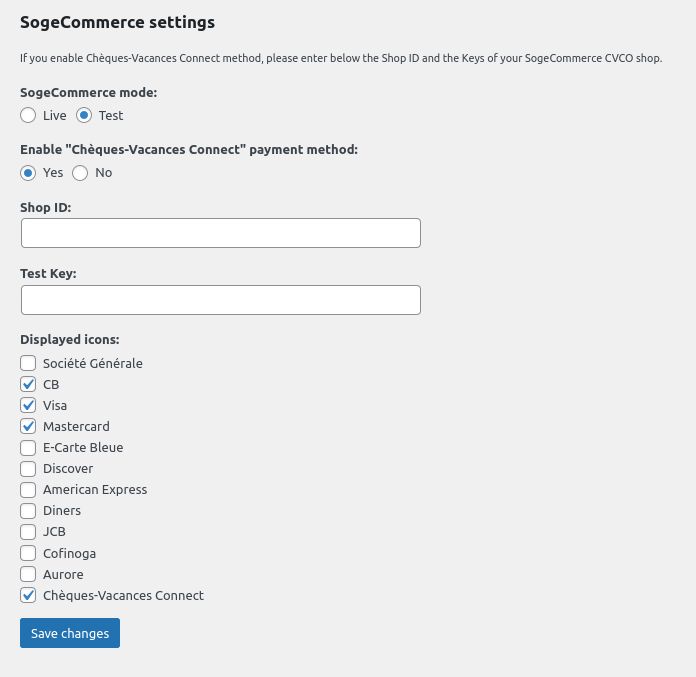
Square for HBook
- Once you have activated Square for HBook plugin, you need to validate the licence in HBook > Licence.

- In HBook > Payments > Active payment gateways, you will activate Square.
- In HBook > Payments > Square settings, set Square payment gateway. You will need to add the following information:

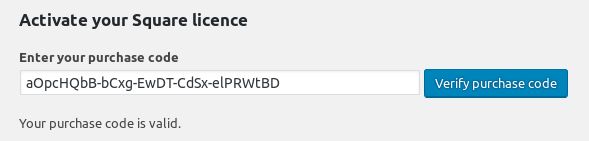
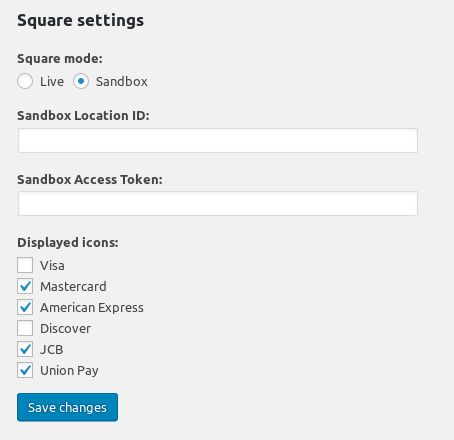
Where to find the Location ID and Access token?
- You will need to create an application in Square Developer dashboard. You can name it for example “HBook Booking system”.
- Sandbox and Live Location ID

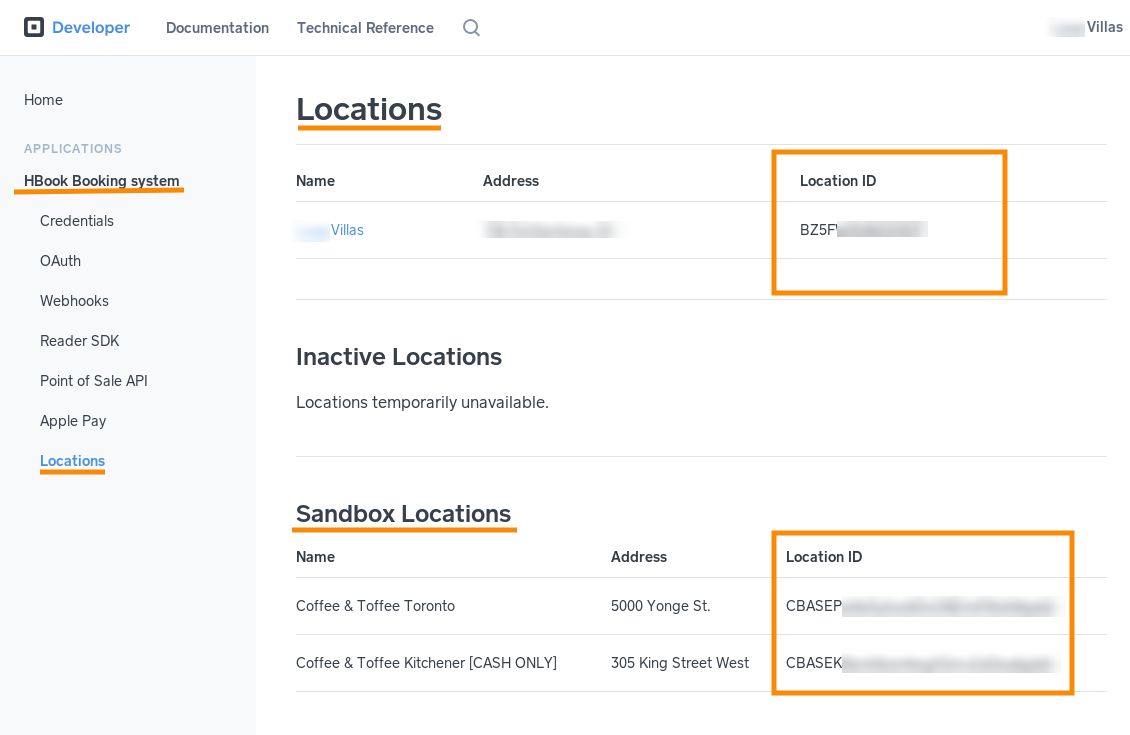
- Sandbox Access token

- Sandbox Access token
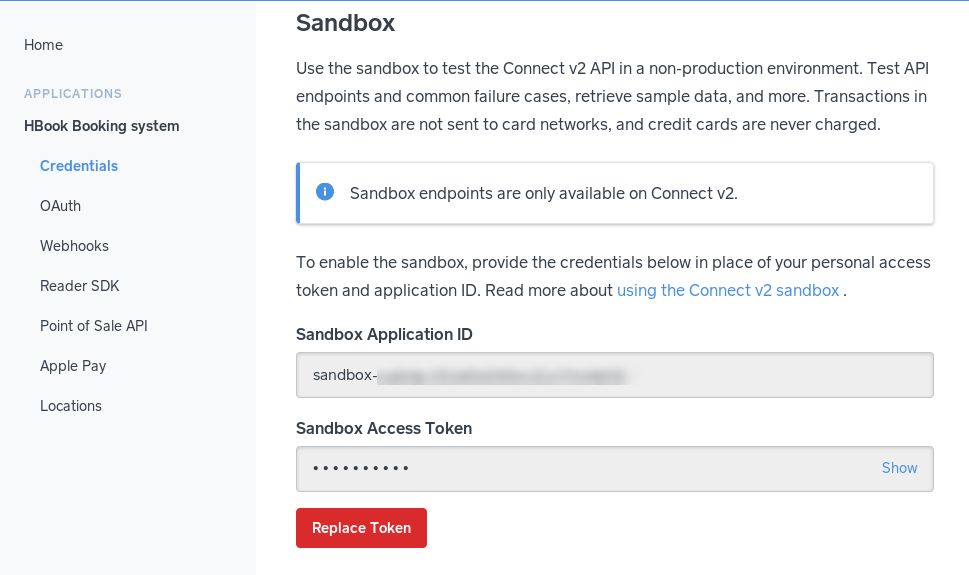
- Live Access token

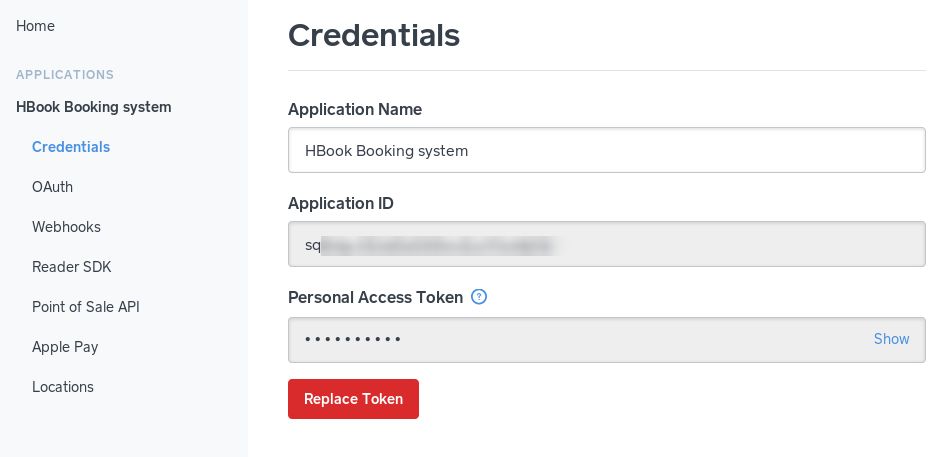
Which cards to use to test Sandbox environment?You can find the test card details here.
SystemPay for HBook – Caisse d’Épargne and Banque Populaire
SystemPay add-on include translation files for French language. If your website/user is in French, you will see the admin and the front-end already translated to French.
- Once you have activated SystemPay for HBook plugin, you need to validate the licence in HBook > Licence.
- In HBook > Payments > Active payment gateways, you will activate SystemPay.
- In HBook > Payments > SystemPay settings, set SystemPay payment gateway. You will need to add the following information:

- You will find the Shop ID and Keys in Paramétrage > Boutiques > Clés. If you wish to enable “Cheques-Vacances Connect” payment method on HBook, make sure that you are providing the “Shop ID” and “Key” of your CVCO account on SystemPay Back Office.

Viva Wallet for HBook
- Once you have activated Viva Wallet for HBook plugin, you need to validate the licence in HBook > Licence.
- In HBook > Payments > Active payment gateways, you will activate Viva Wallet.
- In HBook > Payments > Viva Wallet settings, set Viva Wallet payment gateway. You will need to add the following information:

- In Viva Wallet dashboard, you will need to create a webhook. Navigate to Settings > API Access and go to the tab Webhooks. You will need to indicate :
- the URL of the webhook. You will indicate it as “www.domain.com/confirmation-vivawallet”, changing “www.domain.com” to your actual WordPress site url.
- set it as “Active”
- select the event type “Transaction Payment Created”


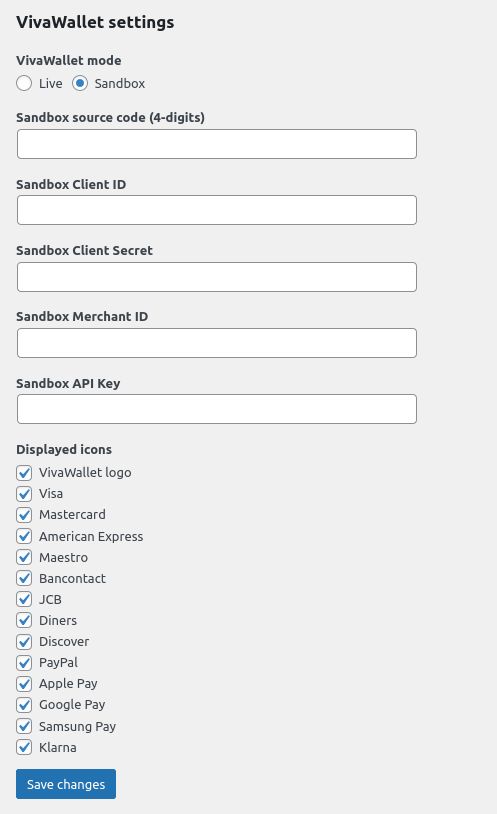
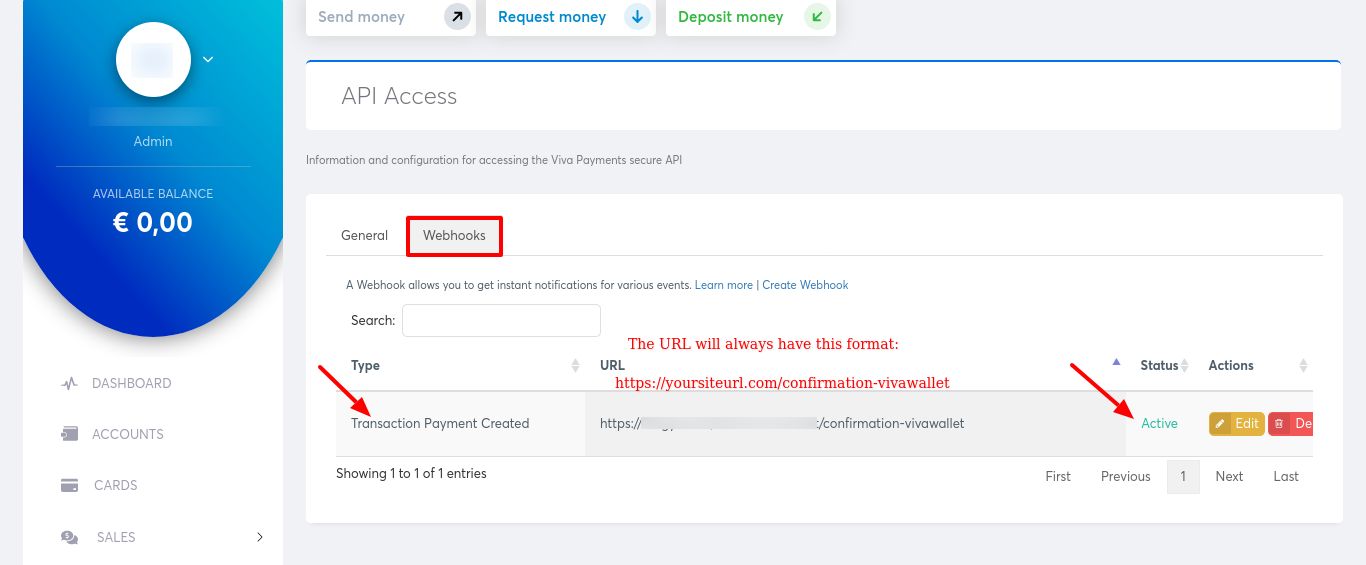
Do I need to whitelist VivaWallet IPs? Where can I get information ?If you have troubles to verify your Webhook url, you should whitelist VivaWallet IPs to make sure you receive the webhook call. You can find the list of VivaWallet IPs here.
How to create a Sandbox Viva Wallet account ?
You can create a Sandbox Account from here.
How to create a Live Viva Wallet account ?
You can create your Live Account from here.
Where to find the Source Code, Merchant ID, API Key, Client ID and Client Secret, ?
- Source Code: You will need to create a website/app in Viva Wallet dashboard. Navigate to Sales > Online Payments > Websites/Apps. Click on “New app/website” and check below for the settings. You can name it for example “VivaWallet HBook”.
- When you create or edit a website/app, you will see the following settings. Please make sure that you enter the “Success URL” and “Failure URL” as described.

- Merchant ID, API Key, Client ID and Client Secret : Navigate to Settings > API Access.

- Source Code: You will need to create a website/app in Viva Wallet dashboard. Navigate to Sales > Online Payments > Websites/Apps. Click on “New app/website” and check below for the settings. You can name it for example “VivaWallet HBook”.
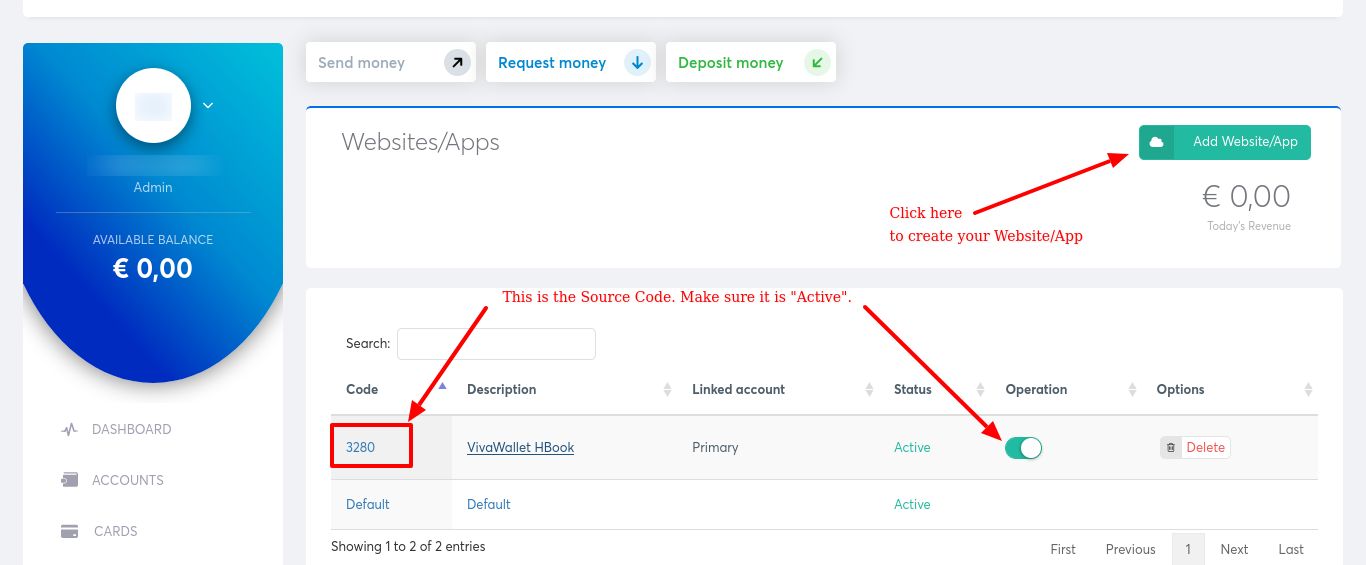
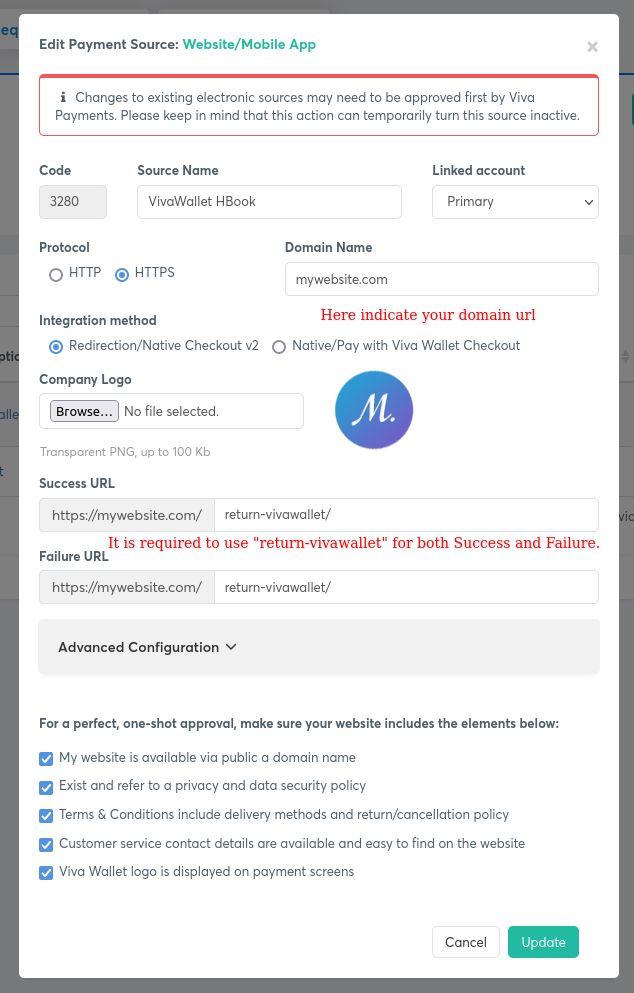
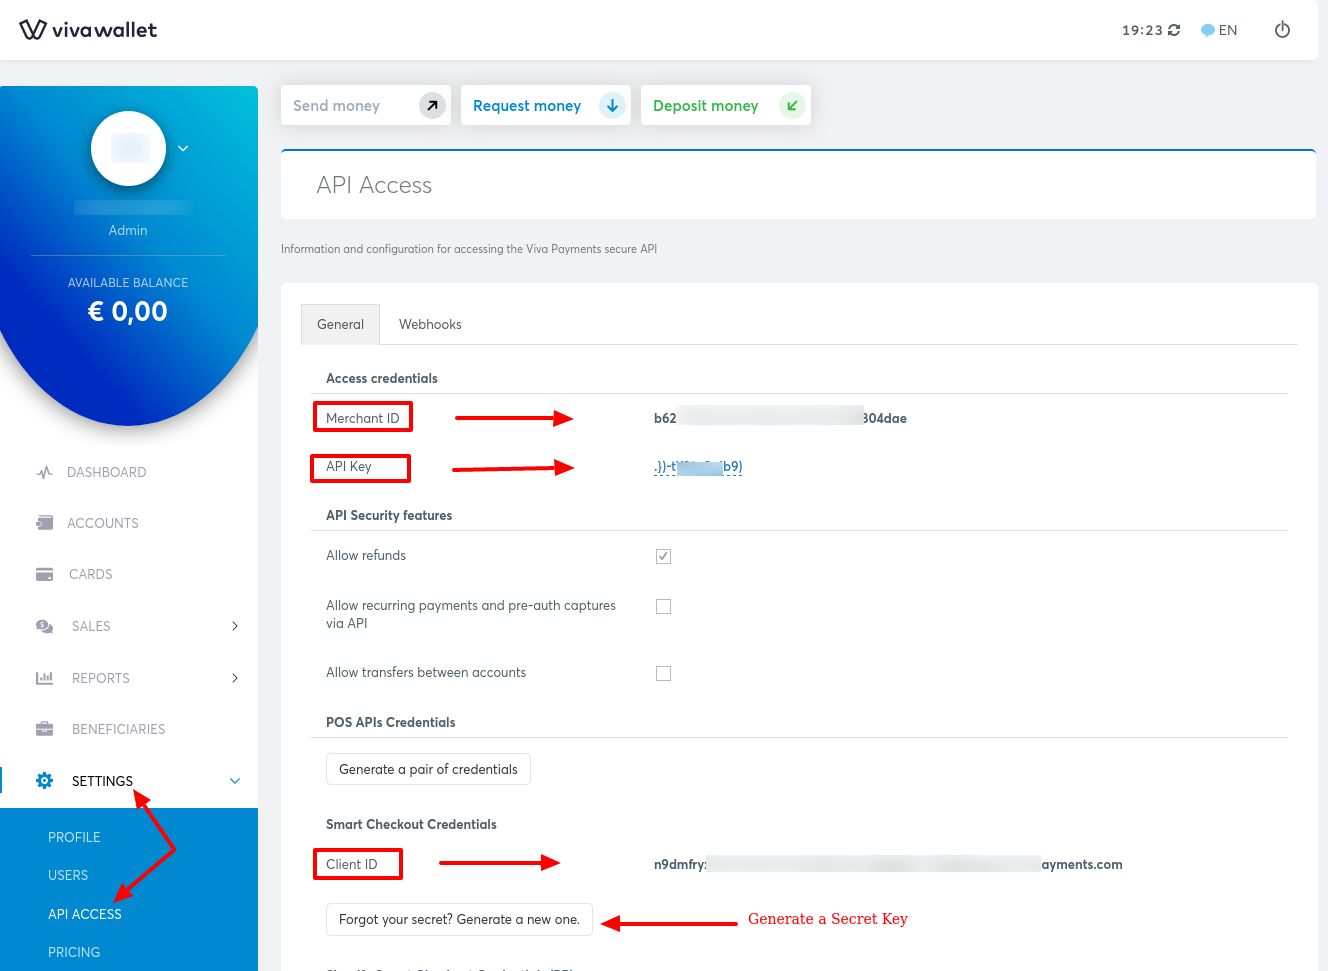
Which cards to use to test Sandbox environment?You can find the test card details here.
Plugin Customization
In order to facilitate customization different filters and actions have been created. We recommend that you insert your customization code in the functions.php of your child theme to make sure it is not erase on plugin or theme update.
Filters for the accommodation type post
- hb_accommodation_cpt
- hb_accommodation_public
- hb_accommodation_has_archive
- hb_accommodation_supports
- hb_accommodation_taxonomies
Filters for the search form
- hb_search_form_markup
- hb_search_form_title
Filters for the accommodation selection
- hb_available_accommodation_markup
- hb_first_available_accom_num
Filters for the extra-services selection
- hb_extra_name
- hb_extras_form_markup
- hb_resa_extra_formatting
Filters for the details form
- hb_details_form_markup_before_field
- hb_details_form_markup_after_field
- hb_details_form_markup
Filters for the payment section
- hb_payment_types
- hb_stripe_credit_cards_icons
Filters for the summary and book now area
- hb_resa_summary_markup
- hb_resa_summary_no_external_payment_markup
- hb_resa_summary_external_payment_markup
- hb_policies_area_markup
- hb_confirm_area_markup
Filters for the invoice table
- hb_invoice_table_style
- hb_invoice_table_markup
Filters for the actions associated to the reservation and customer
- hb_create_reservation
- hb_create_customer
- hb_reservations_updated
- hb_blocked_accom_updated
Filters for the shorcodes [hb_accommodation_list], [hb_rates], [hb_availability]
- hb_accommodation_list_markup
- hb_rates_markup
- hb_availability_on_click_refresh
Filters for HBook additional roles (reservation reader, reservation manager, pricing manager, HBook manager)
- hb_resa_reader_capabilities
- hb_resa_manager_capabilities
- hb_pricing_manager_capabilities
- hb_hbook_manager_capabilities
Filters to add actions that trigger automatic emails
- hb_email_actions : to add actions upon which an email is sent automatically
Various
- hb_language_list
- hb_uncompleted_resa_deletion_delay
- hb_retina_scale_factor
- hb_image_sizes
- hb_strings : to add external strings for translation in HBook > Text
- hb_ical_additional_info
Js functions
HBook plugin also try to call these two global JavaScript functions:
- hbook_show_accom_list
- hbook_reservation_done
hb_accommodation_taxonomies
This filter is applied to the taxonomies parameter which is passed to the register_post_type function used for creating the Accommodation custom post type.
Parameter:
- $taxonomies: (array) list of taxonomies.
Example:
Adding categories to the Accommodation posts.
function categories_for_accommodation( $taxonomies ) {
	$taxonomies[] = 'category';
	return $taxonomies;
}
add_filter( 'hb_accommodation_taxonomies', 'categories_for_accommodation' );
Please note that by default posts using a custom post types are not included in archive pages. To add them (if you wish to have a page for a category for example), you will need to add the following code:
function hbook_add_custom_types( $query ) {
	if( (is_category() || is_tag()) && $query->is_archive() && empty( $query->query_vars['suppress_filters'] ) ) {
	$query->set( 'post_type', array(
	'post', 'hb_accommodation'
		));
	}
	return $query;
}
add_filter( 'pre_get_posts', 'hbook_add_custom_types' );
hb_accommodation_has_archive
This filter is applied to the has_archive parameter which is passed to the register_post_type function used for creating the Accommodation custom post type.
Parameter: none
Example:
To disable the archive for the accommodation post types:
function hb_disable_archive() {
	return false;
}
add_filter( 'hb_accommodation_has_archive', 'hb_disable_archive' );
hb_accommodation_supports
This filter is applied to the supports parameter which is passed to the register_post_type function used for creating the Accommodation custom post type.
Parameter:
- $supports: (array) list of supported items.
Example:
Adding support for excerpts to the Accommodation posts.
function support_for_excerpts( $supports ) {
	$supports[] = 'excerpt';
	return $supports;
}
add_filter( 'hb_accommodation_supports', 'support_for_excerpts' );
hb_search_form_markup
This filter is applied to the HTML mark up of the form which is used for searching available accommodation.
Parameters:
- $output: (string) the HTML code of the form.
- $form_id: (string) the id of the form as passed to the [hb_booking_form] shortcode via the form_id attribute.
hb_search_form_title
This filter is applied to the title of the search form.
Parameter:
- $title: (string) the HTML code of the title of the search form.
Example:
function change_title_tag( $title ) {
	return str_replace( 'h3', 'h2', $title );
}
add_filter( 'hb_search_form_title', 'change_title_tag' );
hb_extra_name
This filter is applied to the name of each extra service (extra services are displayed as a list after the accommodation selection).
Parameter:
- $display_name, $option, $price
- $display_name: (string) name of the extra as it will be displayed
- $extra: (array) information about the extra
- $price: (array) price of the extra
hb_extras_form_markup
This filter is applied to the HTML mark up of the form which displays extra services.
Parameter:
- $output: (string) the HTML code of the form.
hb_resa_extra_formatting
This filter is applied to the name of each chosen extra service (in emails sent by HBook).
Parameter:
- $formatted_extra_name: (string) the formatted name of the extra service
- $extra_name: (string) the name of the extra service
- $extra_value: (string) value of the chosen option
- $option_choice_name: (string) name of the chosen option
hb_details_form_markup
This filter is applied to the HTML mark up of the form which is used for getting the customer details.
Parameter:
- $output: (string) the HTML code of the form.
hb_payment_types
This filter is applied to the set an order for the payment types listed when a choice is offered to the customer.
Parameter:
- $types: (array) list of accepted payment types. Default order is : array( ‘offline’, ‘store_credit_card’, ‘deposit’, ‘full’ ).
Example:
Changing the default order to have the offline option as last one.
function custom_payment_type_order( $types ) {
	$types = array( 'deposit', 'full', 'store_credit_card', 'offline' );
	return $types;
}
add_filter( 'hb_payment_types', 'custom_payment_type_order' );
hb_stripe_credit_cards_icons
This filter is applied to the set which credit card icons you wish to display in the Stripe payment form.
Parameter:
- $icons: (array) list of credit card icons. Default value is : array( ‘mastercard’, ‘visa’, ‘americanexpress’ ). Possible values are : ‘amazon’, ‘americanexpress’, ‘delta’, ”diners’, discover’, ‘ebay’, ”jcb’, maestro’, ‘mastercard’, ‘solo’, ‘visa’, ‘visaelectron’, ‘switch’
Example:
Display only visa and mastercard icons.
function custom_stripe_payment_icons( $types ) {
	$icons = array( 'visa', 'mastercard' );
	return $icons;
}
add_filter( 'hb_stripe_credit_cards_icons', 'custom_stripe_payment_icons' );
hb_policies_area_markup
This filter is applied to the part of the booking form where customers aknowledge Privacy policy, Terms and conditions.
Parameter:
- $output: (string) the HTML code of the form.
Example:
Add a checkbox to signup to a MailChimp newsletter. This requires MC4WP plugin and custom integration. Please check this article of our knowledgebase.
function add_mailchimp_to_details_form( $output ) {
    $output .= '<h3 class="hb-title hb-title-terms">Our newsletter</h3>';
    $output .= '<p>';
    $output .= '<label>';
    $output .= '<input type="checkbox" name="mc4wp-subscribe" value="1" />';
    $output .= 'Yes! Subscribe me to the your monthly newsletter.</label>';
    $output .= '</p>';
    return $output;
}

add_filter( 'hb_policies_area_markup', 'add_mailchimp_to_details_form' );
hb_invoice_table_style
This filter is applied to the invoice table styles. You can find these styles in wp-content/plugins/hbook/utils/utils.php. Look for the function “get_invoice_table”.
Parameters
- $style: (string) all the CSS applied.
- $resa: (array) the reservation information
hb_create_reservation
This action fires when a new reservation is added to the reservation database table.
Parameter:
- $resa_info: (array) all of the new reservation information.
hb_create_customer
This action fires when a new customer is added to the customer database table.
Parameter:
- $customer_info: (array) all of the customer information.
hb_reservations_updated
This action fires whenever the reservations database table is updated.
Parameter: None.
hb_blocked_accom_updated
This action fires whenever the blocked accommodation database table is updated.
Parameter: None.
hb_accommodation_list_markup
This hook can be used to modify the display of the accommodation list.
Parameter:
- $output: (string) that contains the output of the accommodation list markup.
Example:
For the accommodation list thumbnail to open the accommodation type post in the same tab.
In the functions.php of your child theme add:
			function change_target_self( $output ) {
				return str_replace( '_blank', '_self', $output );
			}
			add_filter( 'hb_accommodation_list_markup', 'change_target_self' );
hb_resa_manager_capabilities
This filter is applied to the list of capabilities of the reservation manager.
Parameter:
- $capabilities: (array) that contains a list of the different capabilities.
Example:
If your theme redirect automatically the user with “read” capability to the front-end, you shoudl add capabilities that are for Contributor or Author, depending on your theme. To view a full list of WordPress roles and capabilities, please refer to https://codex.wordpress.org/Roles_and_Capabilities
	function hb_add_capabiliites_to_manager( $capabilities ) {
		$added_capabilities = array( 'edit_posts', 'delete_pots' );
		$capabilities = array_merge( $added_capabilities, $capabilities );
		return $capabilities;
	}
	add_filter( 'hb_resa_manager_capabilities', 'hb_add_capabiliites_to_manager' );
hb_email_actions
This filter is applied to the list of actions that are shown in the column “Send on” of the email templates in HBook > Emails.
Parameter:
- $actions: (array) that contains information about the different actions : a key (string) => value (string). Required keys are ‘action_value’ and ‘action_text’.
Example:
function add_action_to_email_actions( $actions ) {
	$actions[] = array(
		'action_value' => 'resa_marked_paid',
		'action_text' => esc_html__( 'Reservation marked as paid', 'hbook-admin' ),
	);
	return $actions;
}
add_filter( 'hb_email_actions', 'add_action_to_email_actions' );
Then in the function public function hb_update_resa_paid() that you will find towards in hbook/admin-pages/admin-ajax-actions.php, you will add:
$this->utils->send_email( 'resa_marked_paid', $_POST['resa_id'] );
The function would be then:
public function hb_update_resa_paid() {
	if ( $this->hb_verify_nonce() && $this->hb_user_can_manage_resa() ) {
		if ( $this->hbdb->update_resa_paid( $_POST['resa_id'], $_POST['resa_price'], $_POST['resa_paid'] ) !== false ) {
			echo( 'paid updated' );
			$this->utils->send_email( 'resa_marked_paid', $_POST['resa_id'] );
		} else {
			echo( 'Database error.' );
		}
	}
	die;
}
hb_language_list
This filter is applied to the list of languages managed by HBook in a multi-language website.
Parameter:
- $langs: (array) a key (string) => value (string) array that contains information about the different languages (key is the language locale, value is the language name).
Example:
If you are using a multi-language plugin that is not Polylang or WPML and for which the languages are not detected automatically by HBook:
function new_language_list( $langs ) {
	$added_languages = array(
			'fr_FR' => 'French',
			'it_IT' => 'Italian',
			'es_ES' => 'Spanish',
			'de_DE' => 'German'
	);
	$langs = array_merge( $added_languages, $langs );
	return $langs;
}
add_filter( 'hb_language_list', 'new_language_list' );
hb_uncompleted_resa_deletion_delay
Parameter:
- $delay: (integer + “HOUR” or “MINUTE”) the delay before HBook delete a reservation that was not completed and is shown as “Processing” status (the customer closed the tab, left the payment process, etc.). By default, HBook delete these uncompleted resrevation after 1 HOUR.
Example:
Deleting uncompleted reservations after 30 MINUTE.
function custom_deletion_delay( $delay ) {
	return 30 MINUTE;
}
add_filter( 'hb_uncompleted_resa_deletion_delay', 'custom_deletion_delay' );
hb_retina_scale_factor
Parameter:
- $retina_scale_factor: (integer) the scale factor applied to images displayed by HBook (by default the scale factor is 1).
Example:
Displaying images ready for 3x retina devices.
function custom_retina_scale_factor( $retina_scale_factor ) {
	return 3;
}
add_filter( 'hb_retina_scale_factor', 'custom_retina_scale_factor' );
hb_image_sizes
Parameter:
- $sizes: (multidimensional array) an array of sizes, each size containing “width” and “height” keys. This filter can be useful if you set that HBook uses “static” images resizing in HBook > Misc > Misc. When settings to “Static”, HBook don’t use AquaResizer.
hb_ical_additional_info
Parameter:
- $default_comment_data: (array) an array of values that will be looked for in the DESCRIPTION field of the ical content of an external calendar. When found, HBook will show the value of this field in the column “Comments” for the reservation.
JavaScript functions
hbook_show_accom_list
HBook plugin tries to call this function whenever the list of available accommodation is shown.
Example:
Launching a JavaScript function after the list of available accommodation has been shown.
In the functions.php of your child theme add:
add_action( 'wp_enqueue_scripts', 'enqueue_my_js_scripts' );

function enqueue_my_js_scripts() {
	wp_enqueue_script( 'my-script', get_stylesheet_directory_uri() . '/my-script.js', array(), null, true );
}
and in the child theme directory create a my-script.js file that contains:
function hbook_show_accom_list() {
	my_js_function();
}
hbook_reservation_done
HBook plugin tries to call this function whenever a reservation is successfully completed by a customer.
Example:
Launching a JavaScript function after a reservation has been made. This can be used if you have conversion or tracking code for example.
In the functions.php of your child theme add:
add_action( 'wp_enqueue_scripts', 'enqueue_my_js_scripts' );

function enqueue_my_js_scripts() {
	wp_enqueue_script( 'my-script', get_stylesheet_directory_uri() . '/my-script.js', array(), null, true );
}
and in the child theme directory create a my-script.js file that contains:
function hbook_reservation_done() {
	my_js_function();
}
FAQ
Find an immediate answer to many Frenquently Asked Question in our knowledgebase
A Simple Demo is setup here
Double Room with Rates and Seasons set
A Full Demo can be viewed here. (3 different Property Styles)